Row-level security (RLS) in Power BI
This article provides a detailed overview of implementing Row-Level Security (RLS) in Power BI. It covers setting up roles and rules in Power BI Desktop and the Power BI service with a real world Example


Understanding Row-Level Security in Power BI:
Introduction
In today’s data-driven world, ensuring that sensitive information is accessible only to authorized users is very important. Power BI, offers a robust feature known as Row-Level Security (RLS) to help organizations manage and secure their data effectively. This article delves into the concept of RLS in Power BI with a real world example, explaining its importance, how it works, and best practices for implementation.
What is Row-Level Security?
Row-Level Security in Power BI is a system that allows you to control access to rows in a database table based on the characteristics of the user. Essentially, it means that different users will see different data when they look at the same report or dataset, depending on their permissions.
Overview of Row-Level Security in Power BI:
-
Purpose of RLS in Power BI: RLS in Power BI is designed to restrict data access for specific users. By applying filters at the row level within roles, it ensures that users only see the data they are permitted to access.
-
Applicability: RLS is effective for users with Viewer permissions in the Power BI service, particularly in a workspace environment. However, it doesn’t apply to users with higher permissions like Admins, Members, or Contributors.
How Does Row-Level Security Work in Power BI?
RLS in Power BI works by applying filters to data at the row level. These filters are defined based on user roles and are applied when data is queried from the database.
Setting Up RLS in Power BI Using - Real-World Scenario:
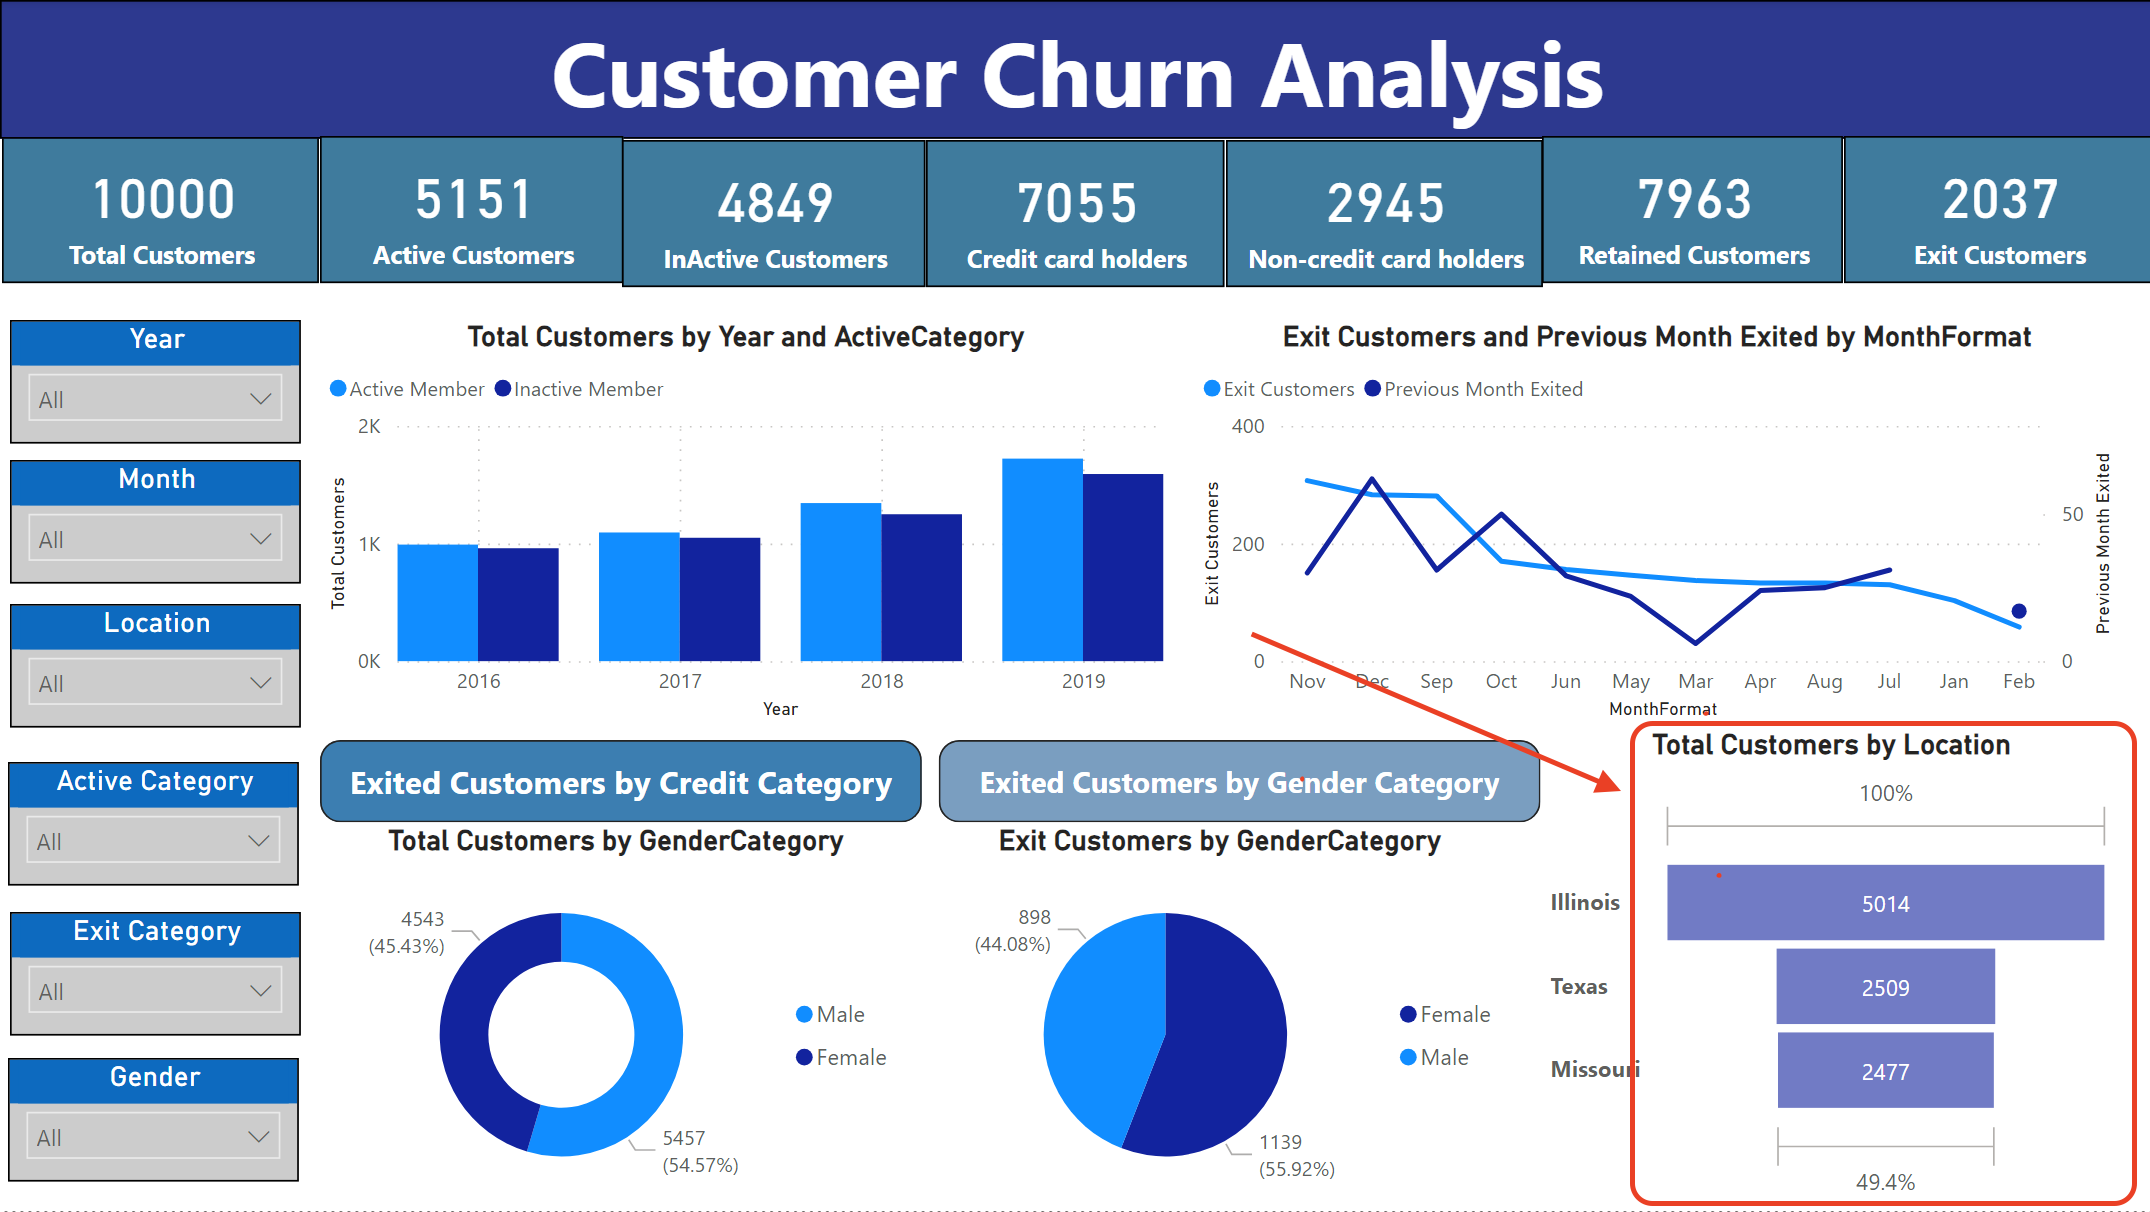
In this scenario, we have a Power BI report designed for Customer Churn Analysis. This report includes a funnel visualization showing the total number of customers by location, specifically Texas, Illinois, and Missouri. To implement Row-Level Security (RLS) region-wise, we will create roles that filter the data based on these regions.
Steps to Implement RLS for Region-Wise Data Filtering
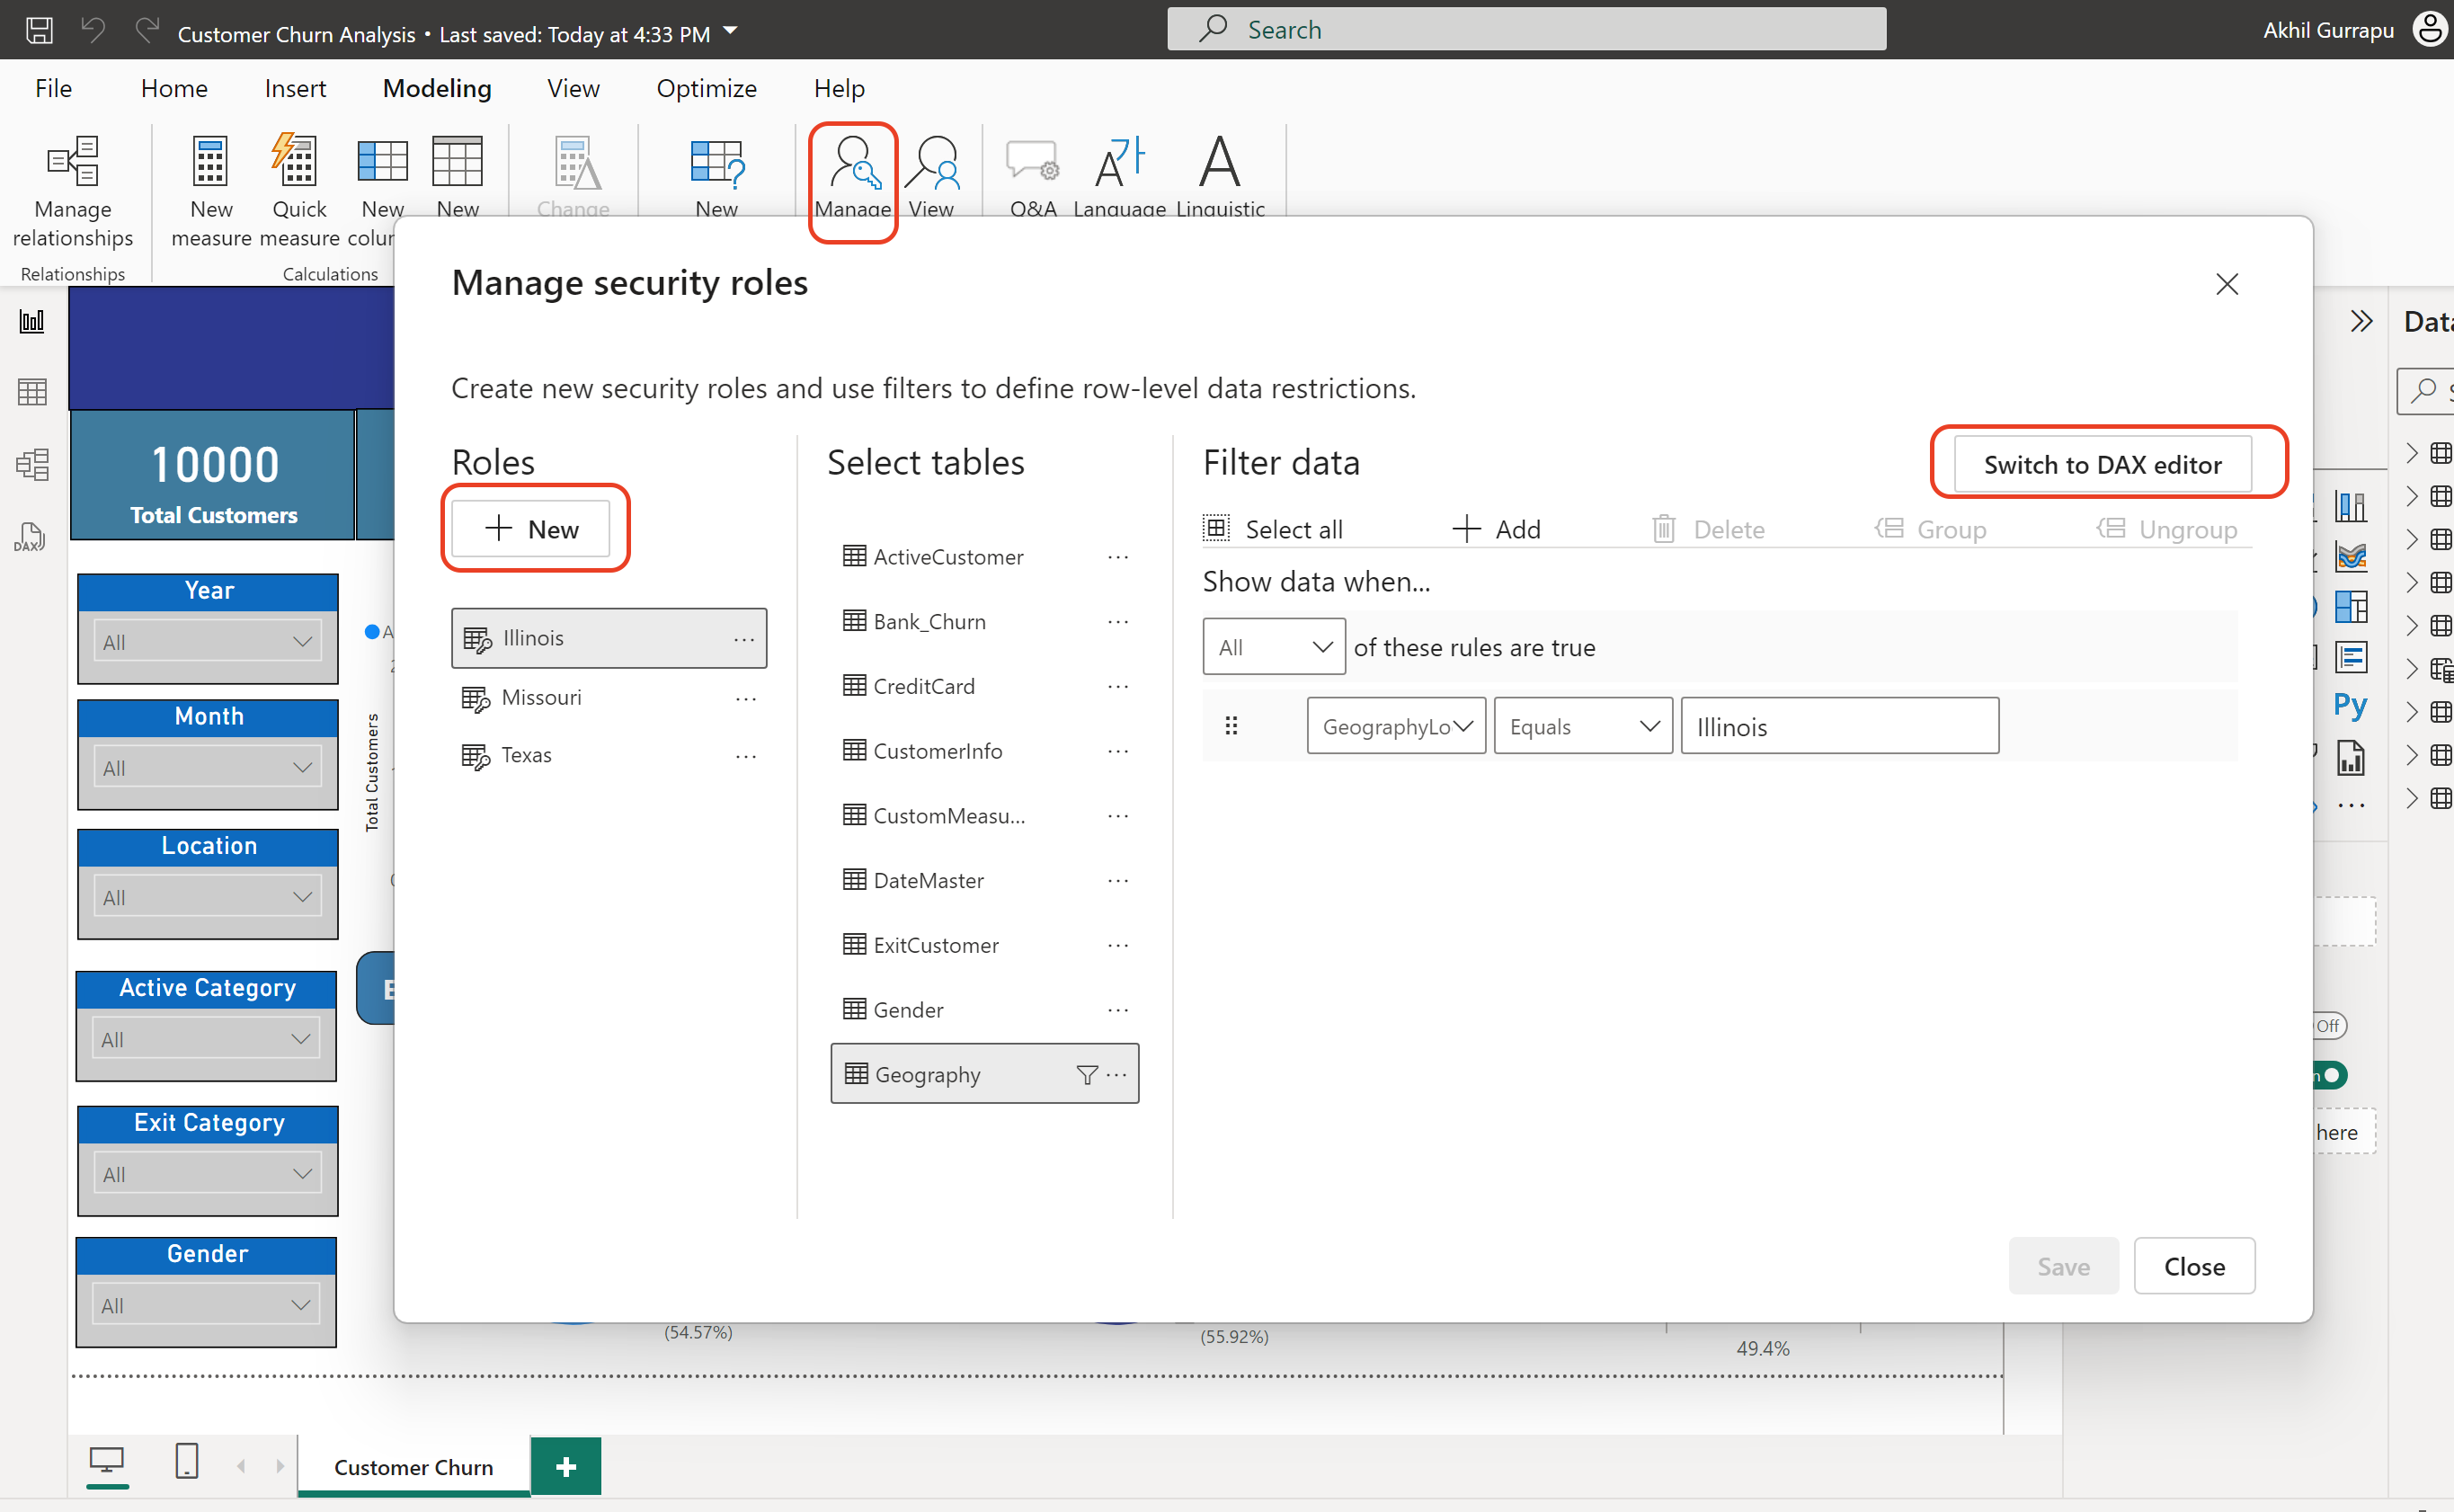
Roles and rules can be defined within Power BI Desktop
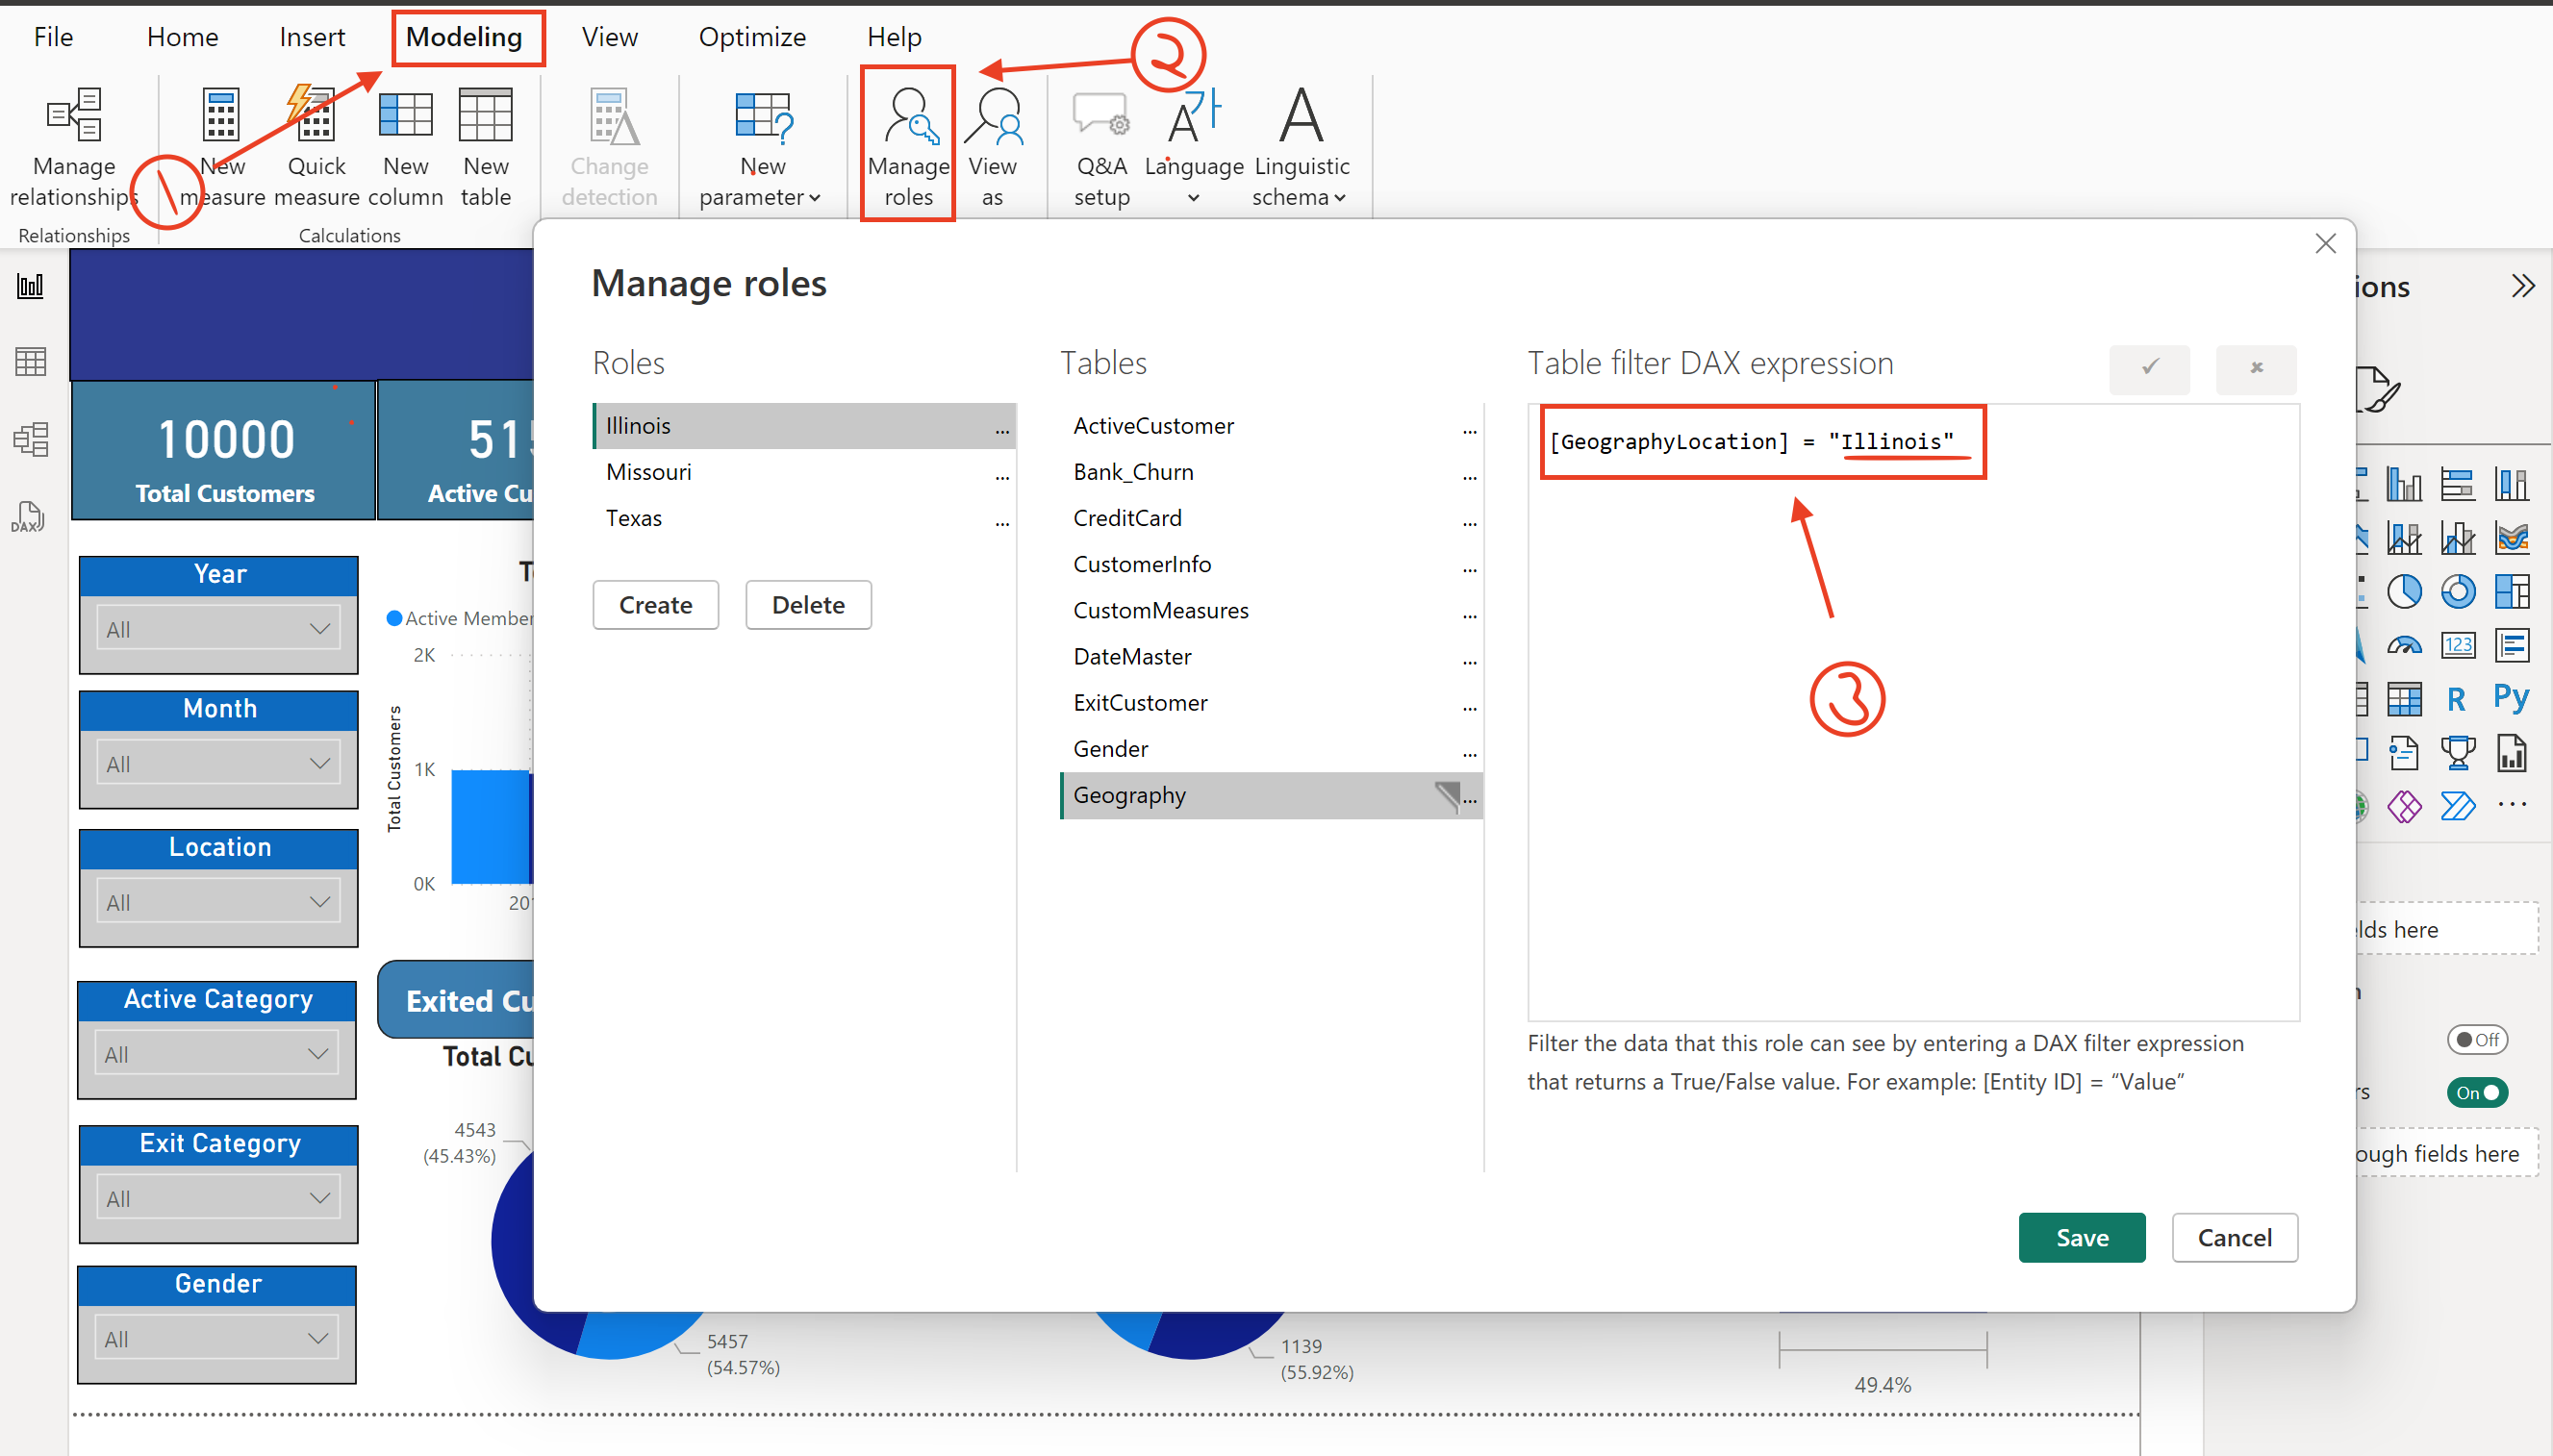
Access RLS in Power BI Desktop:
-
The process involves importing data or setting up a DirectQuery connection, then using the ‘Manage Roles’ option under the Modeling tab.
-
Roles are defined with Data Analysis Expressions (DAX) that return true or false values, with considerations for different formats of username() and userprincipalname() functions.
Creating a Role for Illinois:
- In the Manage Roles section, create a new role. Let’s name it “Illinois”.
- Select the table containing the location data as shown in step - 3 in image below.
Testing and Managing Security
Validation in Power BI Desktop:
After the roles are created, it’s important to validate them to ensure that they are functioning as intended.
Testing the Illinois Role
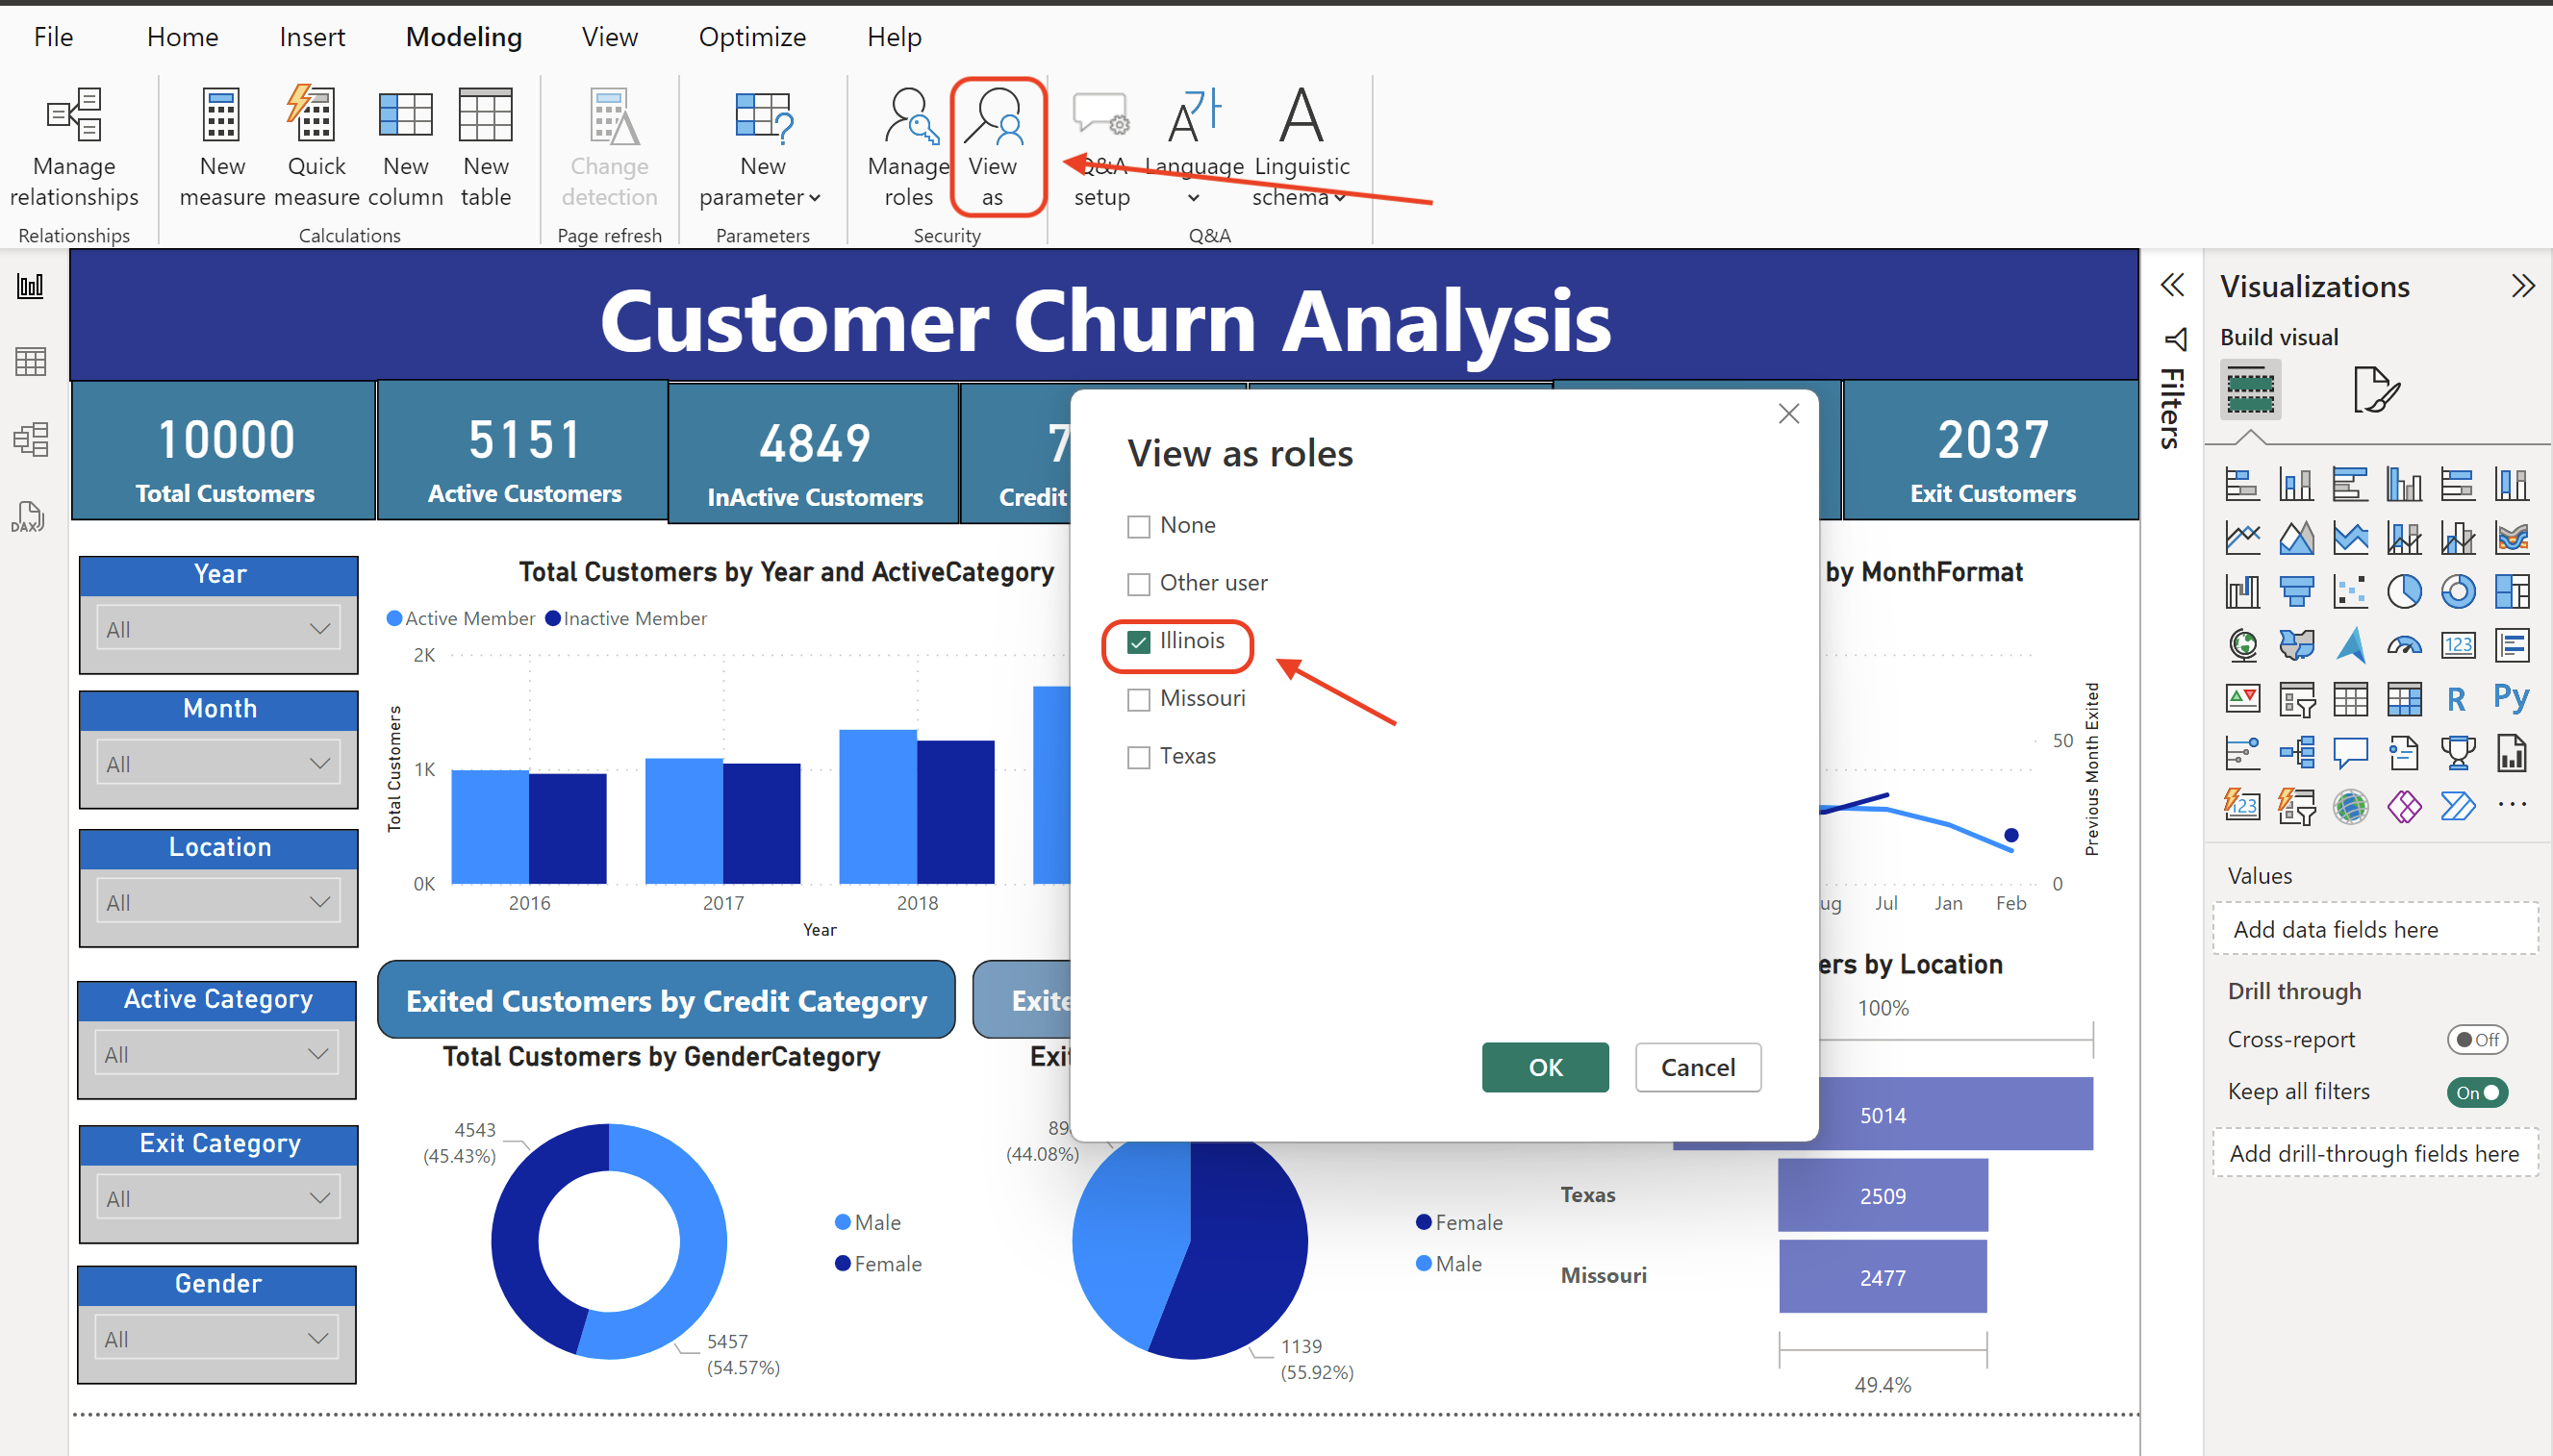
Using the ‘View as’ Feature:
Go back to the Modeling tab.
- Select View as.
- Choose the role “Illinois” from the list of roles.
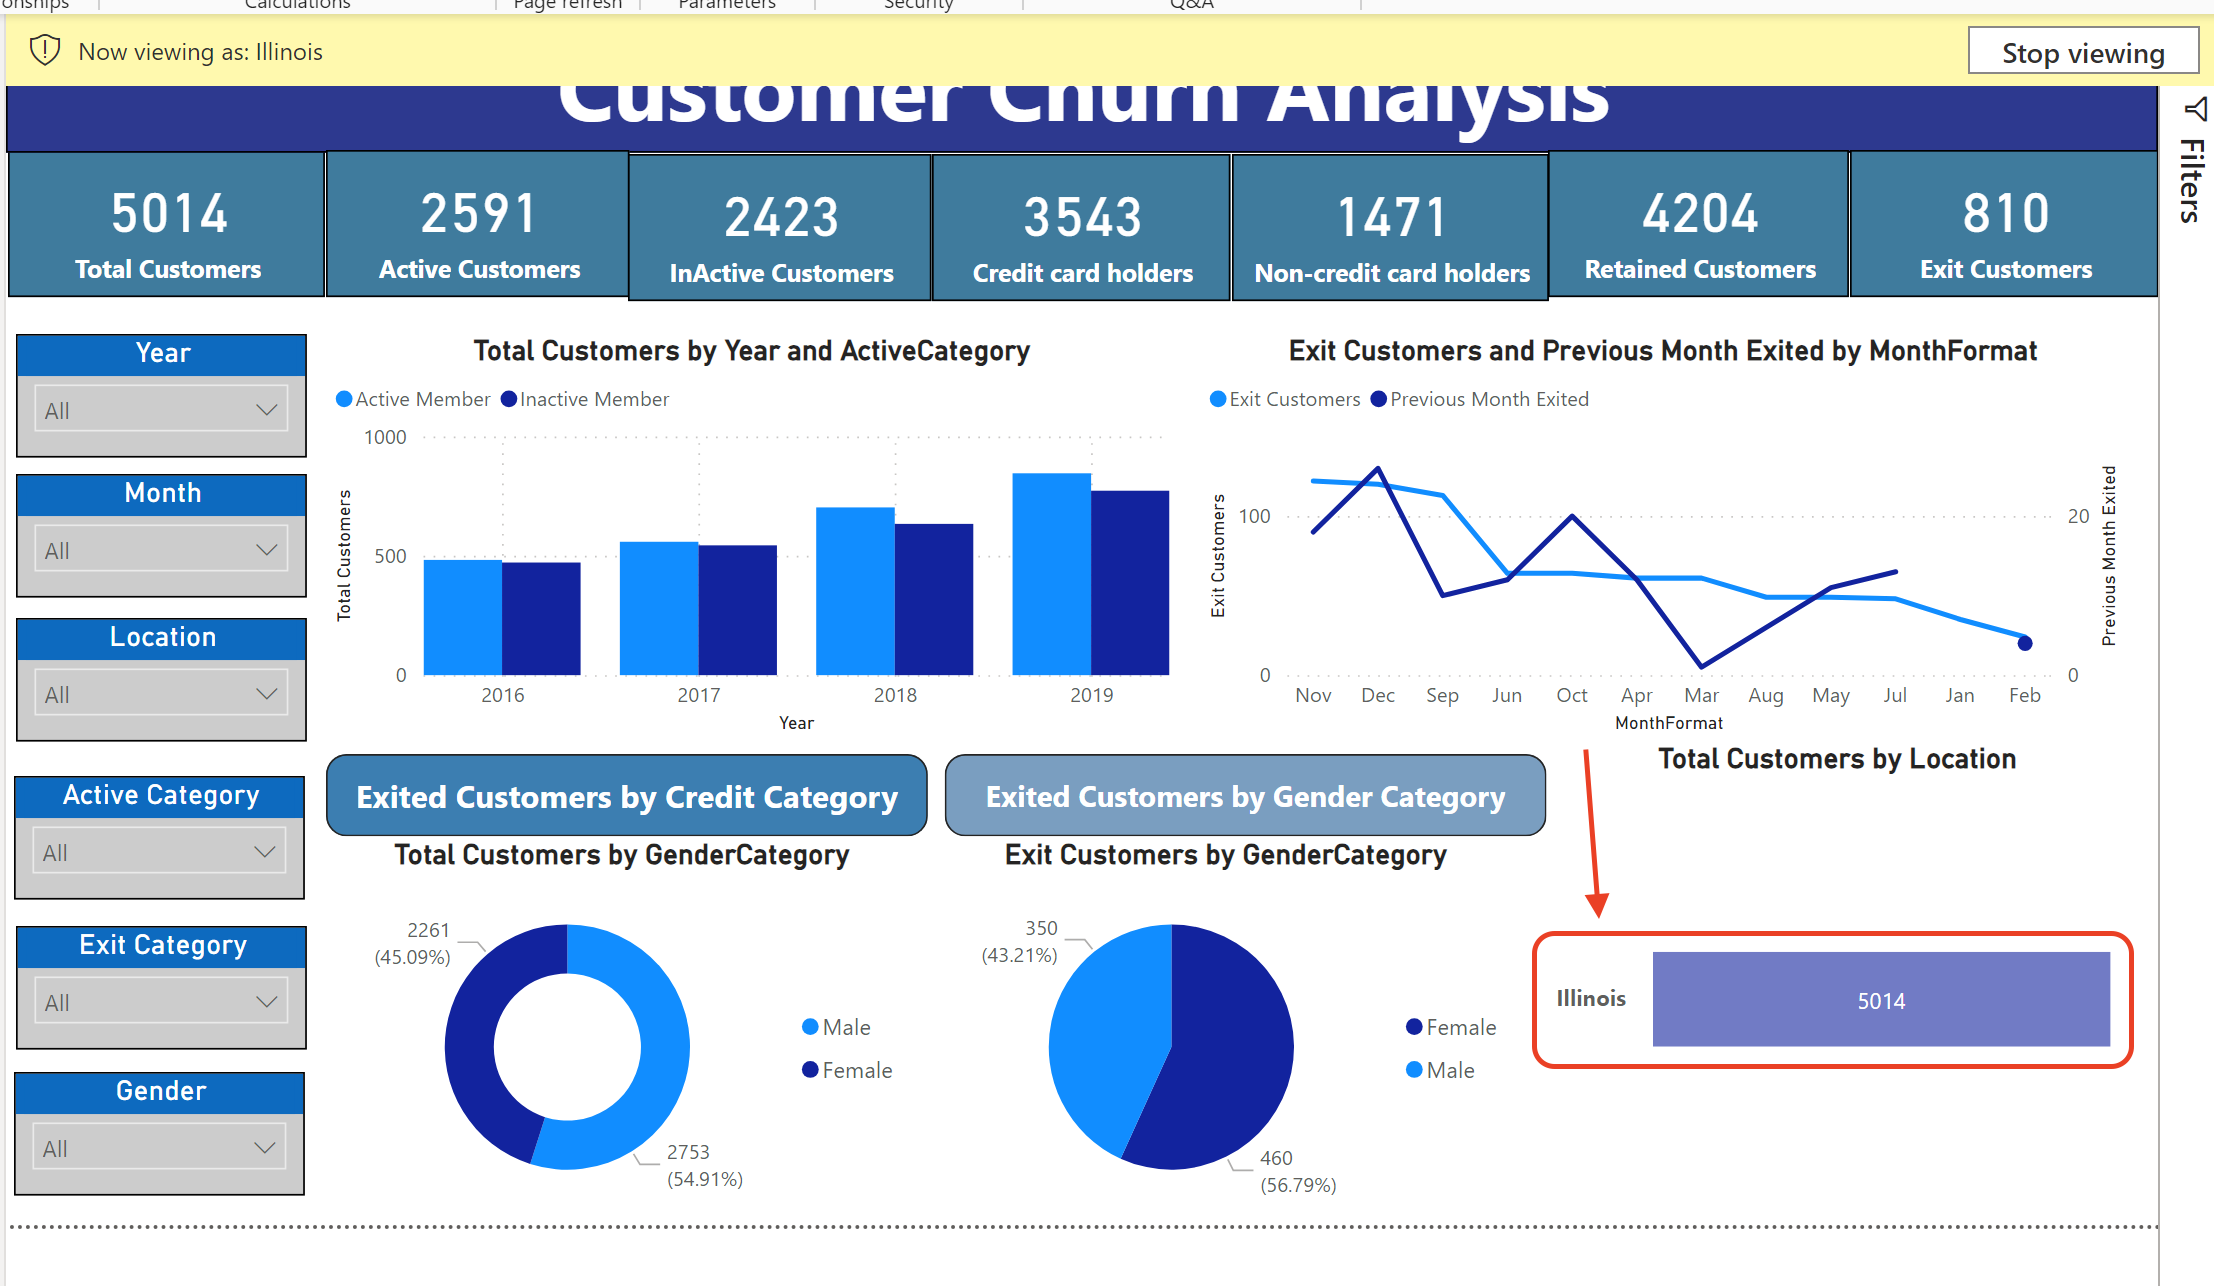
Observing the Funnel Visualization:
- Upon selecting the Illinois role, the funnel visualization in the report will update.
- Now, it should only display data related to customers from Illinois, demonstrating that the RLS is working correctly for this specific region.
Now lets publish the report to a workspace and see how it is managed in the Power BI Services.
Accessing and Managing Row-Level Security in Power BI Service:
- Security on models is managed in the Power BI service, where users can be added to or removed from roles.
- The service provides a way to test roles and view reports as specific roles or users.
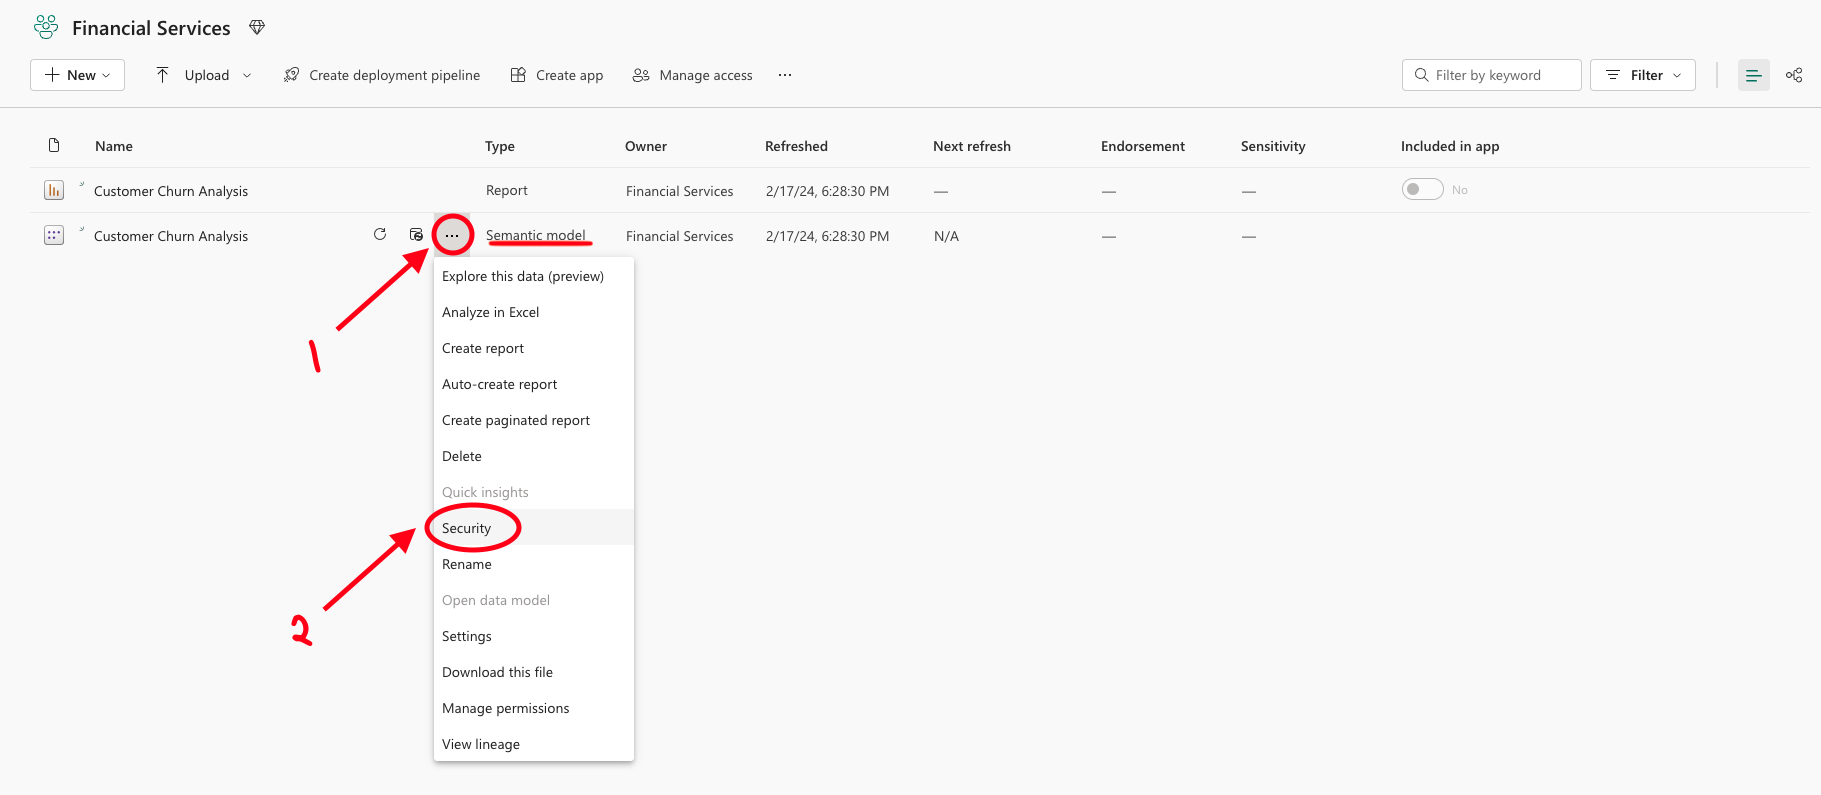
- Selecting the Semantic Model:
- In the Power BI service, navigate to the workspace where your report or dataset is located. Locate the semantic model for which you want to configure RLS. Semantic models are essentially the datasets you’ve uploaded or connected to Power BI. Click on the three dots (…) next to your semantic model to open a context menu.
- Opening RLS Settings:
- In the context menu, select Security. This action will direct you to the RLS configuration page for the selected semantic model.
- Navigating to the RLS Tab.
- Upon opening the Security settings, you will be taken directly to the RLS tab.
Here, you’ll see the roles that you have created in Power BI Desktop.
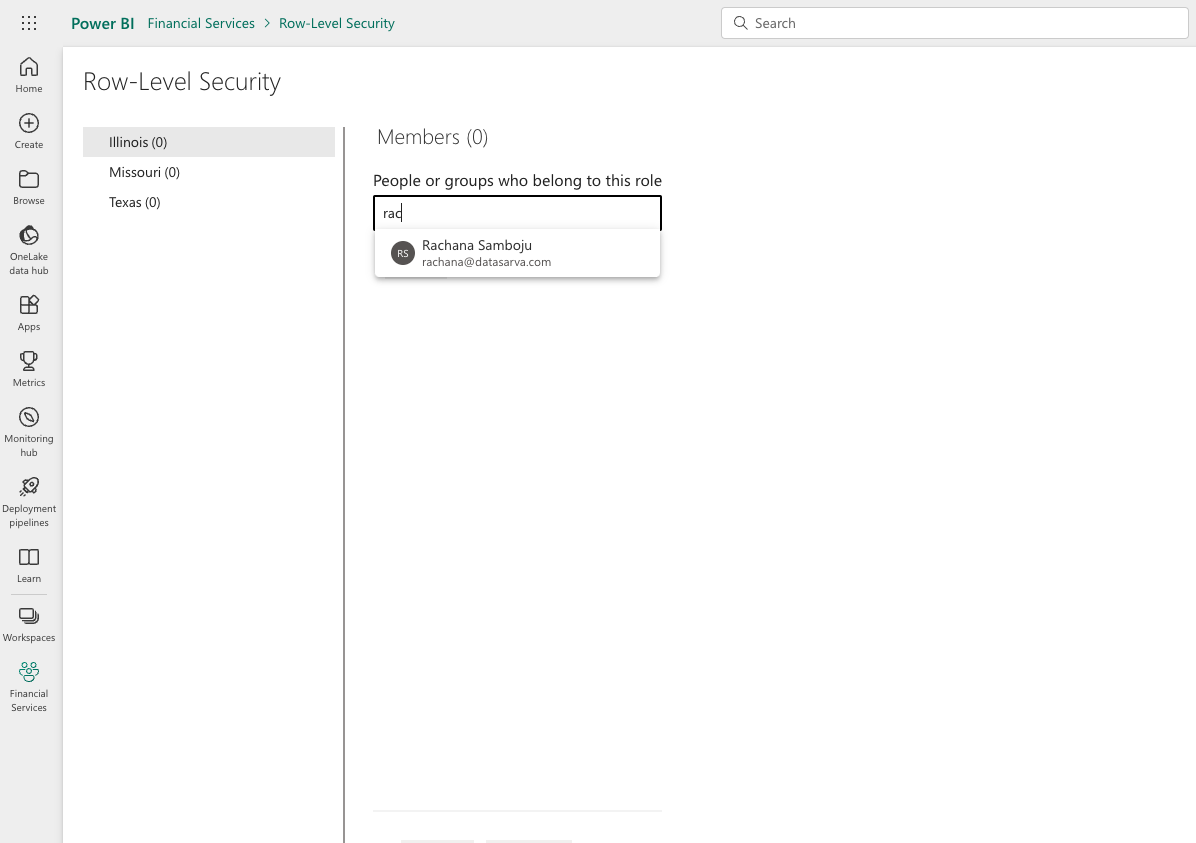
- Assigning Users to Roles:
- Within the RLS tab, you can assign users to the roles you’ve created.
- For each role, you can add individual users or entire security groups, depending on your organizational needs.
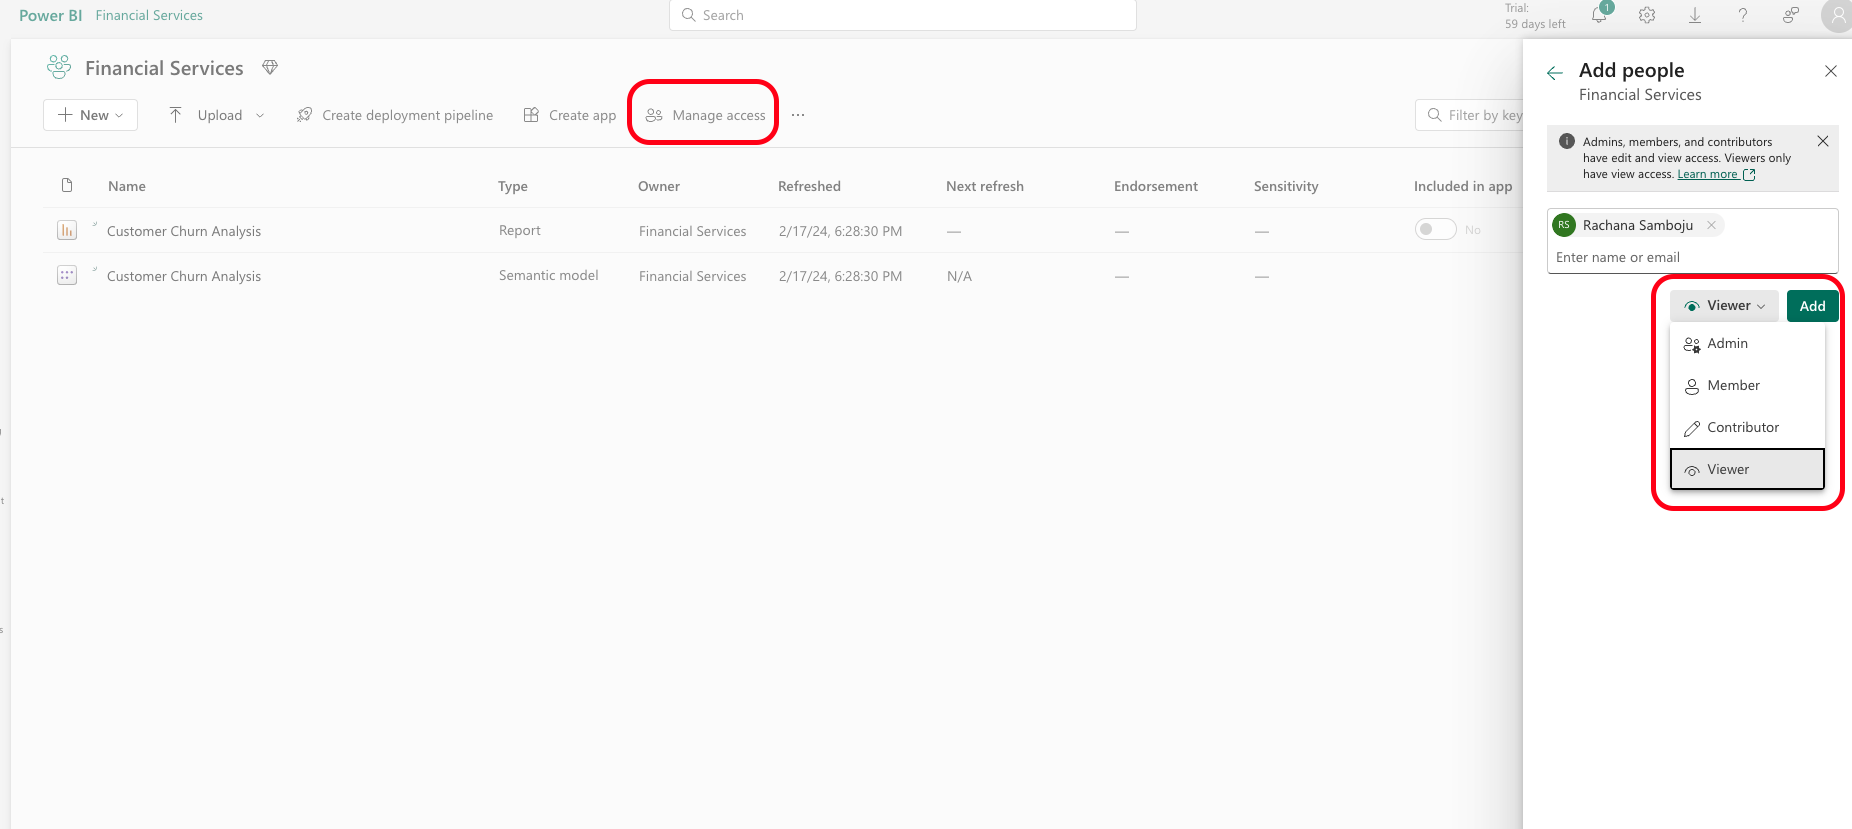
Managing User Permissions for Each Workspace:
- Apart from assigning roles, you also need to manage user permissions for each workspace.
- Assign users as ‘Viewers’ in the workspace to ensure that RLS is effectively applied to them.
- Remember, Power BI users with higher permissions like Admins, Members, or Contributors in a workspace can override RLS settings, so they should be assigned carefully.
This practical approach to implementing and validating RLS in Power BI provides a clear example of how businesses can utilize this feature to tailor data access and ensure data security and compliance, especially in reports dealing with sensitive regional data.
Other Key Considerations:
- Workspace Role Impact: Be aware of how different workspace roles (Viewer, Member, Contributor, Admin) interact with RLS. RLS typically applies to users with ‘Viewer’ roles in a workspace.
- Dynamic Security: If your RLS setup uses dynamic security based on user attributes (like username() or userprincipalname()), ensure these attributes are correctly reflected in the Power BI Service.
- Regular Audits: Regularly review and audit RLS settings and user assignments to maintain data security and compliance.
Considerations and Limitations
- RLS needs to be recreated in Power BI Desktop if previously defined in the service.
- It’s applicable only to Import and DirectQuery connections, not live connections.
- RLS does not limit access to columns or measures, only rows.
- Security roles from data sources (e.g., SQL Server roles) are independent of RLS in Power BI.
- Users can belong to multiple roles, with additive permissions.
Exploring the Enhanced Row-Level Security Editor in Power BI (Preview Feature)
The introduction of the enhanced Row-Level Security (RLS) editor in Power BI represents a significant advancement in how users can define and manage security roles within their reports. This new feature, currently in preview, offers an intuitive and flexible interface for creating and modifying RLS roles, catering to both basic and advanced user requirements.
Enable the Preview Feature:
- In Power BI Desktop, go to Files > Options and Settings > Options > Preview features. Turn on the “Enhanced row-level security editor” option.
- Alternatively, access this feature in the Power BI Service by editing your data model.

Key Features of the Enhanced RLS Editor
Two Modes of Operation:
- Default Drop-Down Interface: Ideal for basic role definitions, allowing users to select options from a predefined list. DAX Interface: Offers advanced capabilities for users who need to create complex or dynamic RLS rules using DAX expressions.
- Seamless Toggle Between Interfaces: Users can switch between the default editor and the DAX editor as needed, providing flexibility in role definition.
Define Security Roles:
-
Similar to our above real world scenario, we need to access this in the similar manner by going to ‘Modeling’ tab, and clicking on ‘Manage roles’ we can access this feature.
-
For more complex RLS filters, such as those using dynamic rules like username() or userprincipalname(), switch to the DAX editor.