Preparing Data for Analysis in Power BI
Welcome to the Microsoft PowerBI Certification Series! Discover the world of data analytics and business intelligence with our comprehensive series. Learn about Power BI, data analysis processes, roles in data management, and gain insights into using Power BI effectively.


Preparing Data for Analysis in Power BI
Get Data into Power BI
In this blog post, we’re exploring how to import and manage data in Power BI.
Get Data from Files
Let’s first focus on flat files like Excel, CSV, and text files.
Key Points
- Flat Files: Simple files with no complex structures, perfect for Power BI.
- Data Import Options: Power BI lets you import data from local storage, OneDrive (Business/Personal), and SharePoint.
- Importing Steps:
- Select ‘Get data’ on the Home tab in Power BI.
- Choose your file (e.g., Excel).
- Use the Navigator window to pick data to import.
- Loading Data: Directly load or clean data in Power Query before loading.
- Updating File Paths: Change file paths in Power Query if needed, but keep file structure the same.
Get Data from Relational Data Sources
To connect Power BI Desktop to an SQL Server for sales data analysis, follow these simple steps:
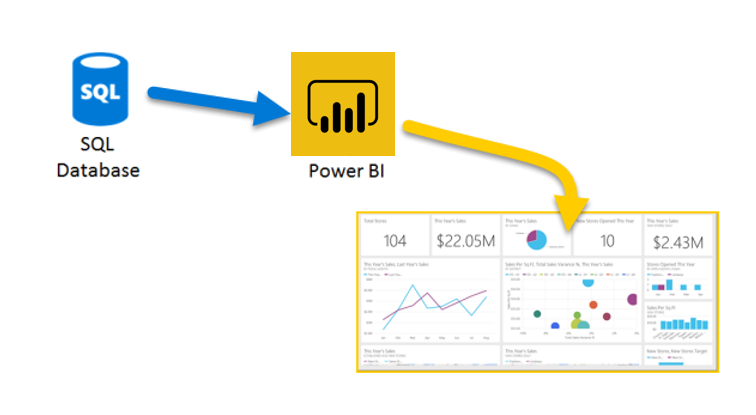
- Use the ‘Get Data’ feature in Power BI Desktop and select ‘SQL Server’.
- Enter your database server and name. Choose between ‘Import’ or ‘DirectQuery’ modes.
- Authenticate using Windows, Database, or Microsoft account credentials.
- In the Navigator window, select the tables you need and choose to either ‘Load’ or ‘Transform Data’.
- For specific data, write an SQL query, like selecting certain columns from a table.
- Adjust data source settings in Power BI if needed, especially for security reasons.
Get Data from Azure Cosmos DB (NoSQL Database)
Learn how to import data from Azure Cosmos DB, a NoSQL database, into Power BI for reporting:
- Connect to Azure Cosmos DB: Use Power BI Desktop’s ‘Get Data’ feature. Choose ‘More…’, select Azure Cosmos DB, and enter your database details.
- Import JSON Data: In Power BI, navigate and select your data table using the Navigator window. Open the records in Power Query, expand and select the required fields, and apply changes. This process transforms your Cosmos DB data into a structured format for Power BI, enabling efficient analysis and reporting.
Get Data from Online Services (SharePoint) to Power BI
Learn how to connect Power BI Desktop to SharePoint for data integration:
- Use ‘Get Data’ in Power BI: Choose ‘SharePoint Online List’ from the ‘Online Services’ category.
- Enter SharePoint URL: Provide your SharePoint site URL.
- Authorize Connection: Log in with your Microsoft account and connect.
- Import Data: In the Navigator window, select the SharePoint list you want to import into Power BI. This method allows easy integration of SharePoint data into Power BI for enhanced analysis and reporting.
Power BI Storage Modes Simplified
In Power BI, there are three main storage modes:
- Import Mode: Copies data into Power BI for full feature access. Good for regular-sized data and allows scheduled refreshes.
- DirectQuery Mode: Connects directly to data sources for real-time, up-to-date information. Best for large datasets and meets strict security needs.
- Dual Mode: Combines Import and DirectQuery. Ideal for mixed data requirements, choosing the best method for each data piece. Choosing the right mode depends on your data size, update needs, and security requirements.
PowerQuery Overview
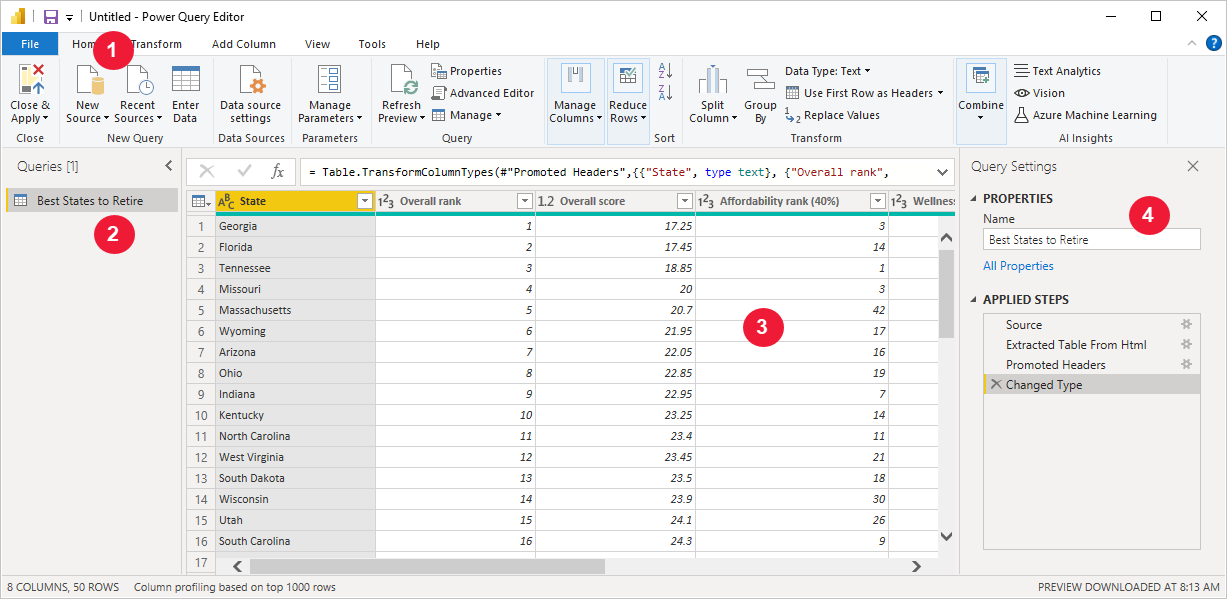
- Ribbon: Active buttons for data interaction.
- Left Pane: Lists queries for selection.
- Center Pane: Displays and shapes selected data.
- Query Settings Pane: Lists query properties and steps.
Optimizing Power BI with Power Query and Query Folding
When building Power BI reports, like for a Sales team, you might encounter performance issues. Two key tools to improve performance are Power Query and Query Folding.
- Power Query: Enhances data source performance. Good practices at the data source level (like in SQL Server) improve Power Query’s efficiency.
- Query Folding: This feature in Power Query tracks your data transformations as native SQL queries, reducing the load on Power BI by performing changes directly in the data source.
- Benefits:
- Faster data refreshes in Power BI.
- Works well with DirectQuery and Dual Storage modes.
- Checking Query Folding: In Power Query Editor, right-click the last step to see if “View Native Query” is available. If yes, query folding is active.
- Not all transformations support Query Folding: For example, adding an index column or changing data types doesn’t support it.
- Query Diagnostics: This tool in Power Query Editor helps identify which steps are slowing down your report.
- Additional Tips:
- Process as much data as possible in the original source.
- Use native SQL queries for better performance.
- Separate combined date and time columns for better data handling. For more details, check Power BI’s Query Folding and Diagnostics guides.
Solving Power BI Data Import Errors: A Quick Guide
- Query Timeout: Reduce the amount of data you’re trying to import, or break it into smaller queries.
- Excel Table Format: If Power BI doesn’t recognize data in Excel, format your data as a table using Ctrl-T.
- File Not Found: Update the file’s location in Power Query if it has been moved or its permissions changed.
- Data Type Issues: Ensure your query uses the correct data type to prevent blank columns.
Clean, Transform, and Load Data in Power BI
Introduction
In Power BI, data preparation is key for accurate analysis. Here’s a simplified summary of challenges with imported data and how Power BI and Power Query help you address them:
Challenges with Imported Data
- Employment status is numbers, not text.
- Some columns have errors.
- Null values in some columns.
- Duplicate customer IDs.
- Address info is combined.
How Power BI and Power Query Help
- Resolve Issues: Fix inconsistencies and null values.
- Replace Values: Use user-friendly terms.
- Profile Data: Understand columns better.
- Transform Data: Modify types and structures.
- Combine Data: Merge sources.
- Naming: Use clear names.
- Advanced Editing: Customize queries for control.
With these steps, you can prepare data for precise analysis in Power BI.
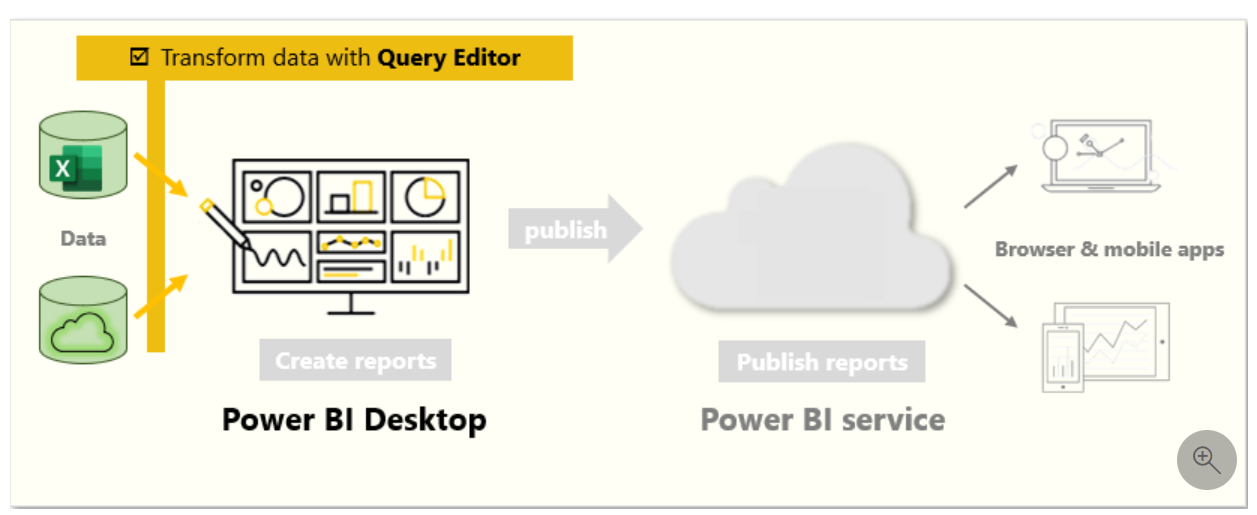
Data Prep with Power Query Editor in Power BI
Power BI’s strength lies in its ability to turn raw data into meaningful insights. To get there, you need clean, structured data. Enter Power Query Editor – your data-shaping companion. In this blog, we’ll simplify the process:
- Open Power Query Editor: Click “Transform data” in Power BI Desktop.
- Identify Columns: Find column headers and names.
- Promote Headers: Use “Use First Row as Headers.”
- Rename Columns: Right-click or double-click to correct names.
- Remove Top Rows: Eliminate blank/unneeded rows.
- Remove Columns: Remove unwanted columns.
- Unpivot Columns: Restructure Excel data.
- Pivot Columns: Organize flat data.
Here’s a straightforward guide to streamline your data:
- Rename Queries: Make query names user-friendly. Replace complex names with simple ones.
- Replace Values: Correct errors like misspellings in your data using the “Replace Values” feature.
- Handle Nulls: Replace null values with appropriate ones for accurate calculations.
- Remove Duplicates: Eliminate duplicate entries to keep your data clean.
- Data Type Importance: Power BI automatically detects data types, but errors can occur, especially in flat files. Correct data types are vital for calculations and relationships.
- Implications of Errors: Incorrect data types hinder calculations and date hierarchies. For example, you can’t calculate Quantity of Orders YTD without the correct data type.
- Changing Data Types: You can change data types in Power Query Editor or Report view. It’s best to do it in Power Query Editor. Select the column, choose “Data Type,” and pick the correct type. The change is saved as a step.
- Final Steps: After cleaning and transforming data, close Power Query Editor and apply changes. Your data is now ready for analysis and reporting in Power BI.
Simplify Your Power BI Workflow: Combining Tables
In Power BI, data consolidation is a key skill for creating informative reports. We’ll explore two methods to do this: appending and merging queries.
Appending Queries
- Purpose: Add rows of data from one table to another.
- Example: Combining a 300-row table with a 100-row table results in a 400-row table.
- Steps:
- Reformat tables: Ensure consistent column names (e.g., ID, company, name, phone).
- Combine queries: In Power Query Editor, select “Append Queries as New.”
Merging Queries
- Purpose: Combine data from different tables based on a common column (similar to SQL JOIN).
- Example: Consolidating orders and order details using the OrderID column.
- Steps:
- Merge tables: In Power Query Editor, select “Merge Queries as New.”
- Define join type: Choose from Left Outer, Full Outer, or Inner join.
- Review merged query.
Master these methods to streamline data preparation in Power BI and create a single source of truth for your reports.
Use of Advanced Editor to Modify M Code
In Power Query, you shape and clean data using steps. These steps can be edited in the M language if needed.
To access the M code:
- Go to the “View” ribbon.
- Click “Advanced Editor.”
You’ll see M code for each step. You can change values directly. Be cautious with step order, as it affects dependencies. The last step is the final result.
M code is optional but helpful for customization. It’s a valuable tool for Power BI data preparation.