Automating Power BI Workflows with CI/CD in Microsoft Fabric
An in-depth blog on automating Power BI workflows with CI/CD (Continuous Integration/Continuous Deployment) in Microsoft Fabric. This blog covers Azure DevOps and Git integration, automating deployments for data pipelines and reports, and best practices for version control and workflow optimization with real-world examples

What is CI/CD (Continuous Integration/Continuous Deployment)?
Continuous Integration (CI)
Continuous Integration is a development practice where team members frequently merge their code changes into a central repository. In the context of Power BI, this means:
- Regular integration of report changes
- Automated validation of changes
- Consistent version control
- Early detection of conflicts and issues
Continuous Deployment (CD)
Continuous Deployment takes the process further by automatically deploying verified changes through various environments. This involves:
- Automated deployment through different stages
- Structured deployment pipelines
- Consistent promotion of changes from development to production
- Reduced manual intervention and human error
Let’s talk about Power BI File Formats:
Understanding the different file formats is crucial for implementing CI/CD in Power BI:
1. PBIX Format
- The standard Power BI Desktop report format
- Binary files that open directly in Power BI Desktop
- Contains both report structure and data
- Best for individual development and simple scenarios
2. PBIT Format
- Template files for sharing report structures
- Contains report layout and data model structure without actual data
- Useful for standardizing report development across teams
- Great for creating reusable templates
3. PBIR Format
- Source-control-friendly format
- Organizes report components into separate JSON files
- Enhanced collaboration capabilities
- Better version control management
- Easier to track changes and merge conflicts
4. PBIP Format (Power BI Project)
- In PBIP Project file that structures report contents into folders
- Contains a pointer to the report folder
- Opens targeted report and model for authoring
- Ideal for enterprise development scenarios
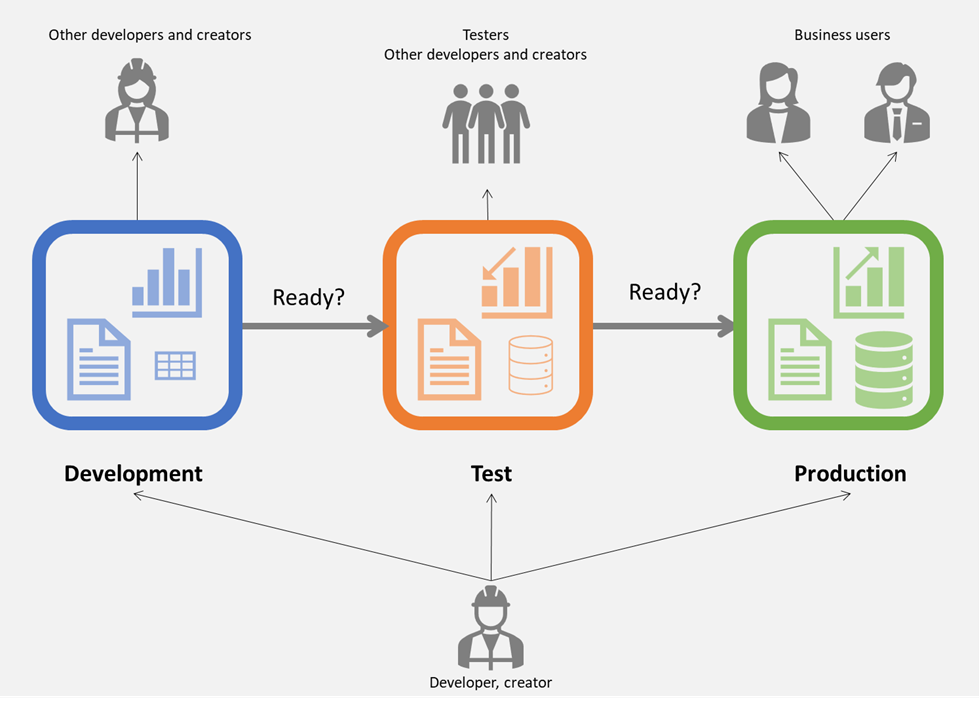
What are Deployment Pipelines in Microsoft Fabric?
Deployment pipelines in Microsoft Fabric are a key feature designed to streamline the process of delivering content through various stages of development, testing, and production. These pipelines enable teams to automate and manage the lifecycle of their content efficiently, ensuring that updates and new features can be tested and deployed with reliability.
Key Features of Deployment Pipelines
-
Stage Configuration Deployment pipelines allow you to configure multiple stages, typically including Development, Test, and Production. You can define between 2 to 10 stages per pipeline, and these stages help manage the flow of content from initial development through to final release.
-
Automation and Integration The pipelines support automation through Microsoft Fabric REST APIs, enabling integration with DevOps tools like Azure DevOps and GitHub Actions. This allows for scheduling deployments, deploying multiple pipelines simultaneously, and ensuring dependencies are managed across pipelines.
-
Content Management Content is cloned from one stage to another within a pipeline. This process maintains connections between items and applies any configured deployment rules. The deployment ensures that the content is updated in the target stage while preserving necessary configurations.
-
Git Integration Microsoft Fabric supports Git integration, allowing developers to use version control for their workspaces. This integration facilitates collaboration and ensures that changes can be tracked and managed effectively before being deployed through the pipeline.
-
Deployment Rules Custom deployment rules can be set up to manage how content is deployed across different environments. These rules help maintain consistency in configurations across stages.
Benefits of Using Deployment Pipelines
-
Efficiency By automating the deployment process, teams can reduce manual errors and speed up the release cycle.
-
Reliability Automated testing and deployment ensure that content is thoroughly vetted before reaching production, reducing the risk of issues post-deployment.
-
Scalability With the ability to manage multiple pipelines and integrate with existing DevOps tools, organizations can scale their development processes efficiently.
Choosing the Right CI/CD Approach for Power BI in Microsoft Fabric
When implementing Continuous Integration and Continuous Deployment (CI/CD) in Power BI, organizations need to carefully consider their approach based on their size, complexity, and requirements. Let’s dive deep into the two primary approaches and understand how they work in real-world scenarios.
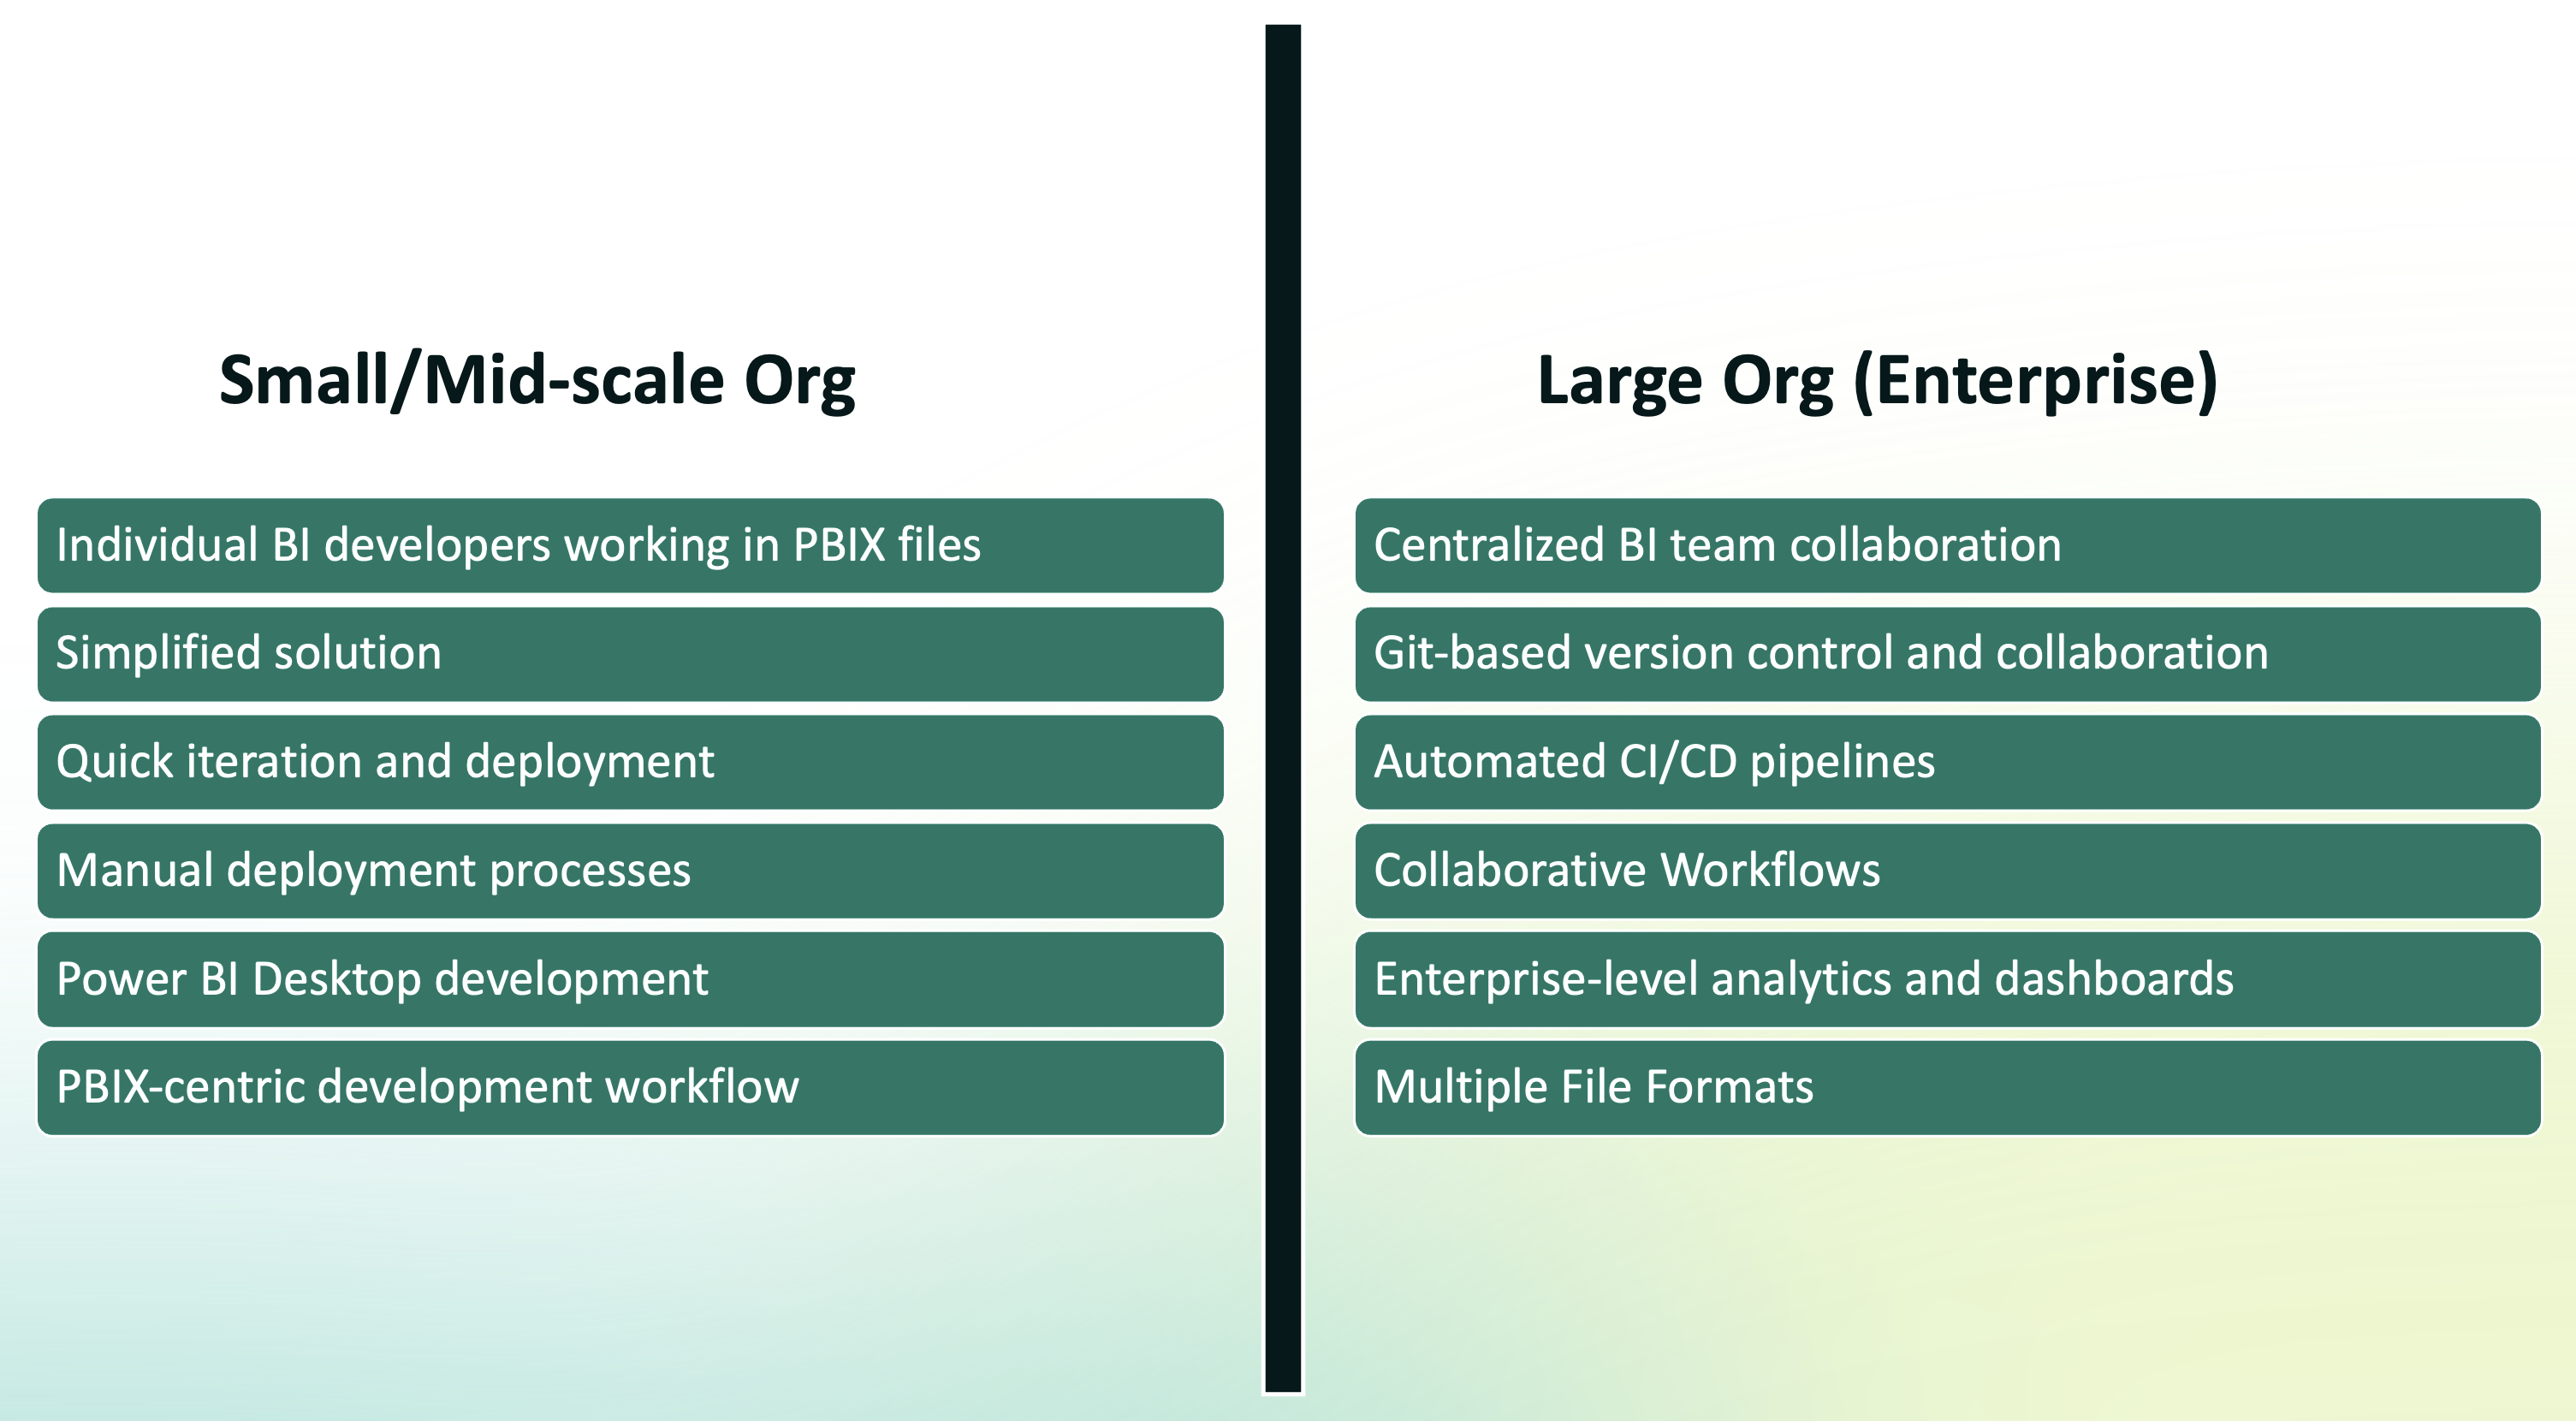
Understanding Small/Mid-scale Organization Approach
Small to mid-sized organizations typically prefer a more straightforward approach to Power BI development and deployment. This approach emphasizes simplicity and speed while maintaining adequate control over the development process.
Development Process
In a small/mid-scale organization, the development process typically centers around Power BI Desktop and PBIX files. Developers work directly in Power BI Desktop, where they can quickly create and modify reports. This direct approach allows for rapid development and immediate visualization of changes.
The workflow usually follows these steps:
- A developer opens Power BI Desktop and creates or modifies a report
- Changes are saved locally as PBIX files
- The developer tests the report functionality locally
- Once satisfied, they publish directly to the Power BI Service
Deployment Strategy
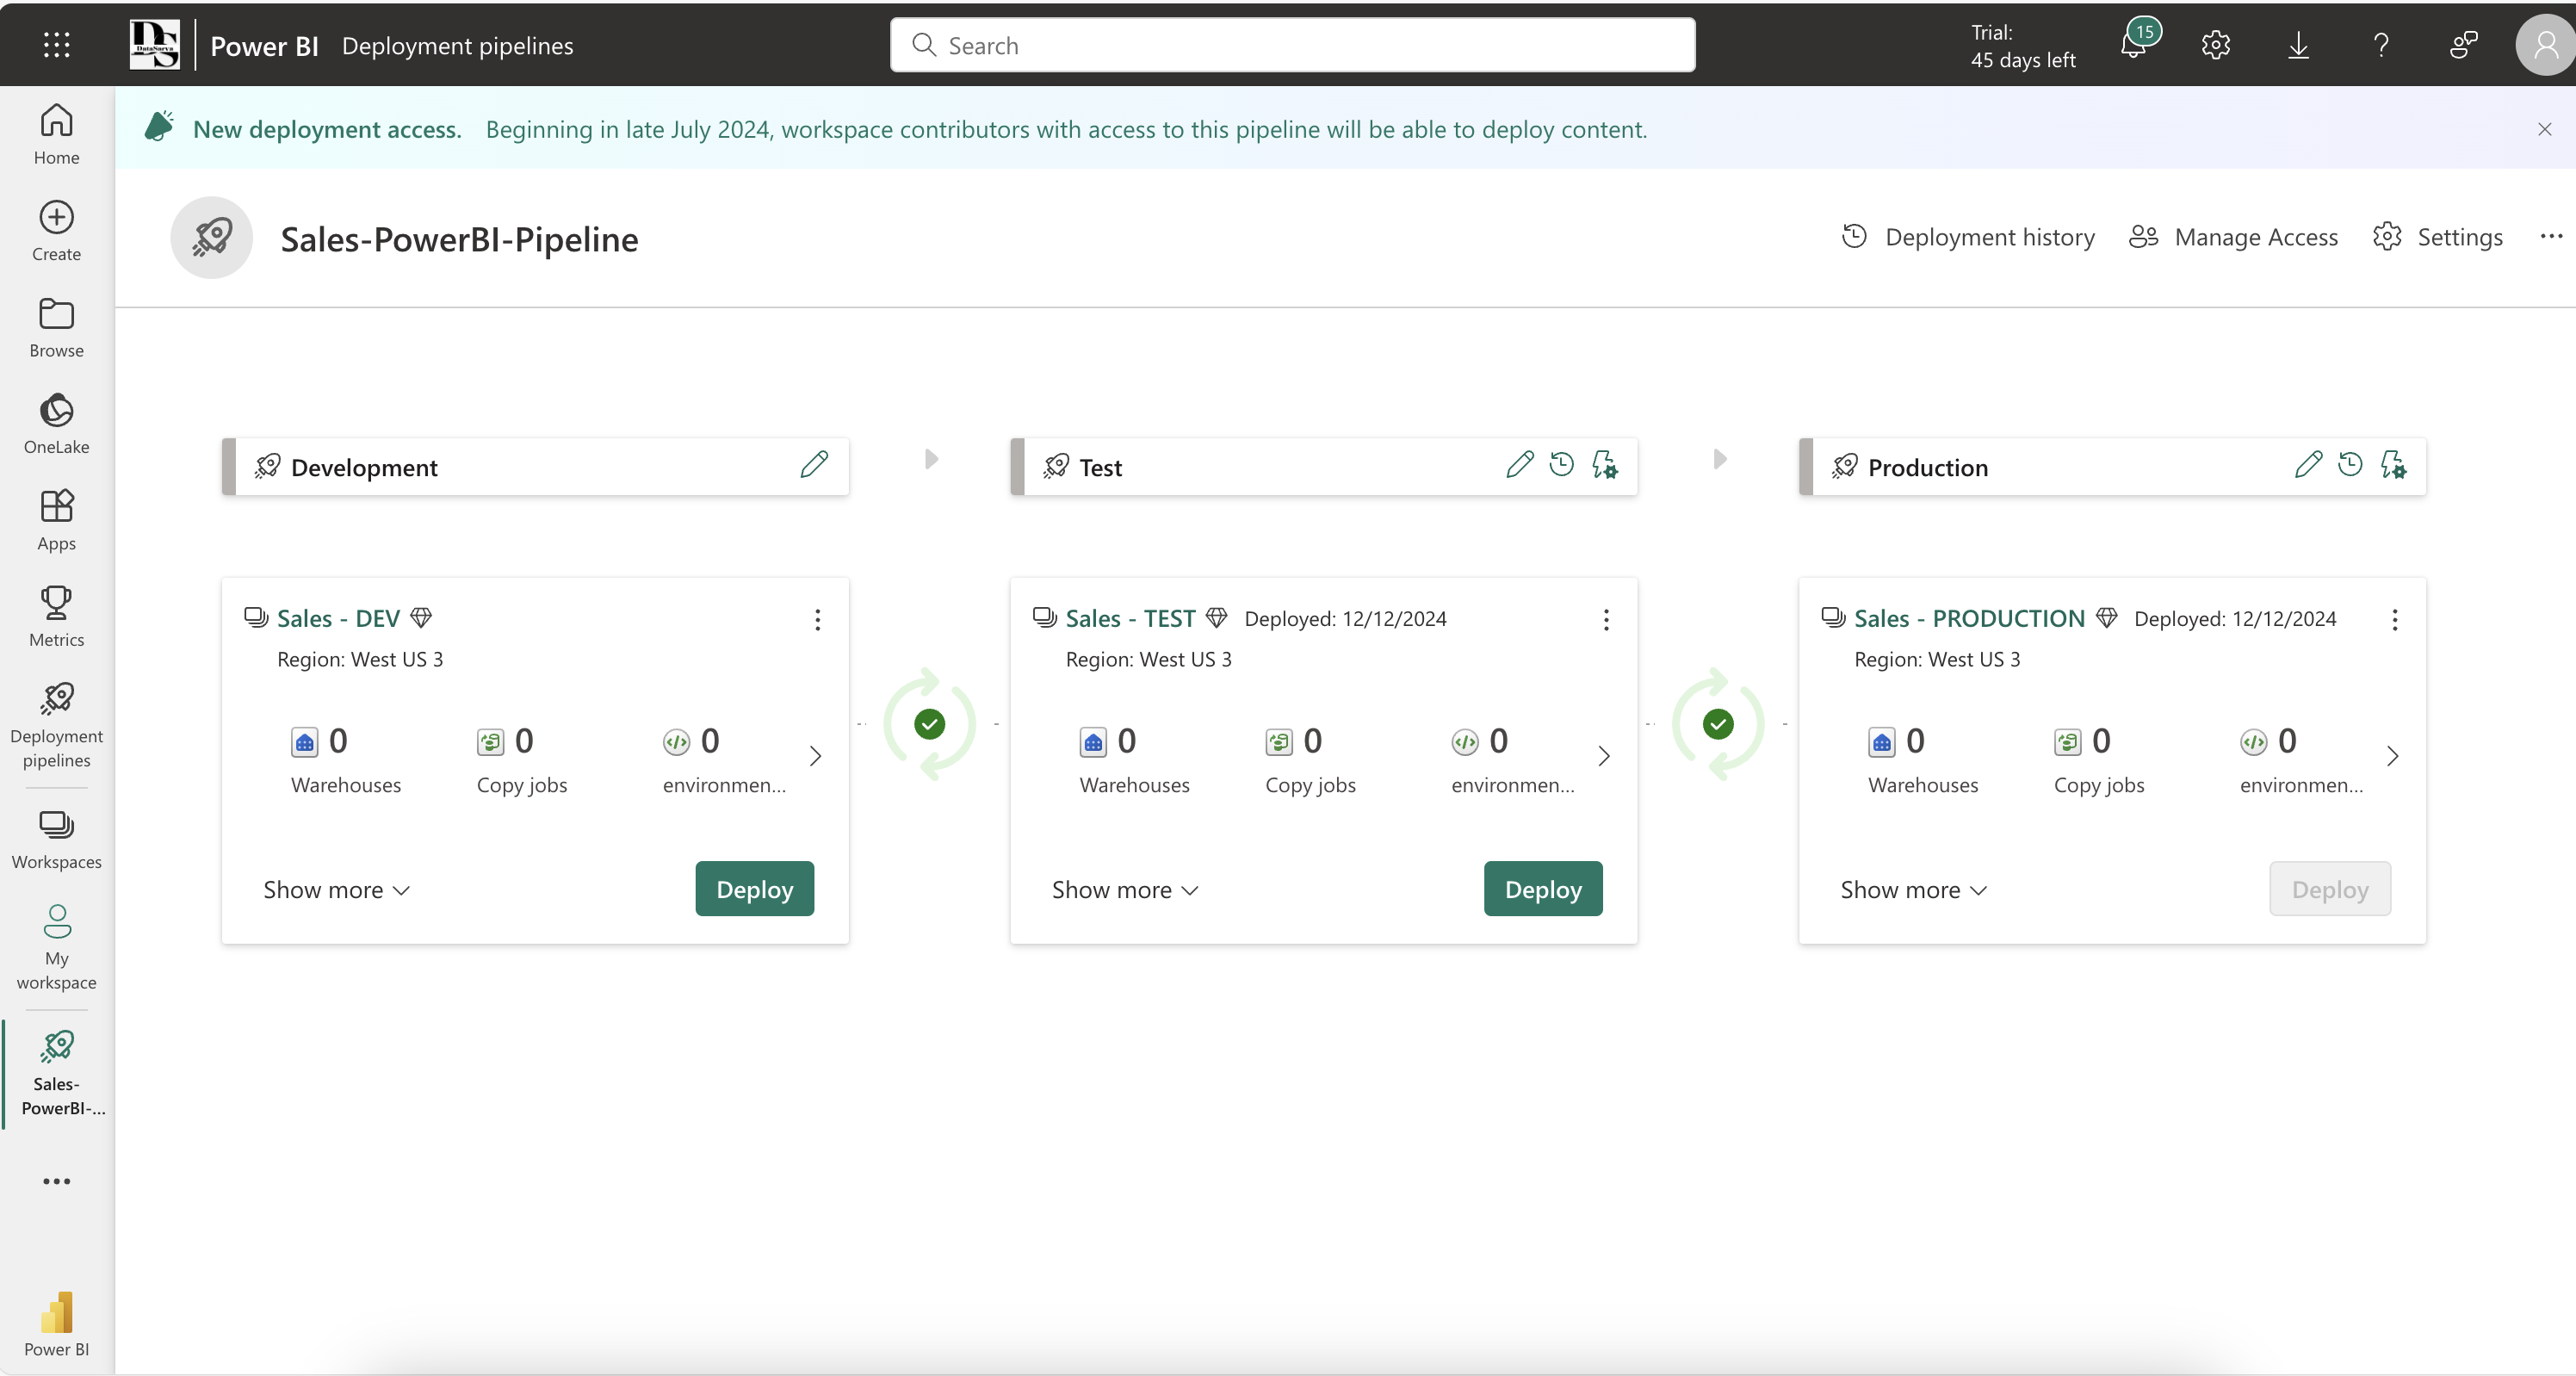
The deployment process in smaller organizations is typically manual but structured. Let’s try to automate it using Deployements Pipelines in Microsoft Fabric.
For smaller organizations, Power BI’s deployment pipelines feature offers a straightforward yet powerful way to manage the deployment of reports across different environments. Let’s walk through the complete process.
Step-by-Step Workflow Process
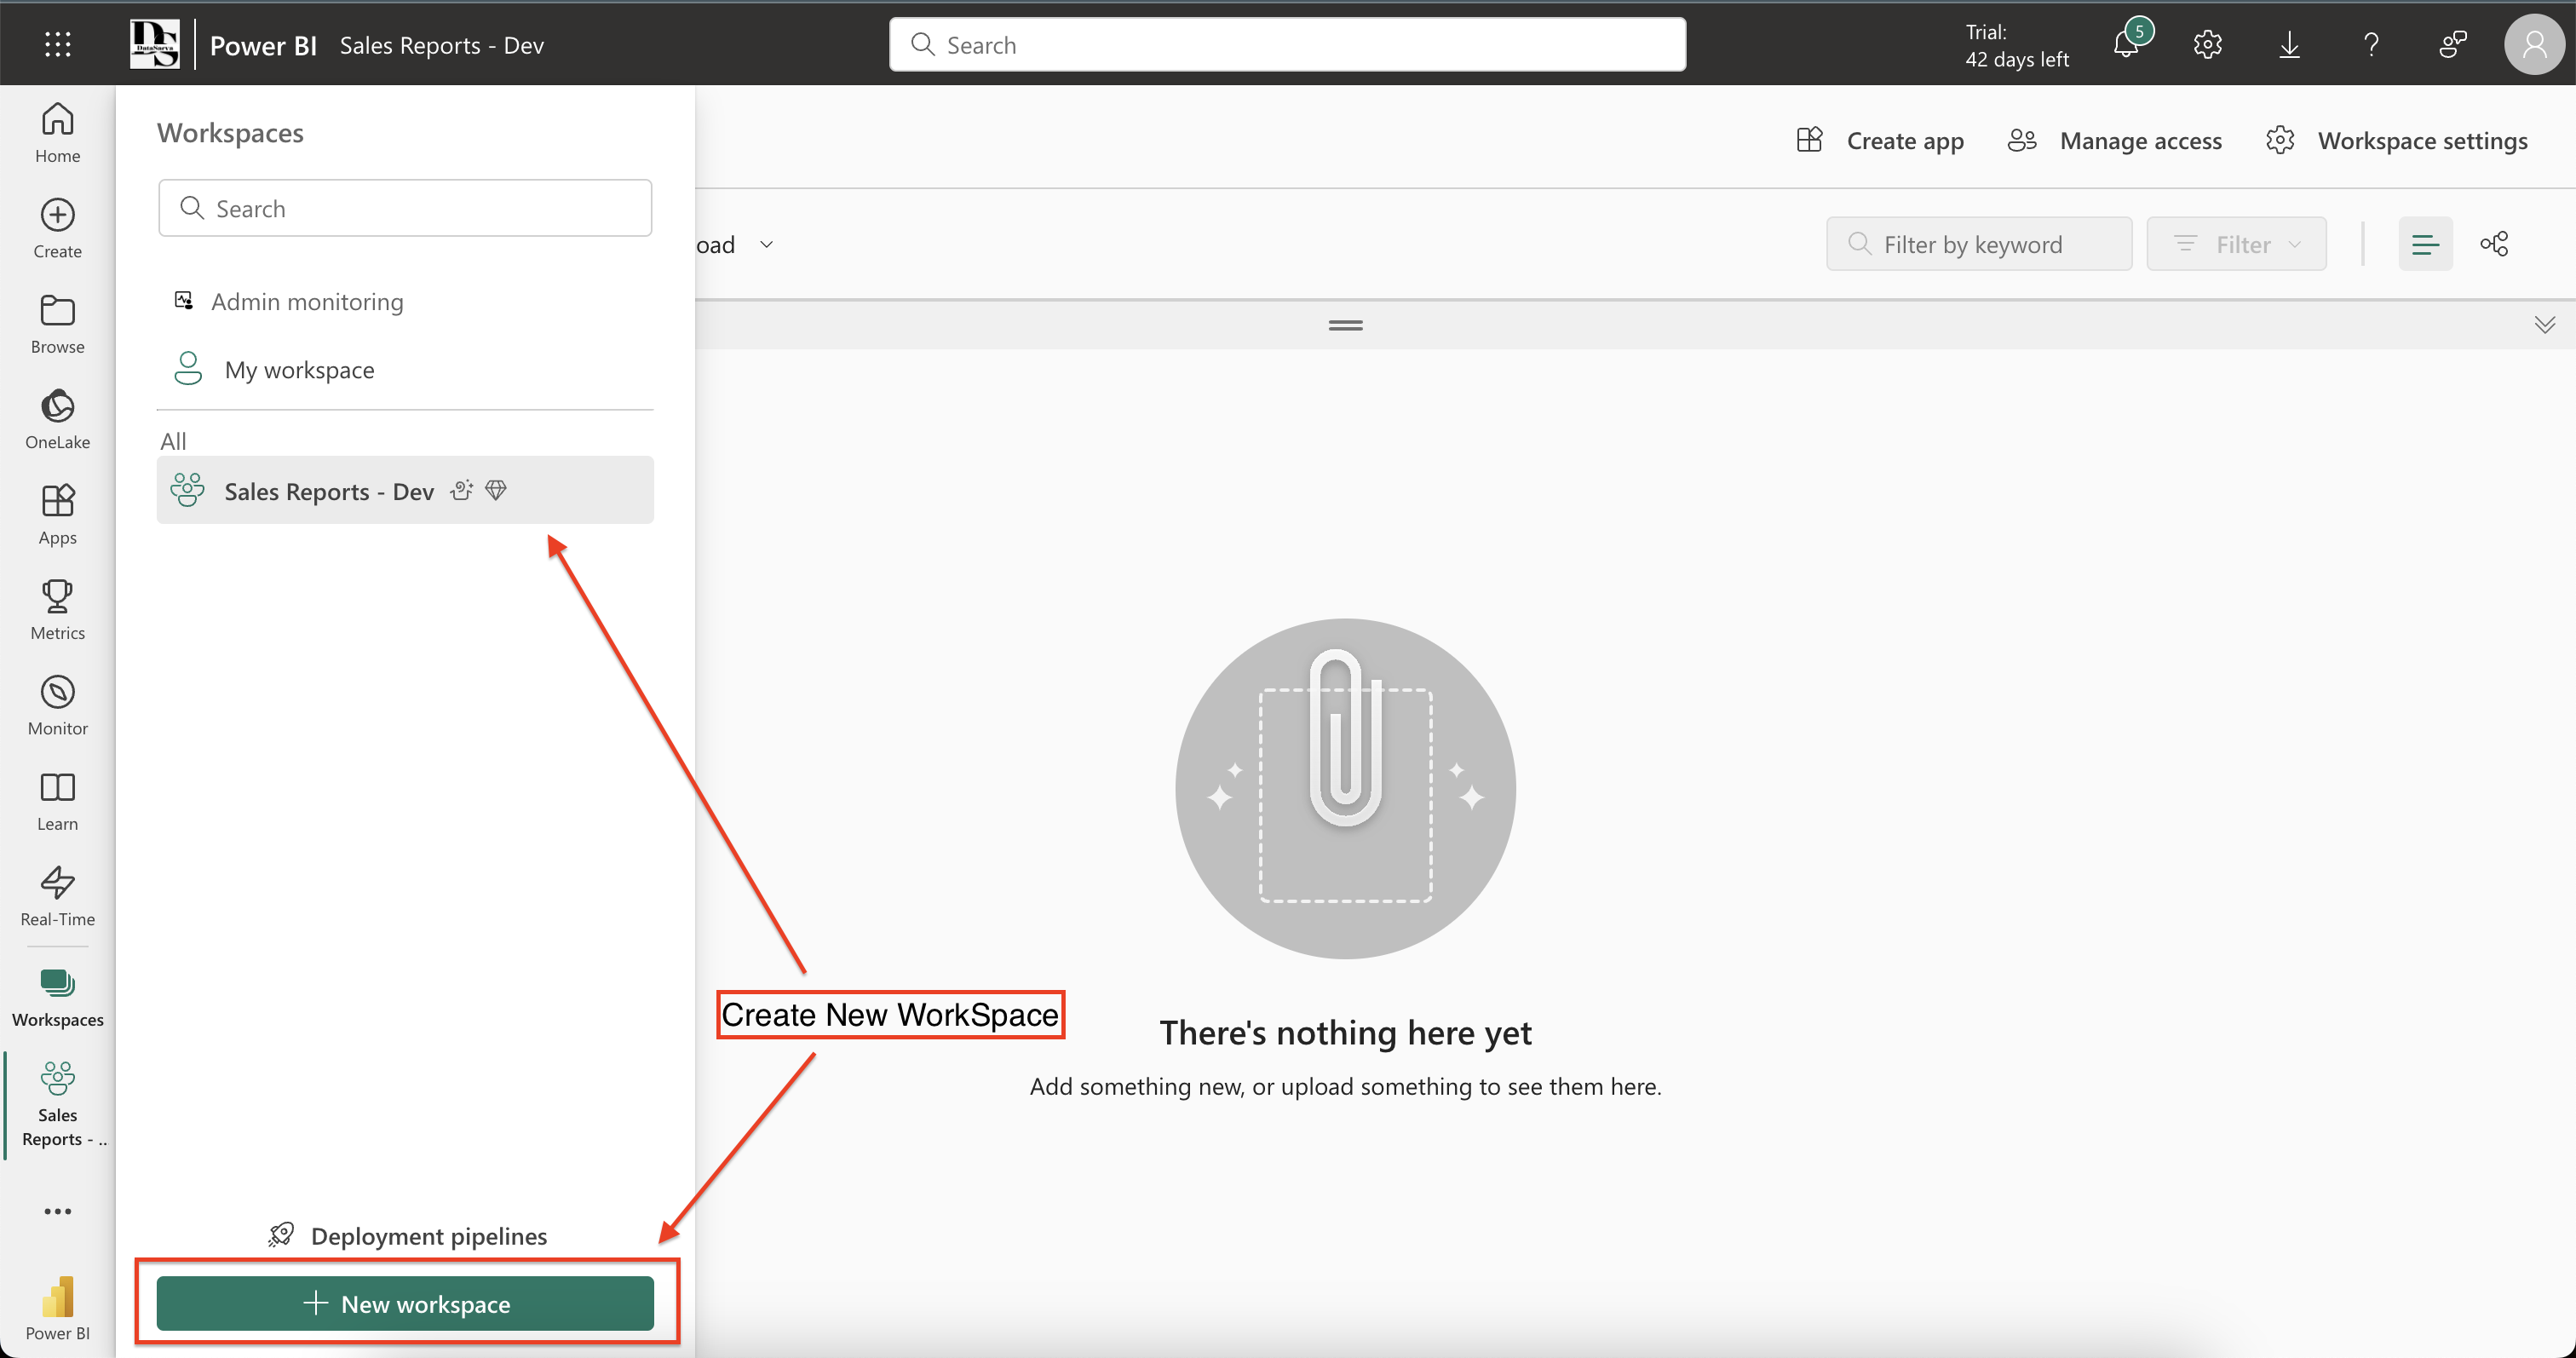
1. Initial Workspace Setup
First, we need to create our development workspace:
- Log into Power BI Service
- Create a new workspace (e.g., “Sales Reports - Dev”)
- Click ‘Workspaces’ → ‘New workspace’
- Name your workspace
- Set appropriate access rights
- Save the workspace
2. Publishing Your PBIX File
Start by getting your report into the development workspace:
- Open your report in Power BI Desktop on local machine
- Click ‘Publish’ within Power BI Desktop (Upload the pbix file in Power BI Service)
- Select your development workspace
- Wait for confirmation of successful publication
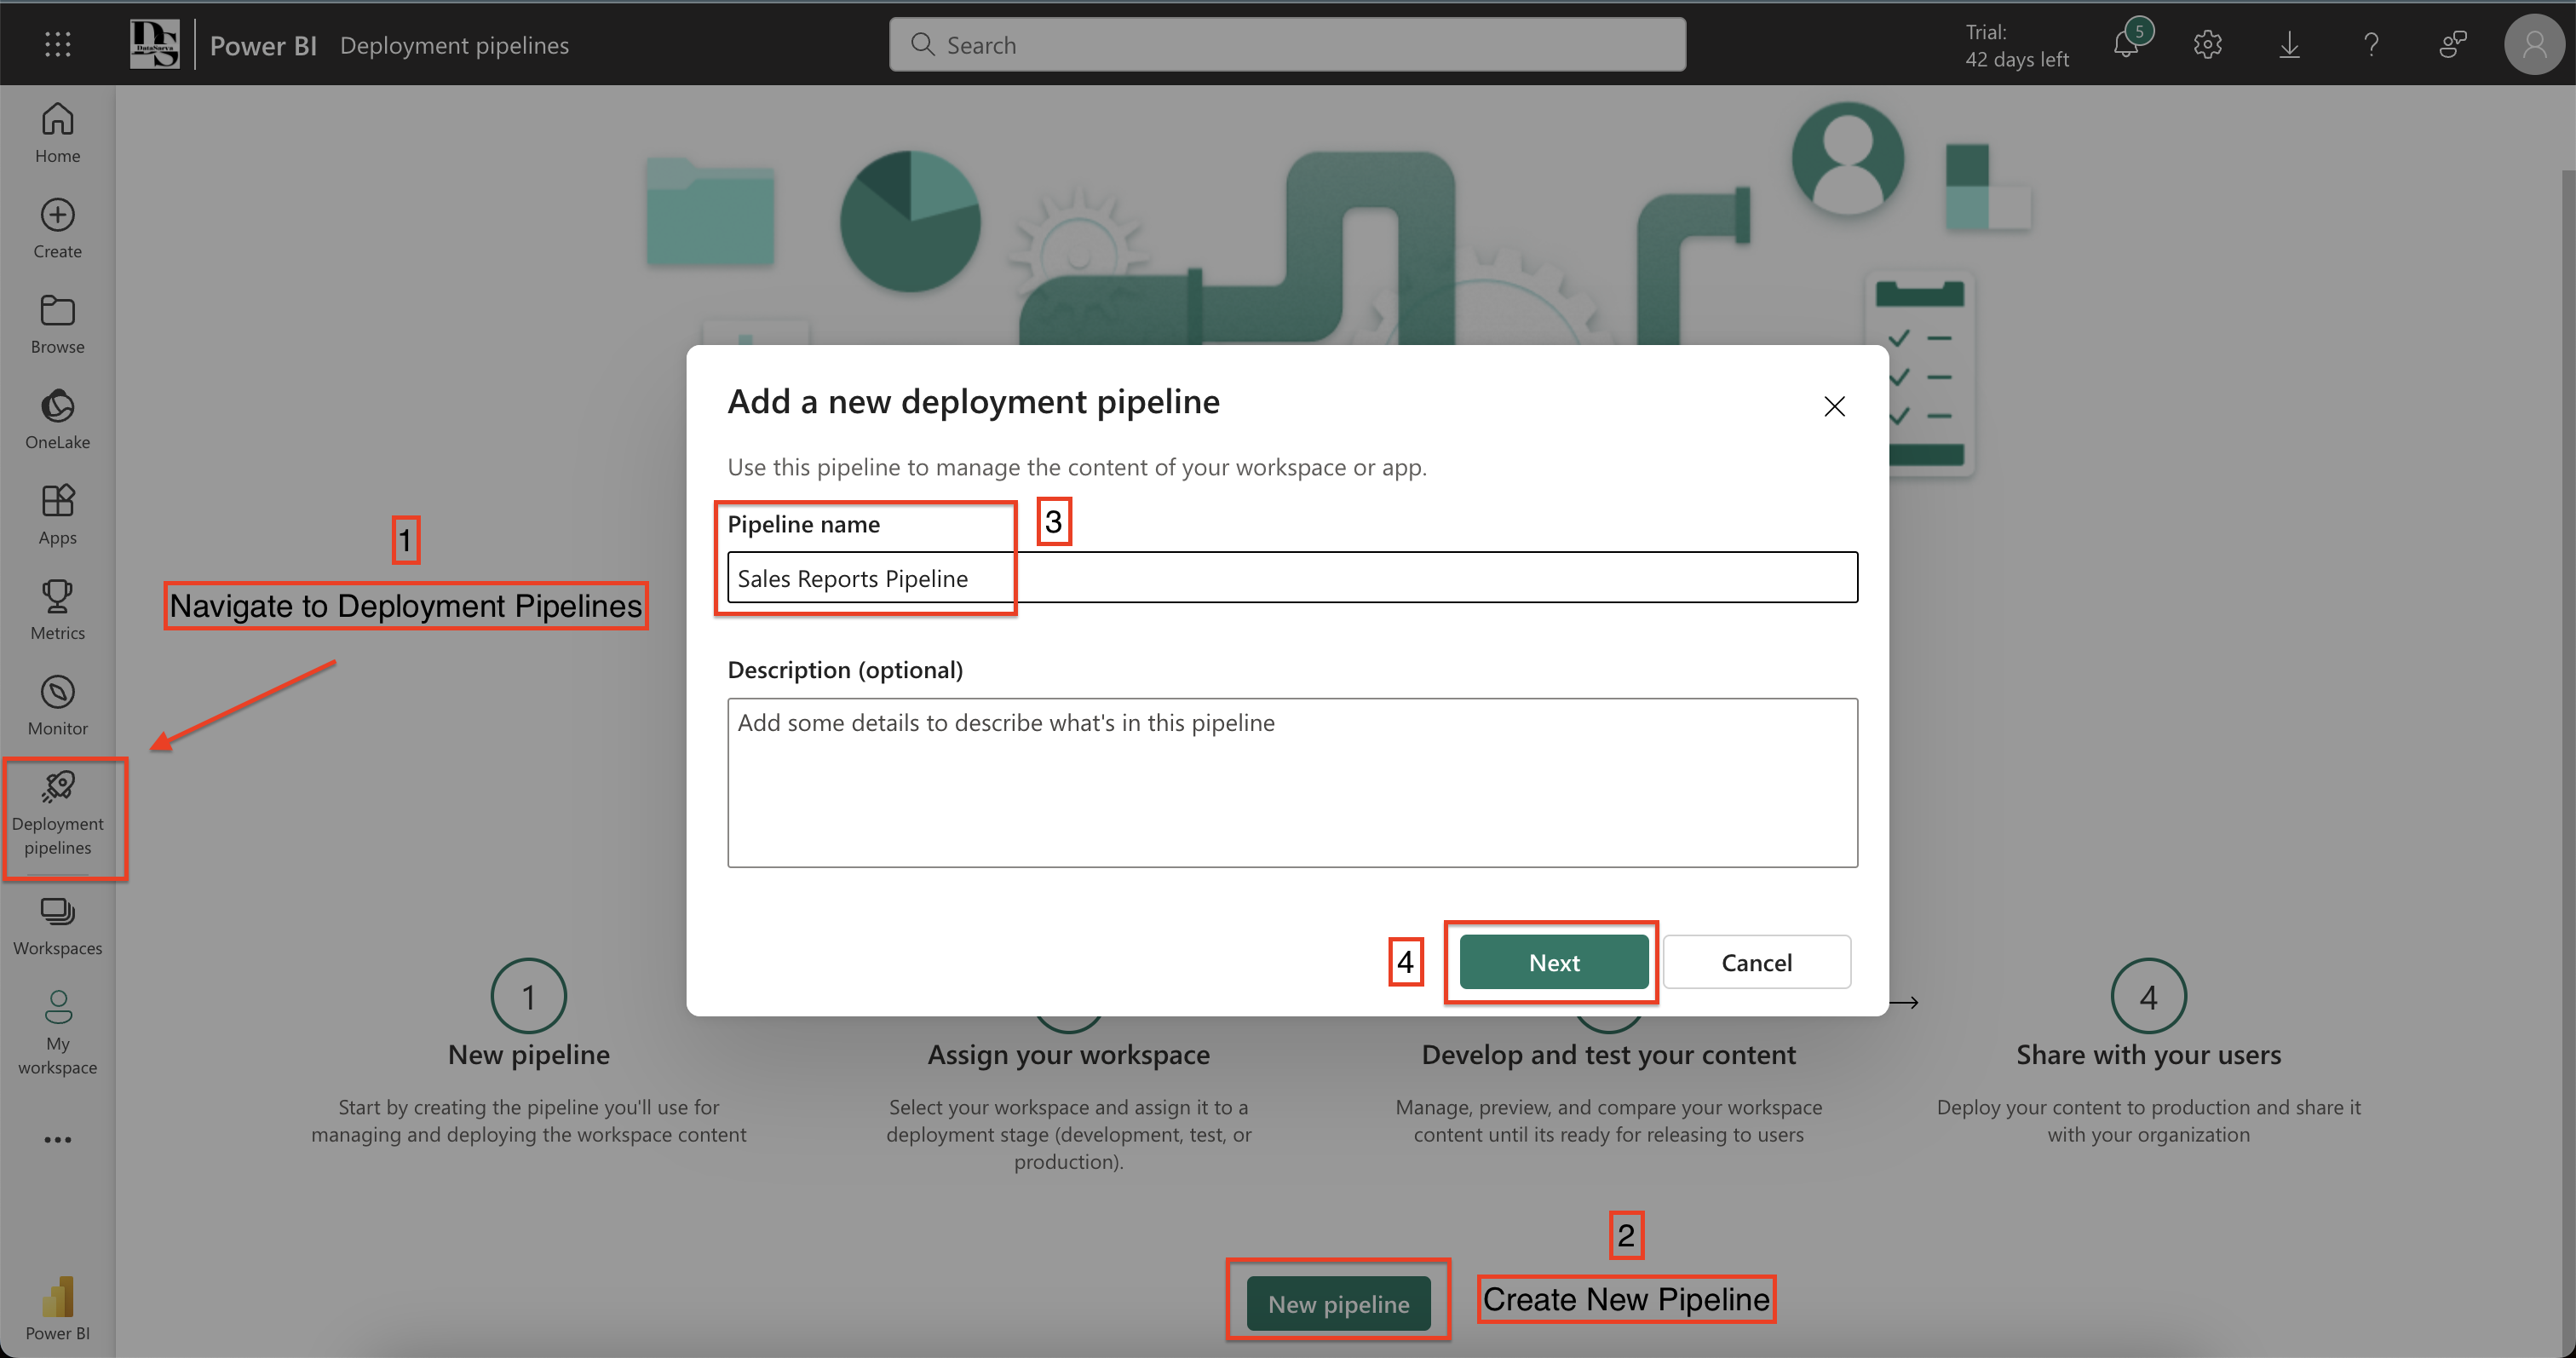
3. Creating the Deployment Pipeline
Now, let’s set up our pipeline:
- Navigate to ‘Deployment Pipelines’ in Power BI Service
- Click ‘Create pipeline’
- Name your pipeline (e.g., “Sales Reports Pipeline”)
- Assign appropriate access permissions
- Click ‘Create’
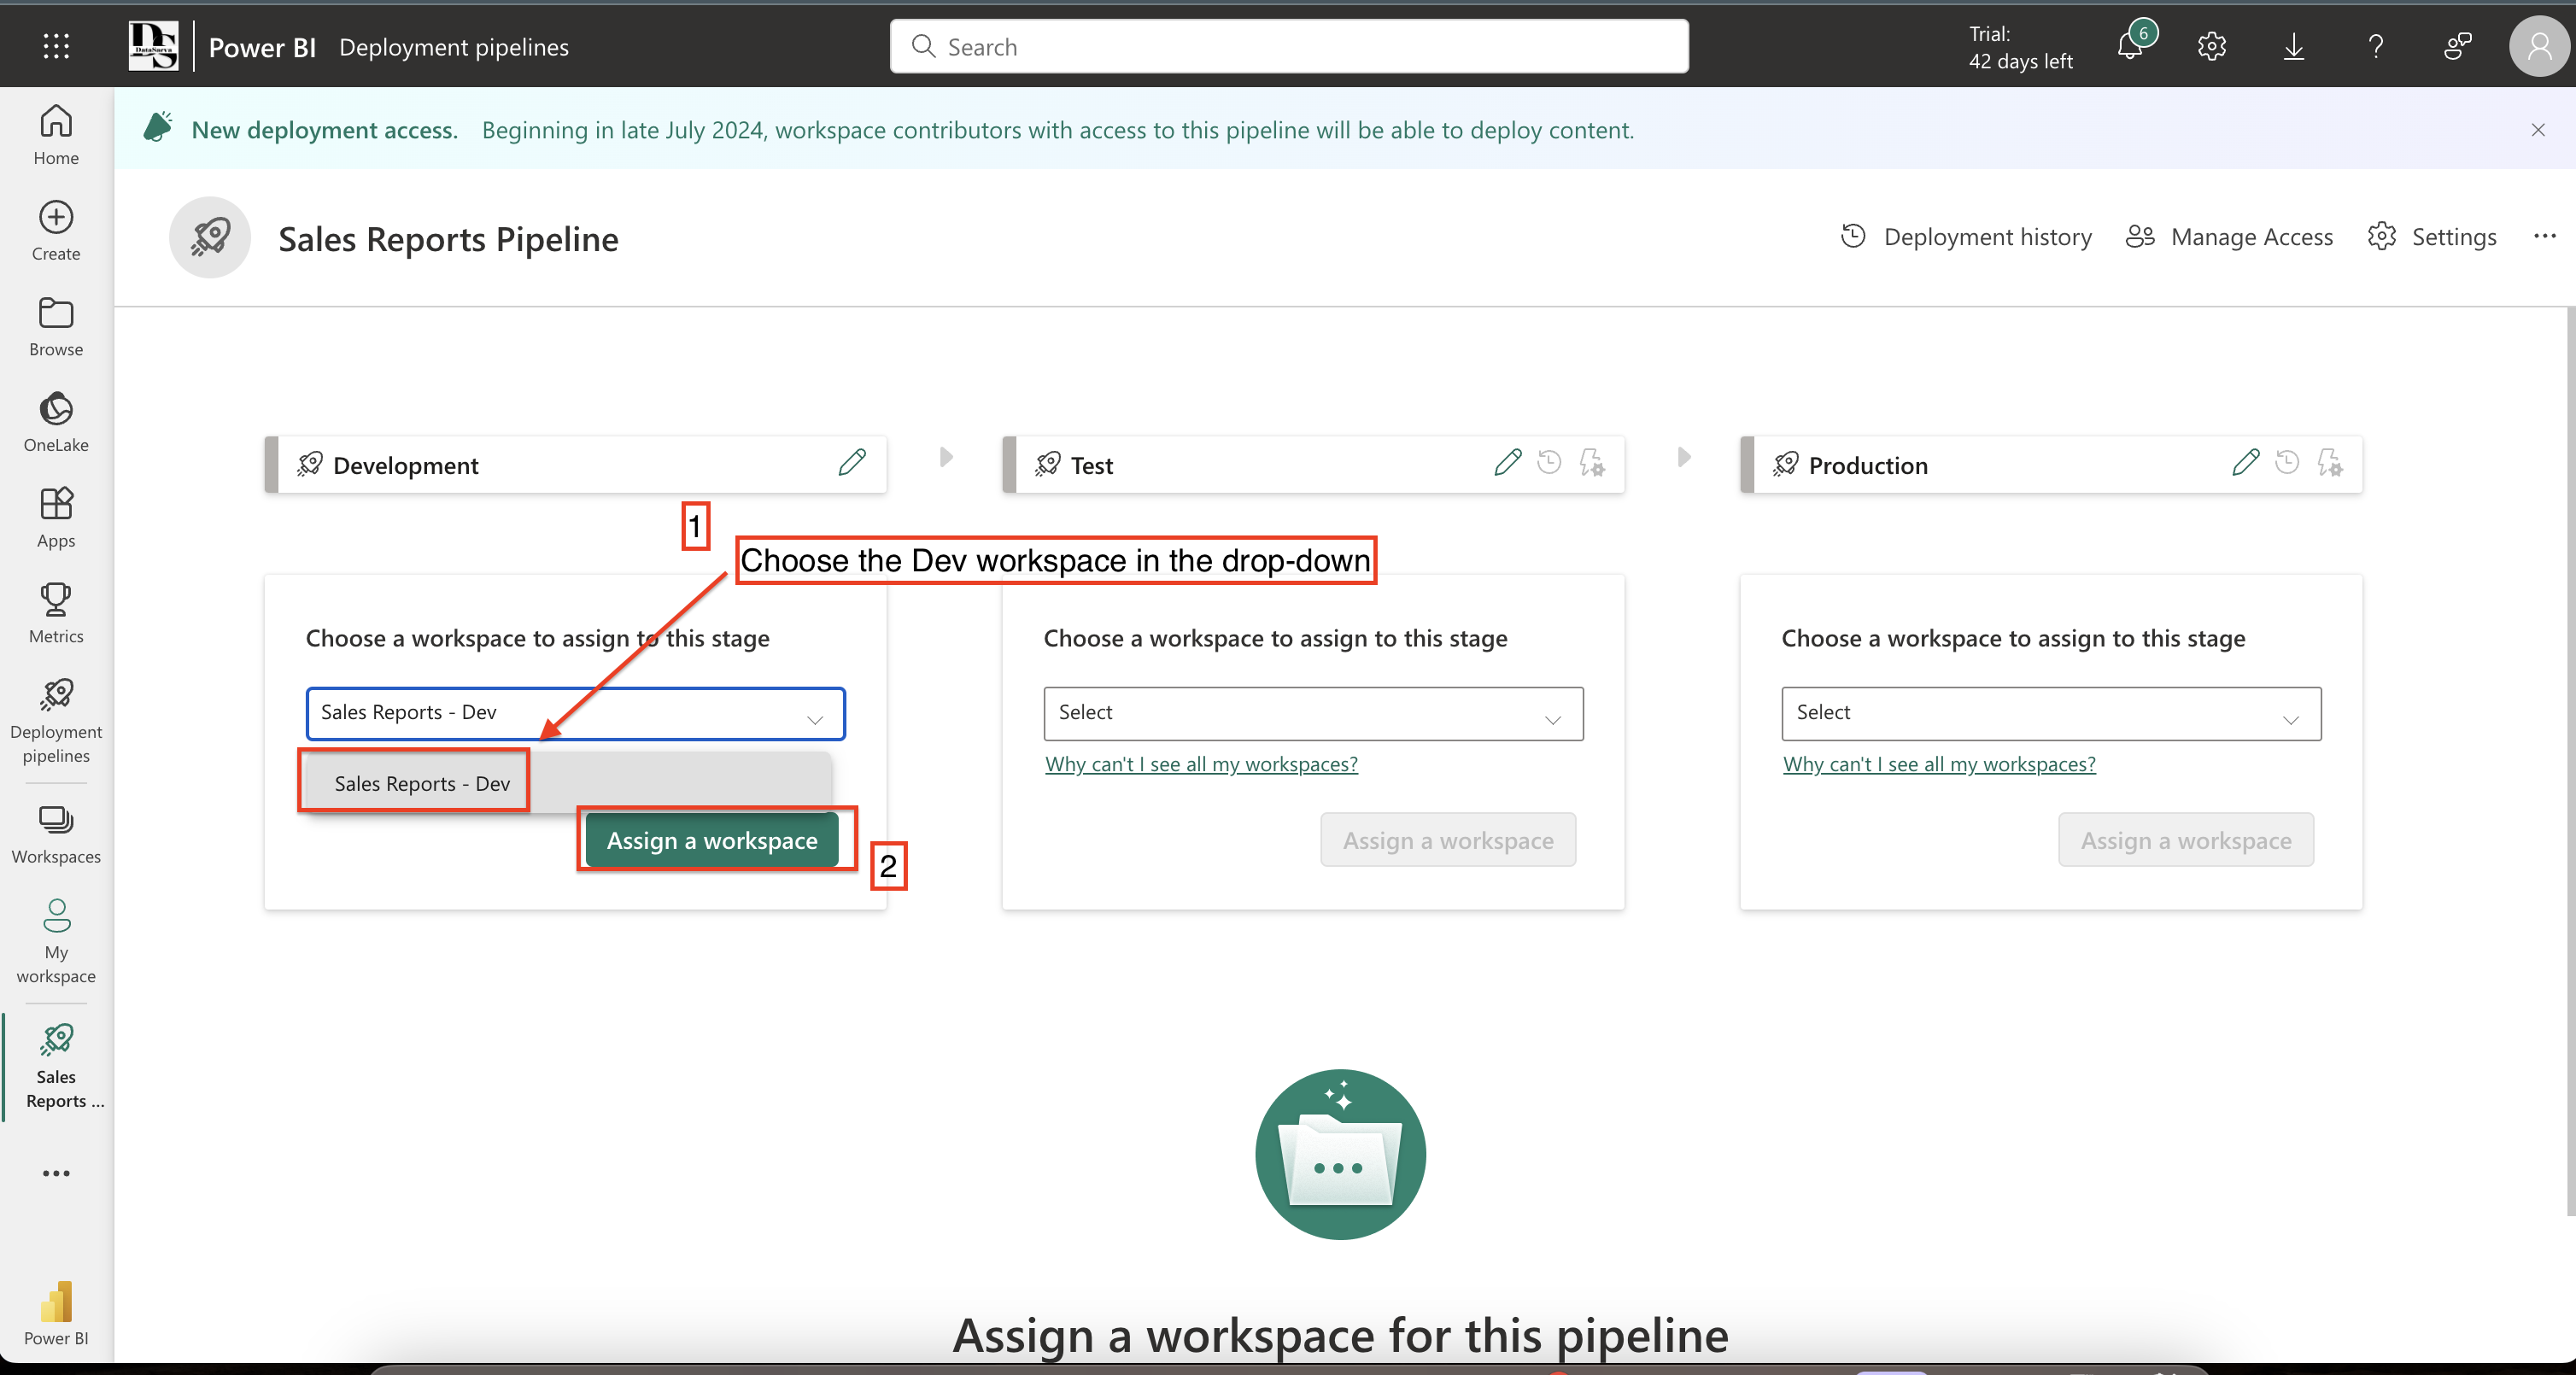
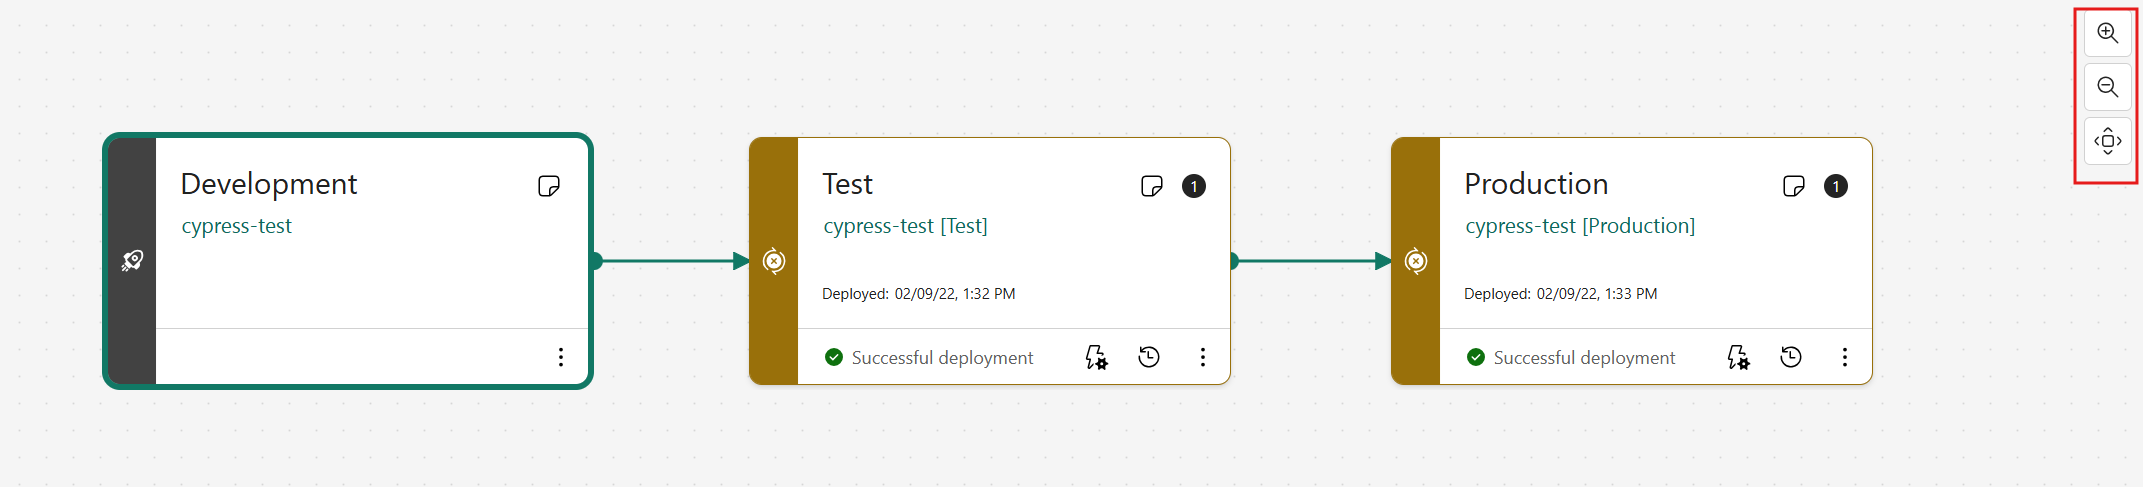
4. Setting Up Pipeline Stages
The pipeline needs three stages:
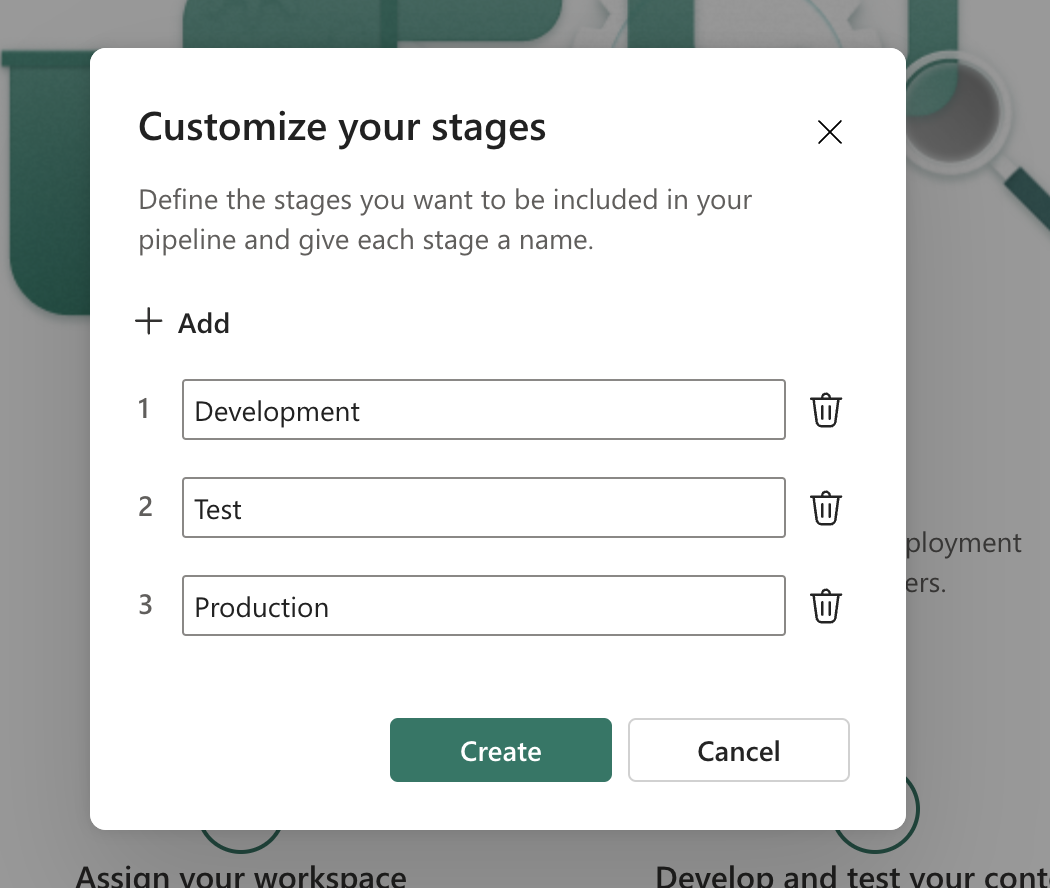
-
Development Stage
- Click ‘Assign workspace’ in the Development stage
- Select your development workspace - ‘Sales Reports - Dev’
- Confirm the assignment
-
Test Stage
- Create a new workspace called “Sales Reports - Test” or [click on Deploy within the Test Stage, Fabric will automatically create new workspaces(TEST, PROD) in the background and assign it to the pipeline stages (Test, Prod) repectively.]
- Click ‘Assign workspace’ in the Test stage
- Select your test workspace
- Confirm the assignment
-
Production Stage
- Create a new workspace called “Sales Reports - Prod”
- Click ‘Assign workspace’ in the Production stage
- Select your production workspace
- Confirm the assignment
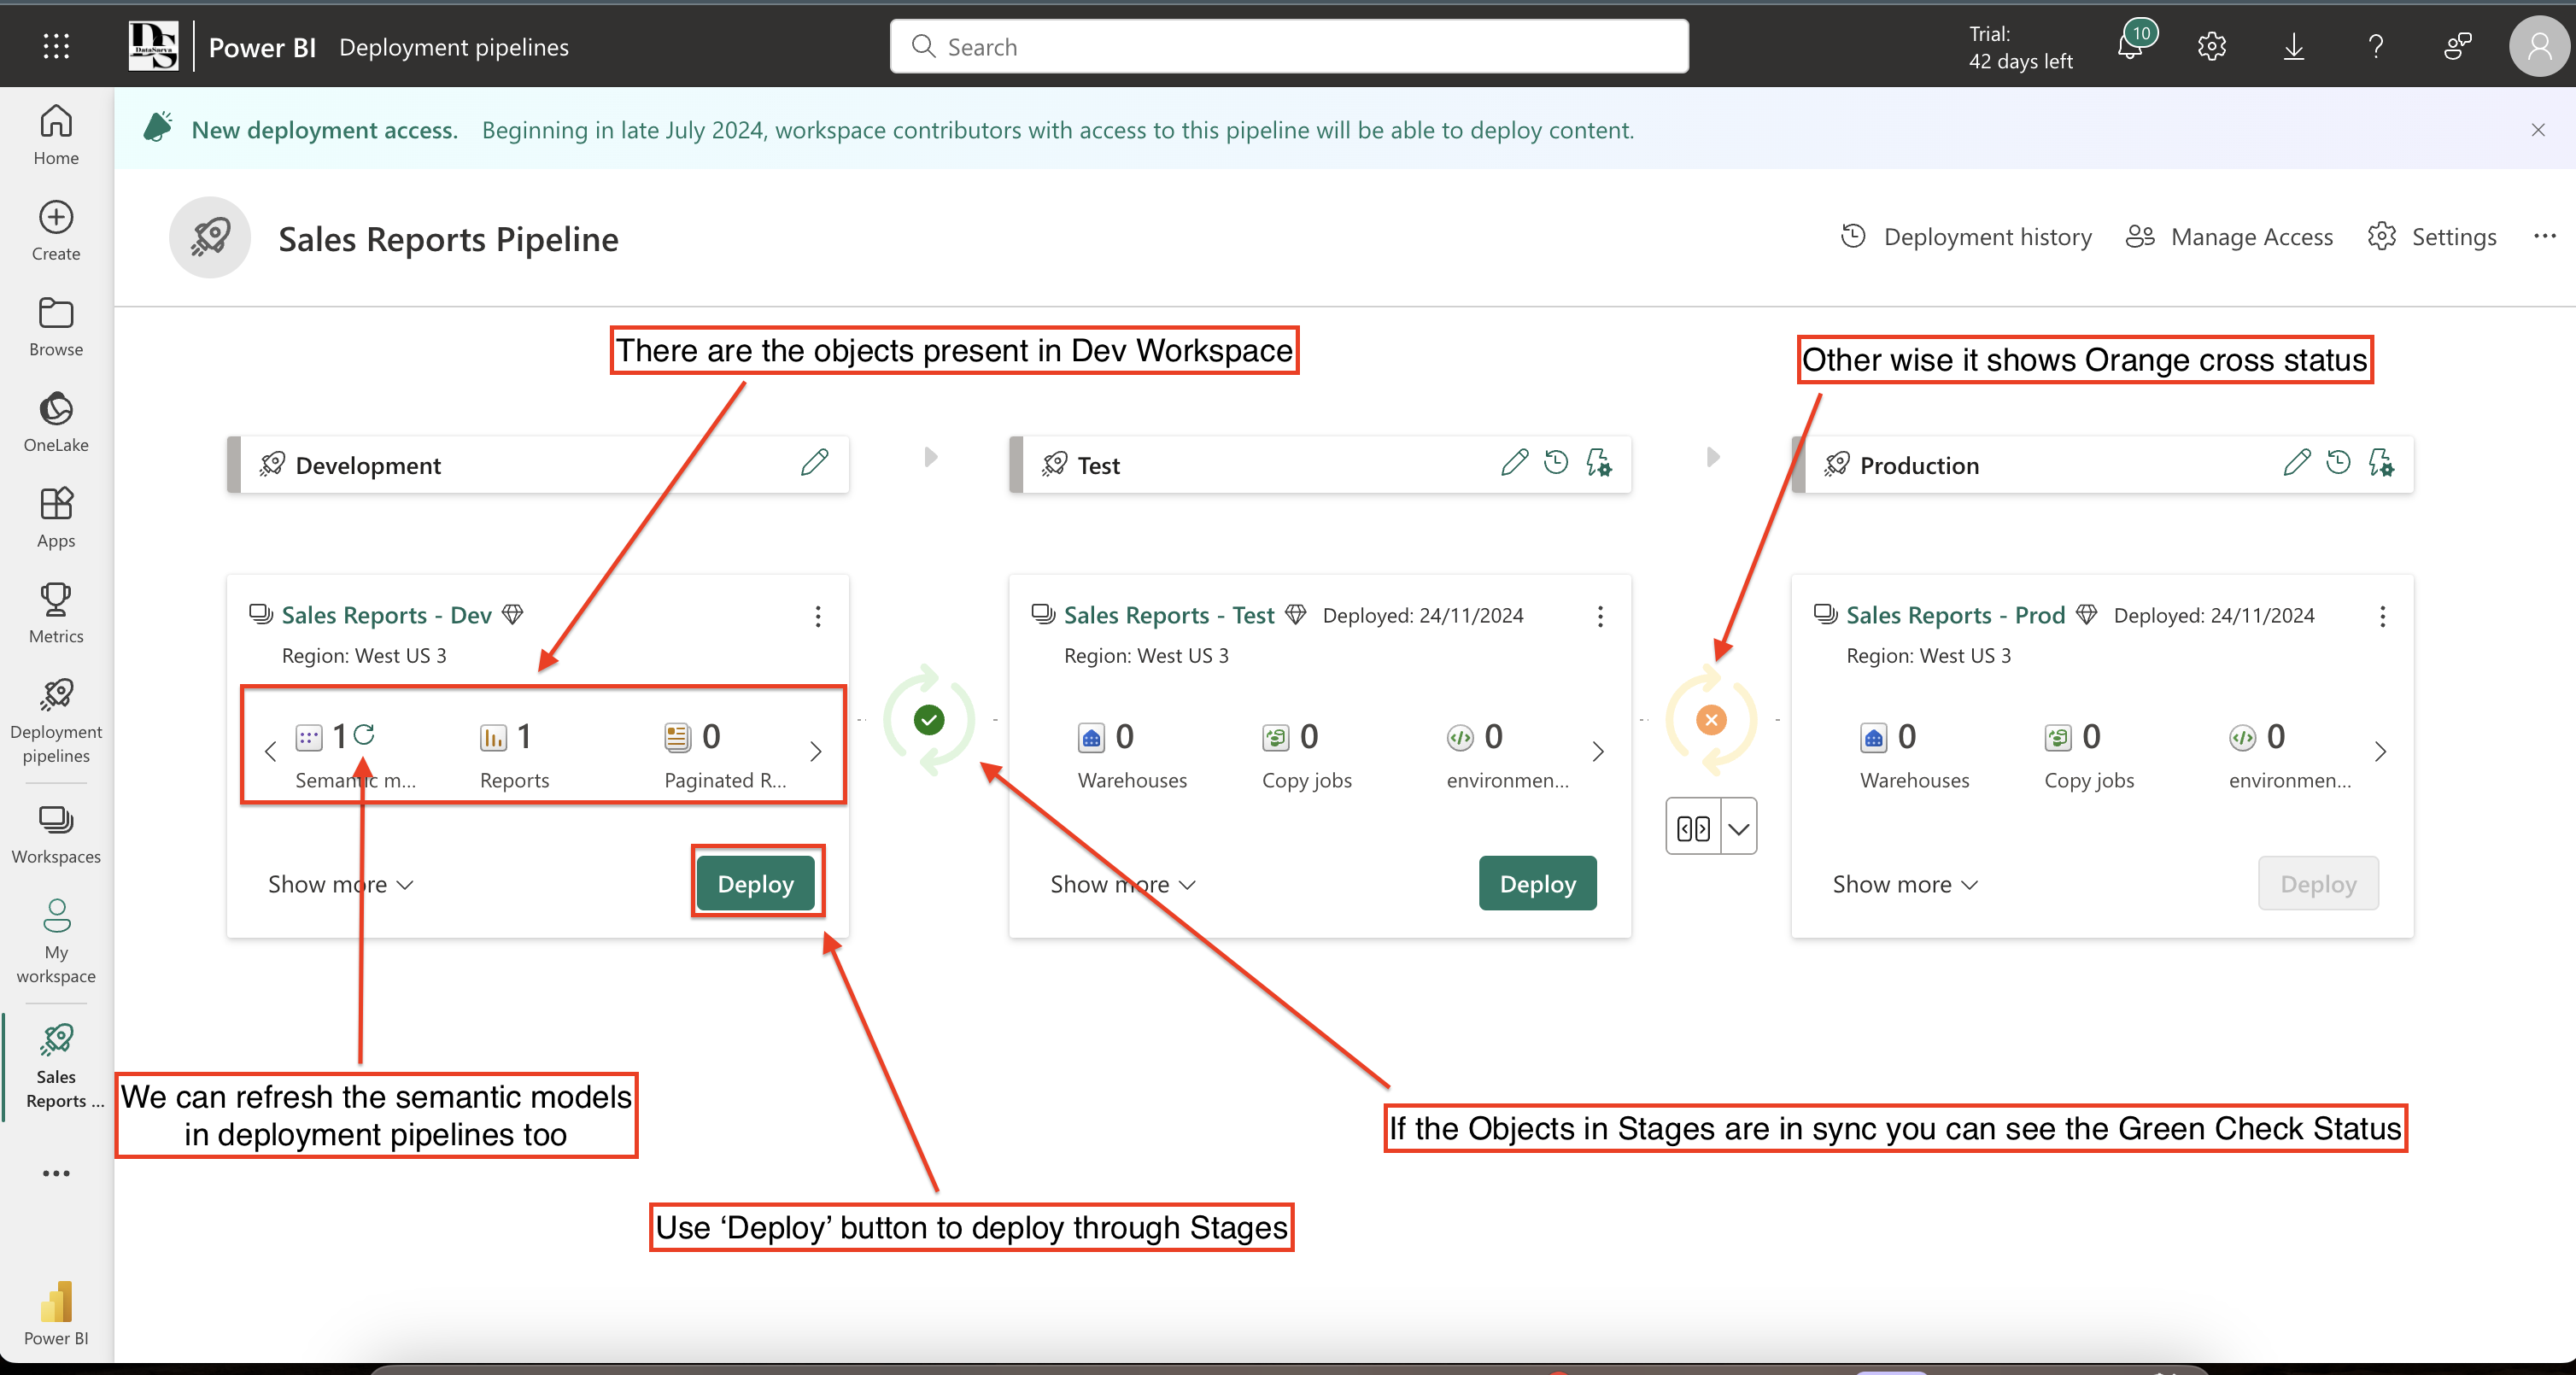
5. Deploying Through Stages
Development to Test
-
In the deployment pipeline view:
- Locate your report in the Development stage
- Click the ‘Deploy’ button between Dev and Test
- Review the deployment settings
- Click ‘Deploy’ to proceed
-
During deployment, Power BI will:
- Copy the report to the test workspace
- Update data source connections if configured
- Maintain report relationships and dependencies
Test to Production
After testing is complete:
- Navigate to the deployment pipeline
- Click the ‘Deploy’ button between Test and Prod
- Review deployment settings
- Confirm the deployment
Best Practices for Deployment
1. Pre-Deployment Checklist
Before deploying to any stage, verify:
- Report loads correctly
- All visuals are working
- Data refreshes properly
- Parameters are correctly set
- Security roles are properly configured
2. Testing Protocol
In the Test environment:
- Verify all calculations
- Check parameter functionality
- Test row-level security
- Validate data refresh
- Perform user acceptance testing
3. Production Deployment
Before deploying to production:
- Schedule deployment during off-peak hours
- Notify stakeholders of upcoming changes
- Backup production version if possible
- Document all changes being deployed
Understanding how Large/Enterprise Organizations approach Power BI Development and Deployment
Large organizations approach Business Intelligence (BI) development fundamentally differently from smaller companies. Where small to mid-sized organizations might rely on individual developers working with simple PBIX files and manual deployment processes, large enterprises have evolved a much more sophisticated and structured approach to BI development.
Centralized BI teams have replaced individual developers, creating a more integrated and systematic approach to developing, managing, and deploying business intelligence resources. This shift requires robust tools and methodologies that can support multiple developers working simultaneously on interconnected projects. Version control has become a critical component of this new approach. The need for collaborative, version-controlled, and scalable BI development has become paramount.
The Power BI Project (PBIP) format emerges as a critical solution to these challenges. Unlike traditional PBIX files, PBIP introduces a structured, folder-based approach that breaks down reports into manageable components. This format allows multiple developers to work on the same project simultaneously, providing unprecedented flexibility and collaboration.
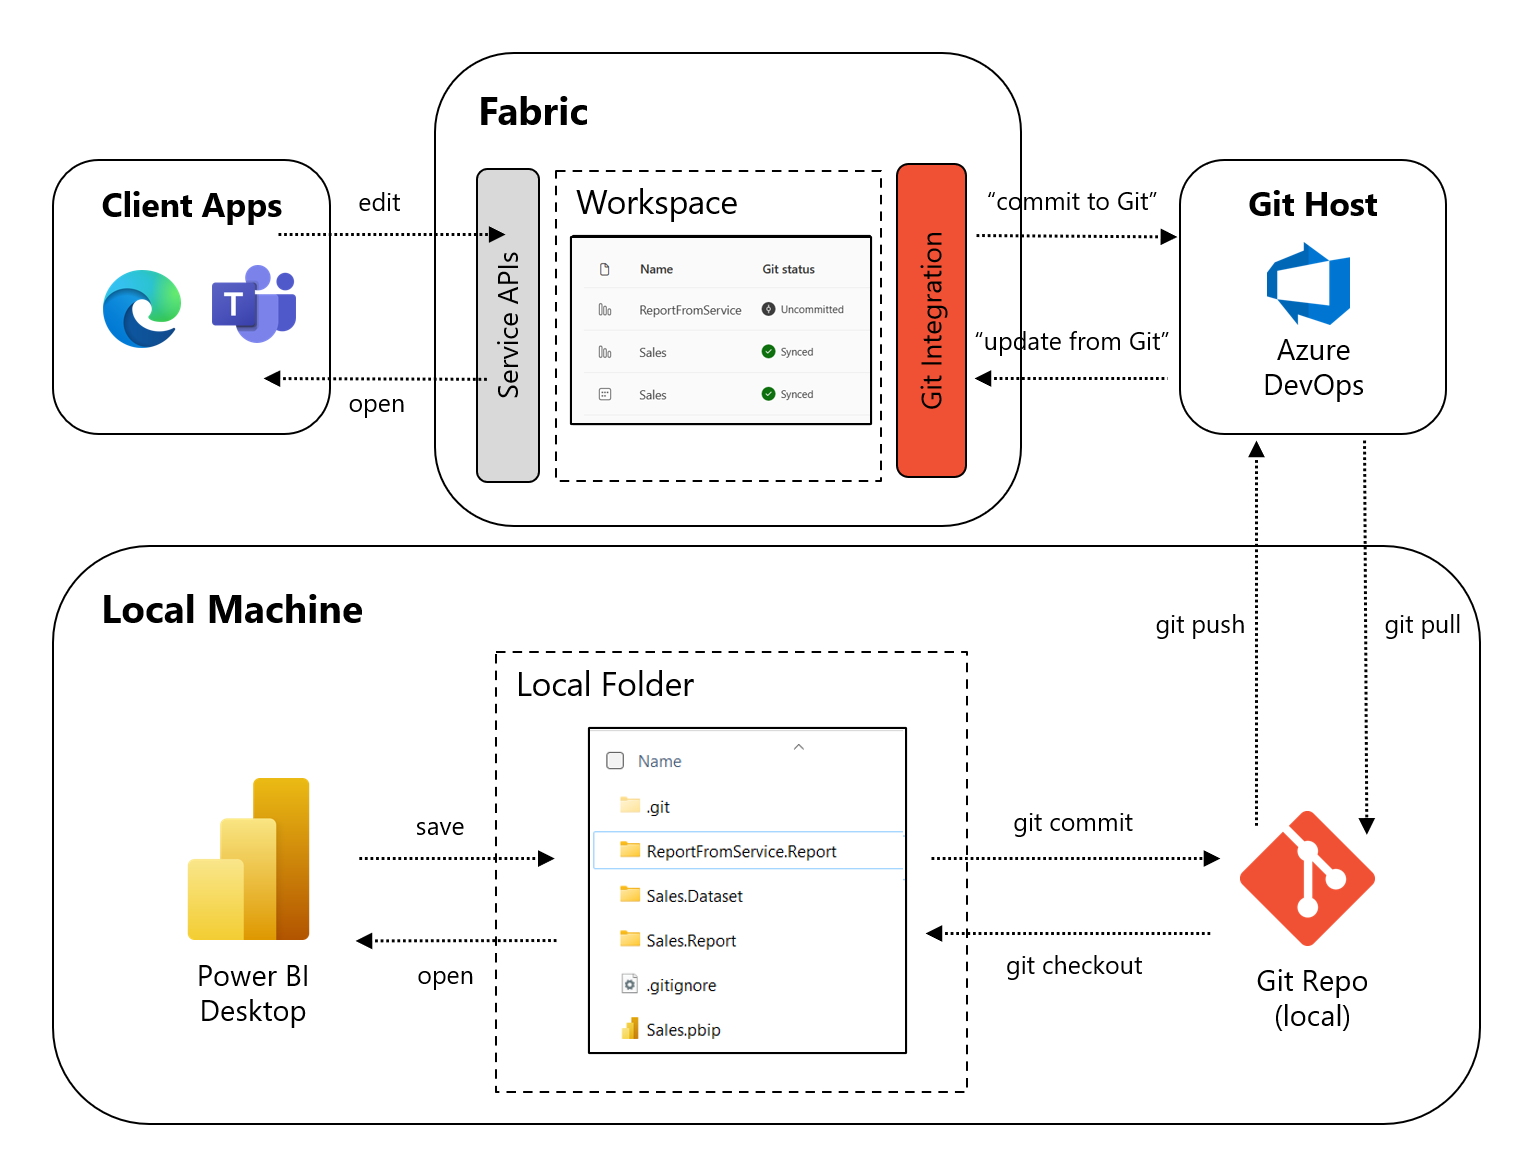
Git integration in Microsoft Fabric represents a game-changing approach for enterprise BI teams. By leveraging Git repositories, organizations can now track every change, manage different versions, and create comprehensive version histories of their business intelligence assets. This approach transforms BI development from a linear, isolated process to a dynamic, collaborative workflow.
Azure DevOps becomes the central nervous system of this new development approach. It provides a robust platform that integrates seamlessly with the PBIP format and Git workflows. Teams can now implement detailed code review processes, manage branches, and create sophisticated deployment pipelines that were previously impossible in traditional BI development.
Instead of working with isolated binary files, enterprises can now leverage advanced file formats like PBIP (Project files), PBIR (Source control-friendly formats), and sophisticated Git-based version control systems. These technologies enable teams to track changes, manage concurrent development, and maintain a comprehensive history of their BI assets. Developers can now work on the same project simultaneously, with clear mechanisms for reviewing, merging, and approving changes.
Let’s Talk more about PBIP Format
The Power BI Project (PBIP) format represents a significant advancement in how Power BI reports and semantic models are stored and managed. This new file format offers several key benefits for Power BI developers and data professionals.
Structure and Components
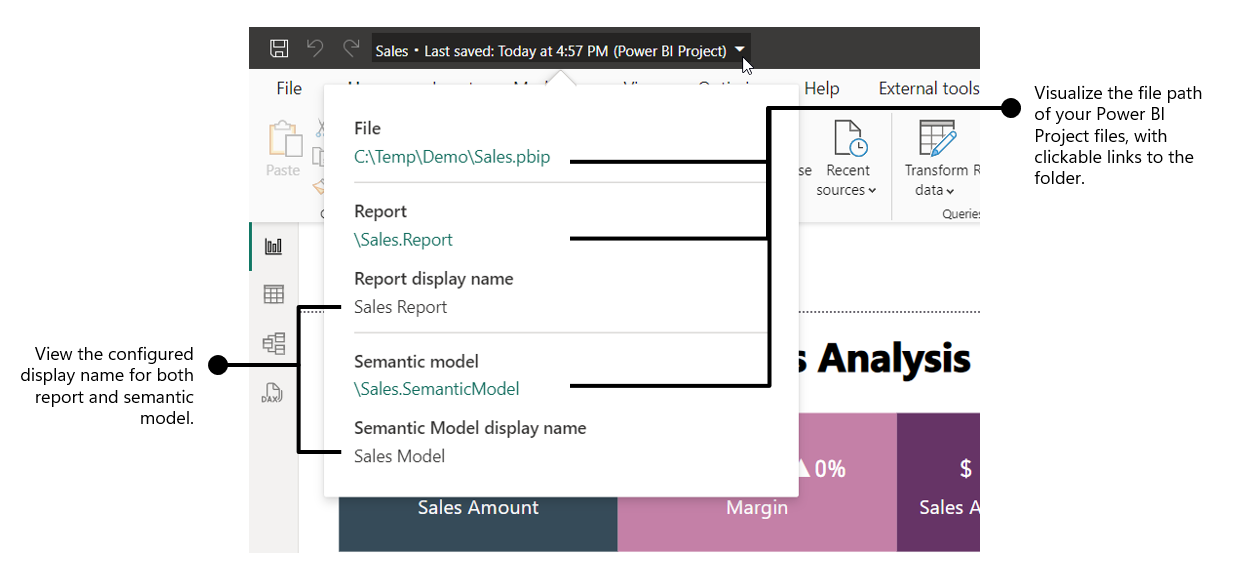
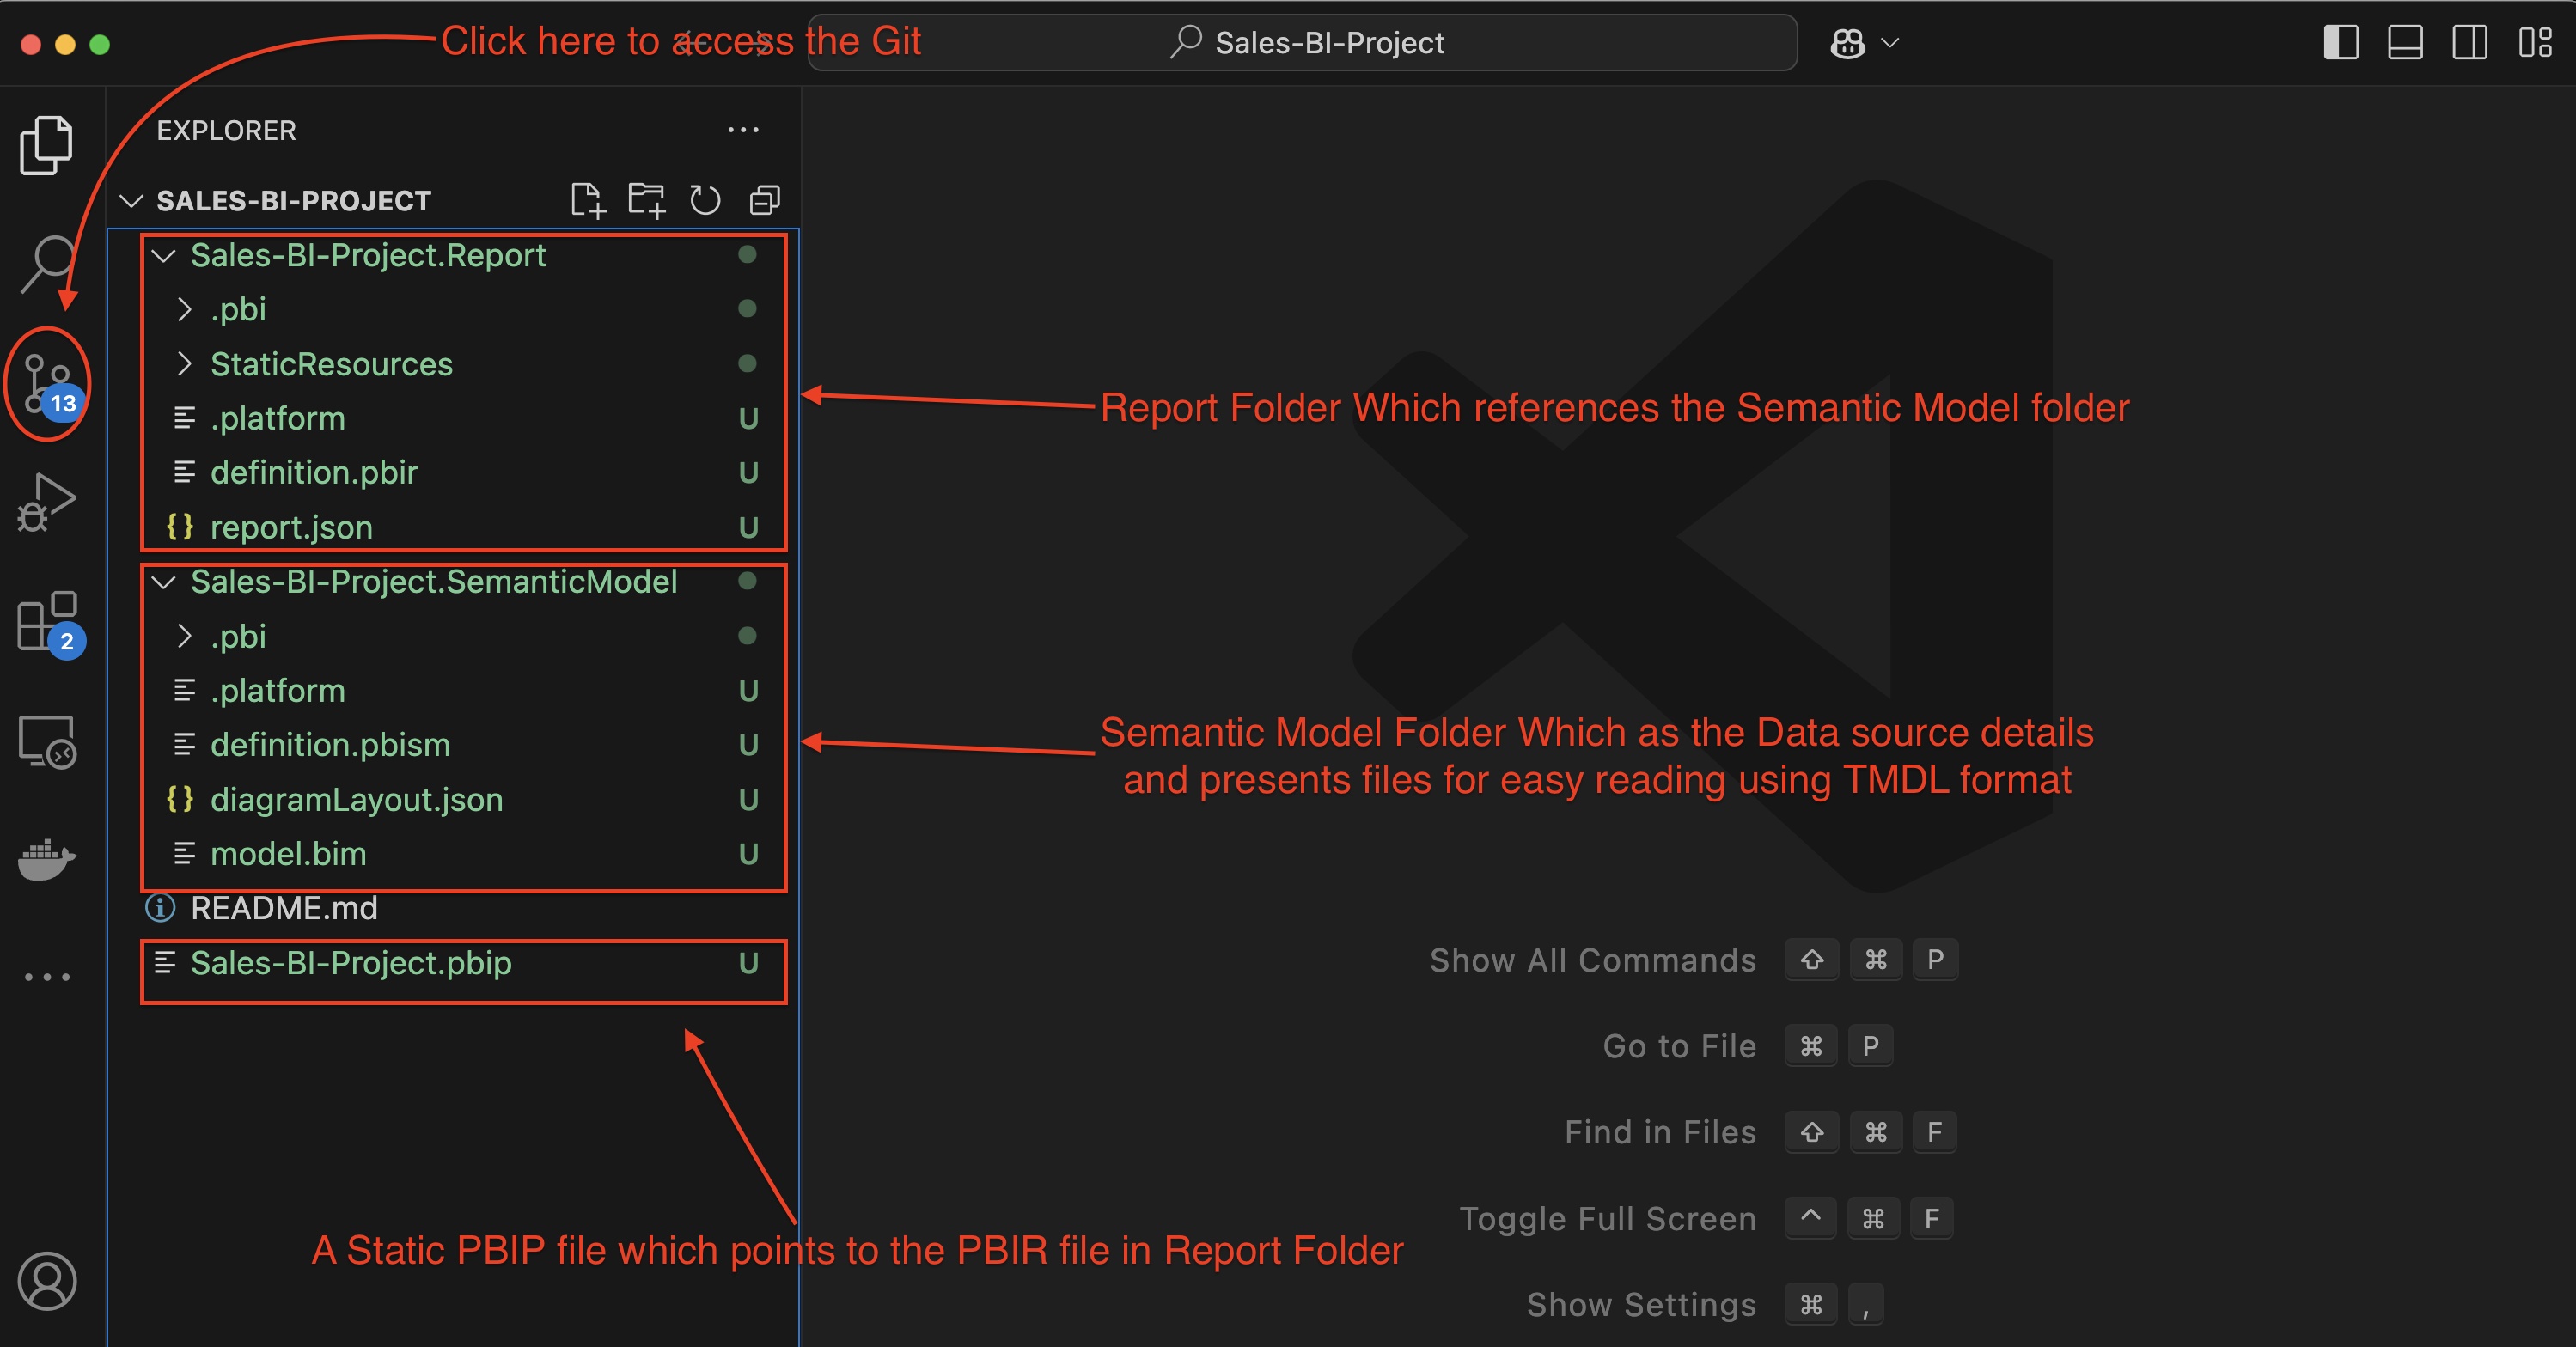
A PBIP file is not a single binary file like the traditional PBIX format. Instead, it’s a collection of folders and files that organize Power BI report components in a source control-friendly structure16. The main components include:
- Pbip file: This serves as a pointer to the report folder.
- Report folder: Contains the report definition files in the Power BI enhanced report format (PBIR).
- Semantic model folder: Stores the data model files using the Tabular Model Definition Language (TMDL).
- A .gitignore file: Specifies files that should be ignored by version control systems

Key Advantages
- Source Control Integration: PBIP format enables seamless integration with version control systems like Git. This allows for better collaboration, change tracking, and version management of Power BI reports.
- Human-Readable Files: Unlike the opaque PBIX format, PBIP stores report and semantic model definitions in human-readable text files. This makes it easier to understand, review, and edit the underlying code of Power BI components.
- Code Editor Support: Developers can now edit Power BI reports and semantic models using standard code editors like Visual Studio Code. This is particularly useful for making programmatic changes and leveraging developer tools for Power BI development.
- Improved Collaboration: The PBIP format facilitates better teamwork by allowing multiple developers to work on different parts of a report simultaneously, leveraging branching and merging capabilities of version control systems.
Working with PBIP Files
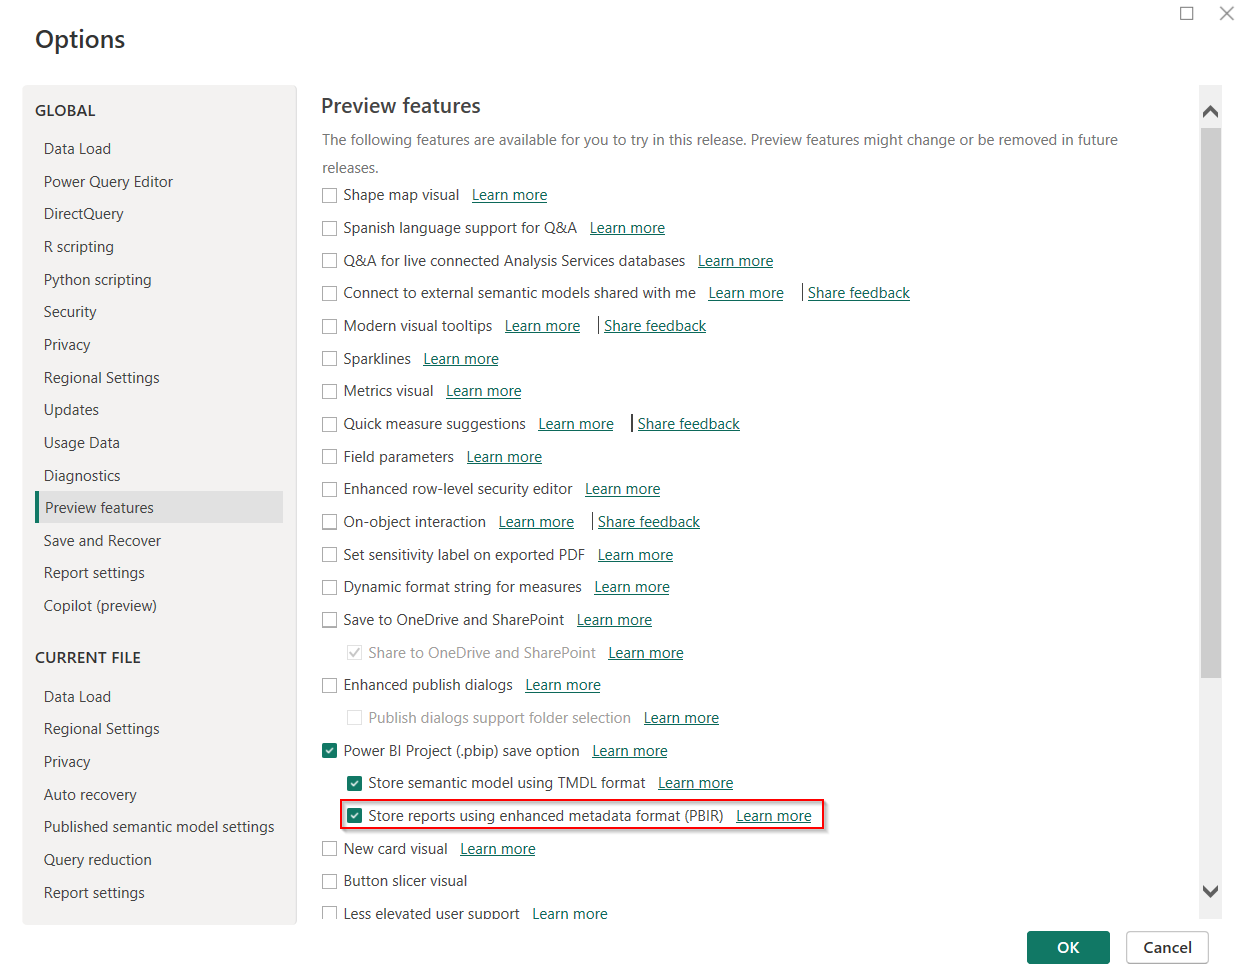
To start using PBIP files:
- Enable the feature in Power BI Desktop under Options and Settings –> Preview features.
- Now Save your existing PBIX file as a PBIP file using the “Save As” option.
- The PBIP structure will be created, containing separate folders for the report and semantic model.
Understanding Git
Git is a distributed version control system that allows multiple developers to work on the same project simultaneously. At its core, Git tracks changes in source code during software development, providing a way to manage different versions of a project efficiently.
The fundamental concept of Git revolves around repositories. A repository contains the entire project history, including all files, commits, and branches. When a developer clones a repository, they receive a complete copy of the project’s entire history, allowing for full offline work and independent development.
Commits are the building blocks of Git. Each commit represents a snapshot of the project at a specific point in time. Every commit has a unique identifier and includes metadata such as the author, timestamp, and a commit message describing the changes made. This approach allows developers to track exactly what changed, when, and by whom.
Branching is where Git truly shines. A branch represents an independent line of development. The default branch in most repositories is called “main” or “master”. When developers want to work on a new feature or experiment, they create a new branch, which allows them to make changes without affecting the main codebase.
Let’s have a look at the available Branching Strategies
Common Branching Models
Feature Branch Workflow
- Each new feature is developed in a separate branch
- Branches are created from the main branch
- Once complete, features are merged back through pull requests
GitFlow Workflow
- Defines strict branching models with main, develop, feature, release, and hotfix branches
- Provides a structured approach for managing complex development cycles
- Ideal for projects with scheduled release cycles
Trunk-Based Development
- Developers frequently merge small, frequent changes to the main branch
- Emphasizes continuous integration and rapid development
- Requires robust automated testing

Implementing CI/CD in Microsoft Fabric at Enterprise Level
Key Components
-
Git Integration
- Enable version control
- Support collaborative workflows
- Track changes effectively
- Manage multiple versions
-
Deployment Pipelines
- Automate transitions between environments
- Maintain consistency across stages
- Reduce manual errors
- Enable rollback capabilities
-
- Deploy dataset definitions
- Deploy report definitions
- Build complex CICD pipelines
- Automate deployment processes
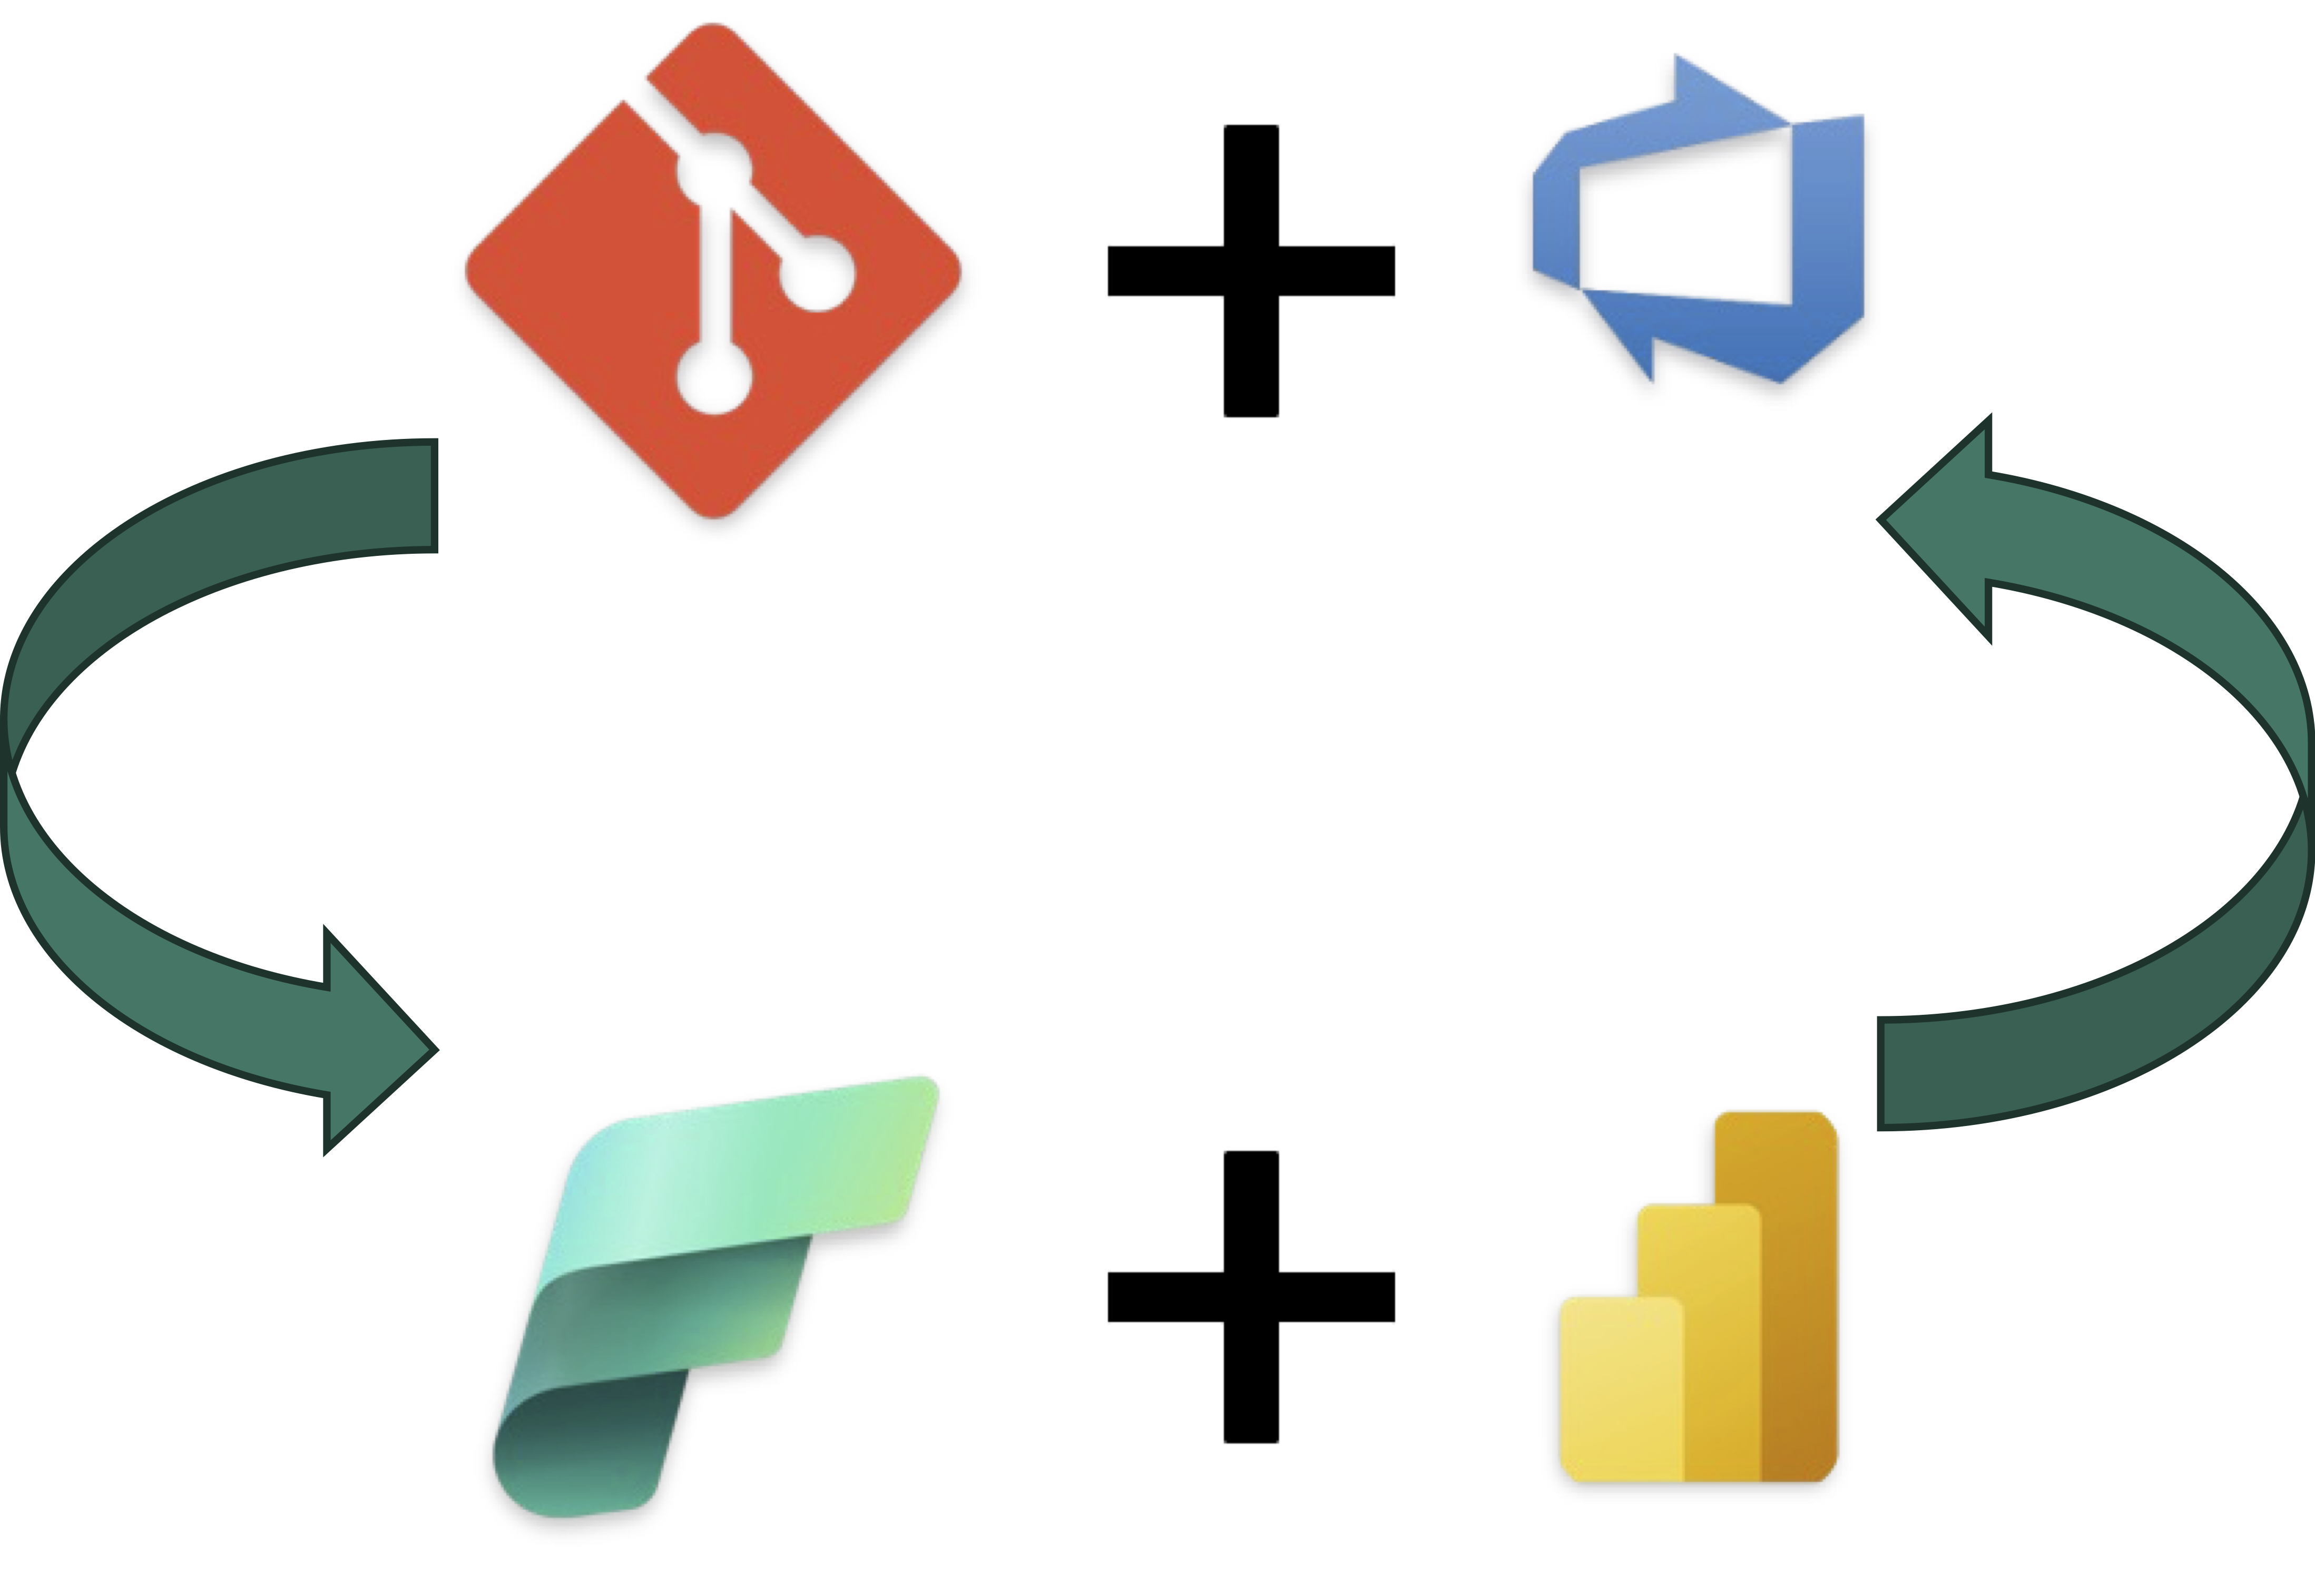
CI – Workflow (PBIP, Azure DevOps, Fabric)
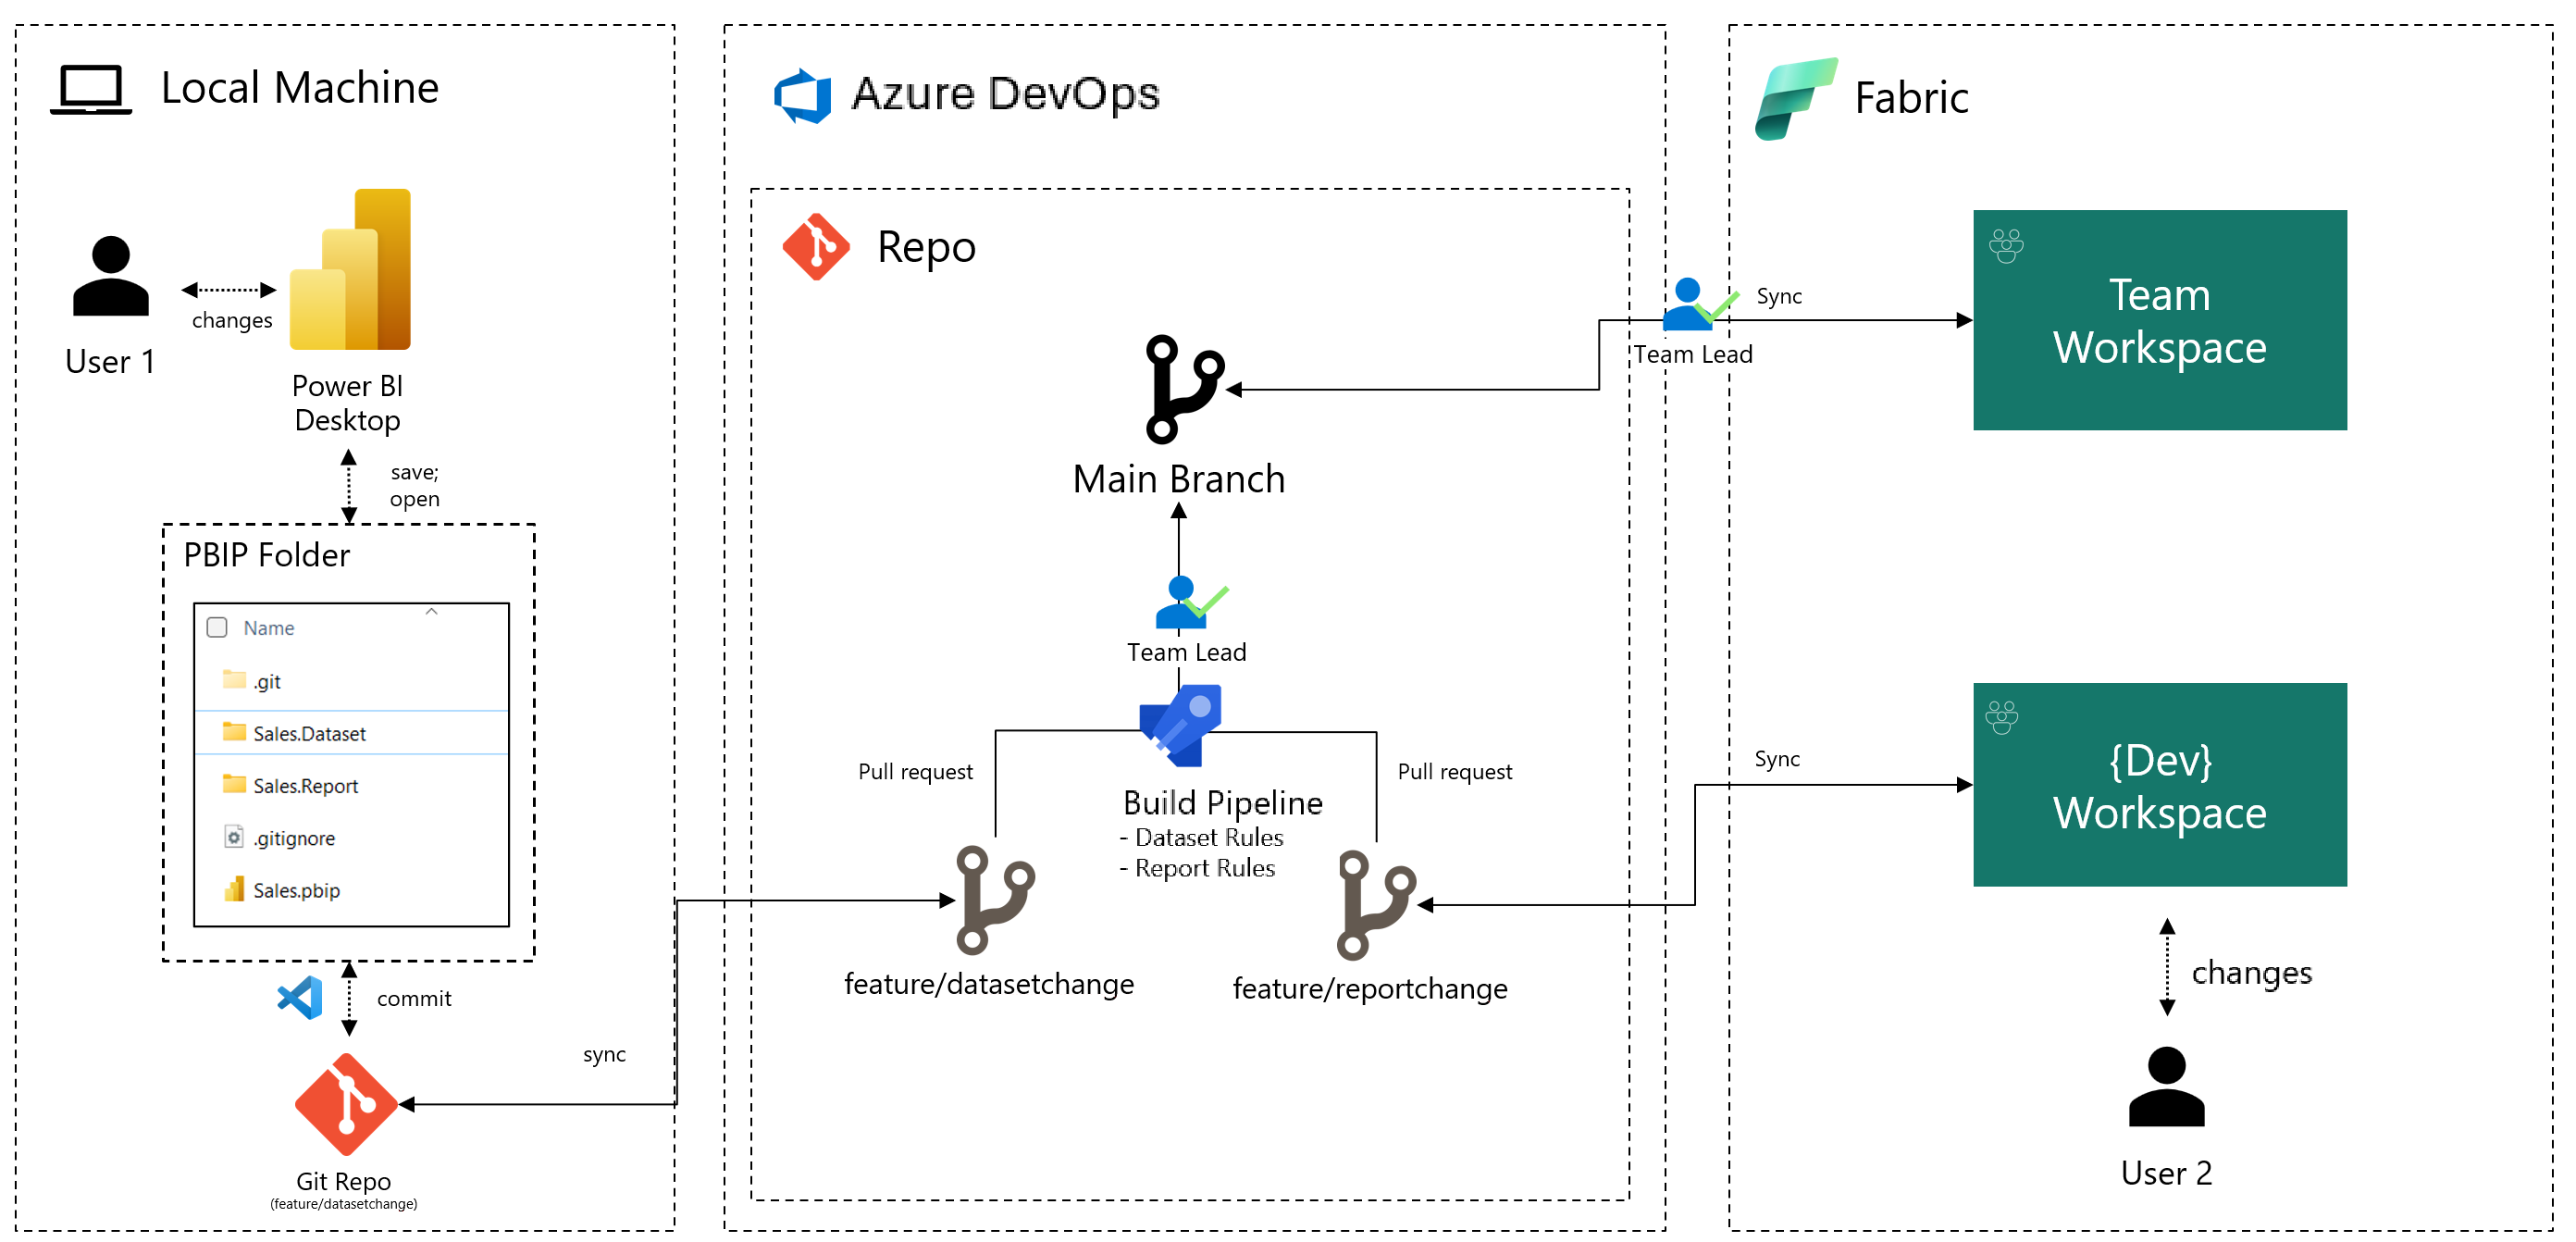
CD - Workflow
Step-by-Step Enterprise BI Development Workflow
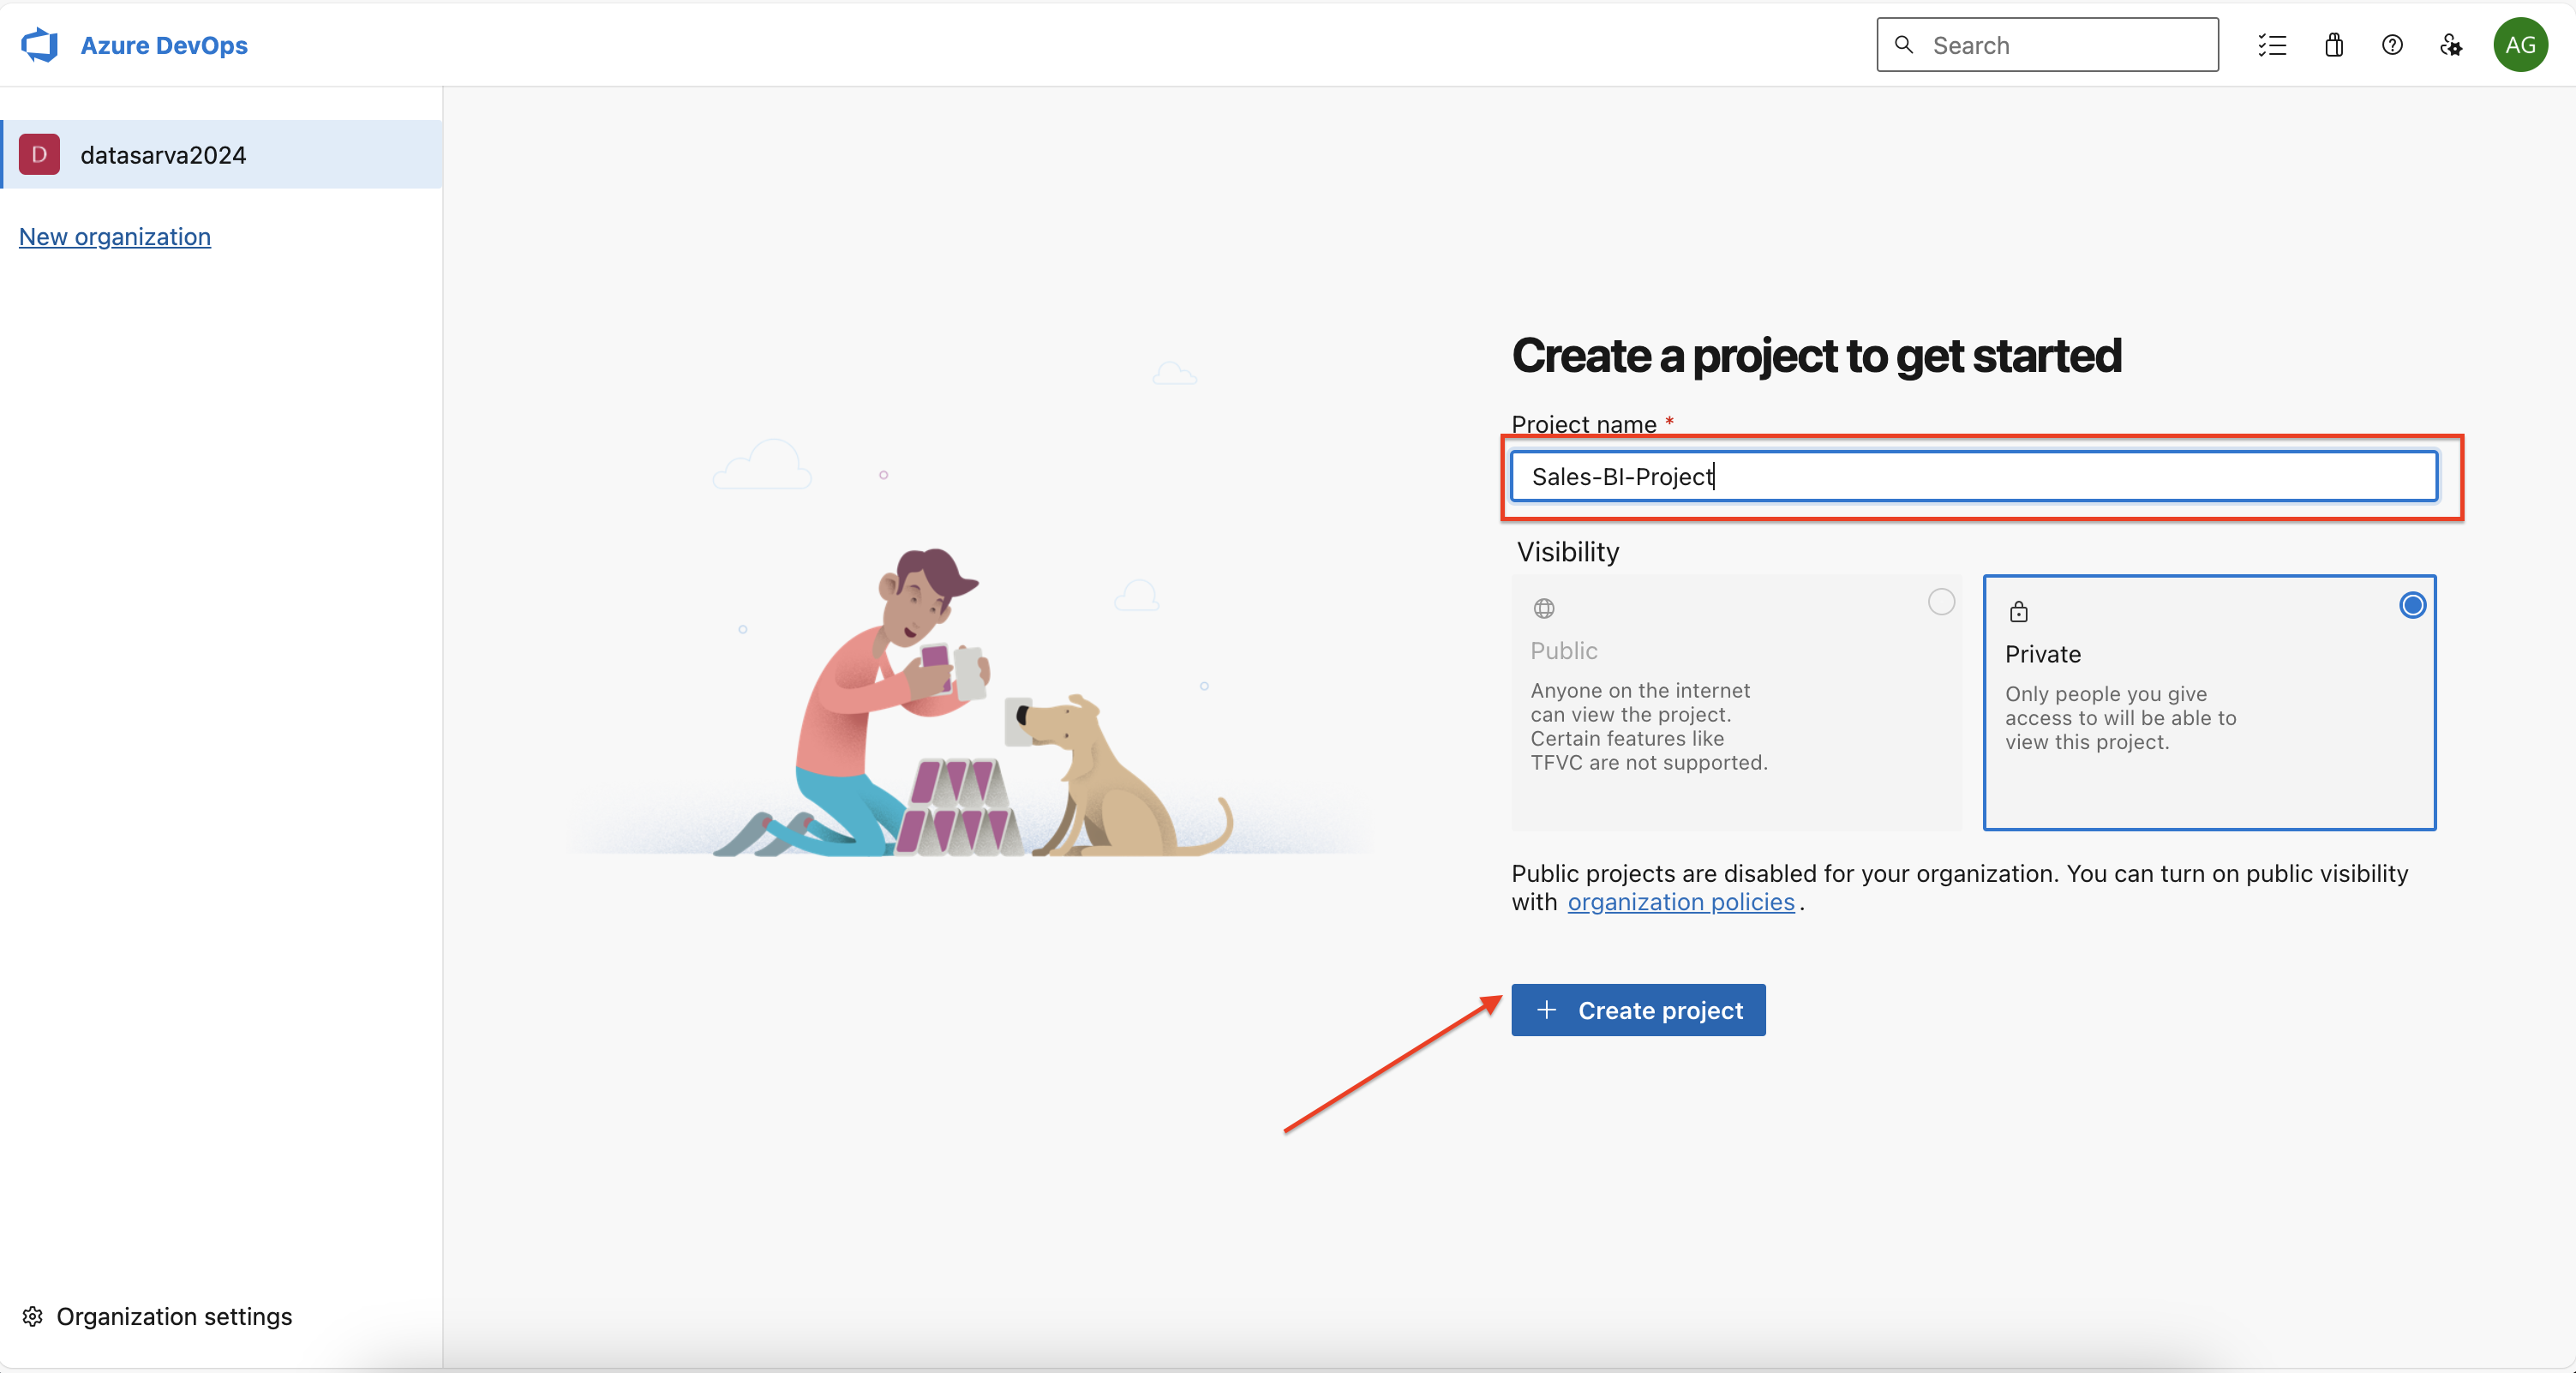
1. Azure DevOps Project Setup
Create Azure DevOps Project
- Log into Azure DevOps
- Click “New Project”
- Name the project (e.g., “Sales-BI-Project”)
- Select visibility (Private recommended for enterprise)
- Create the project
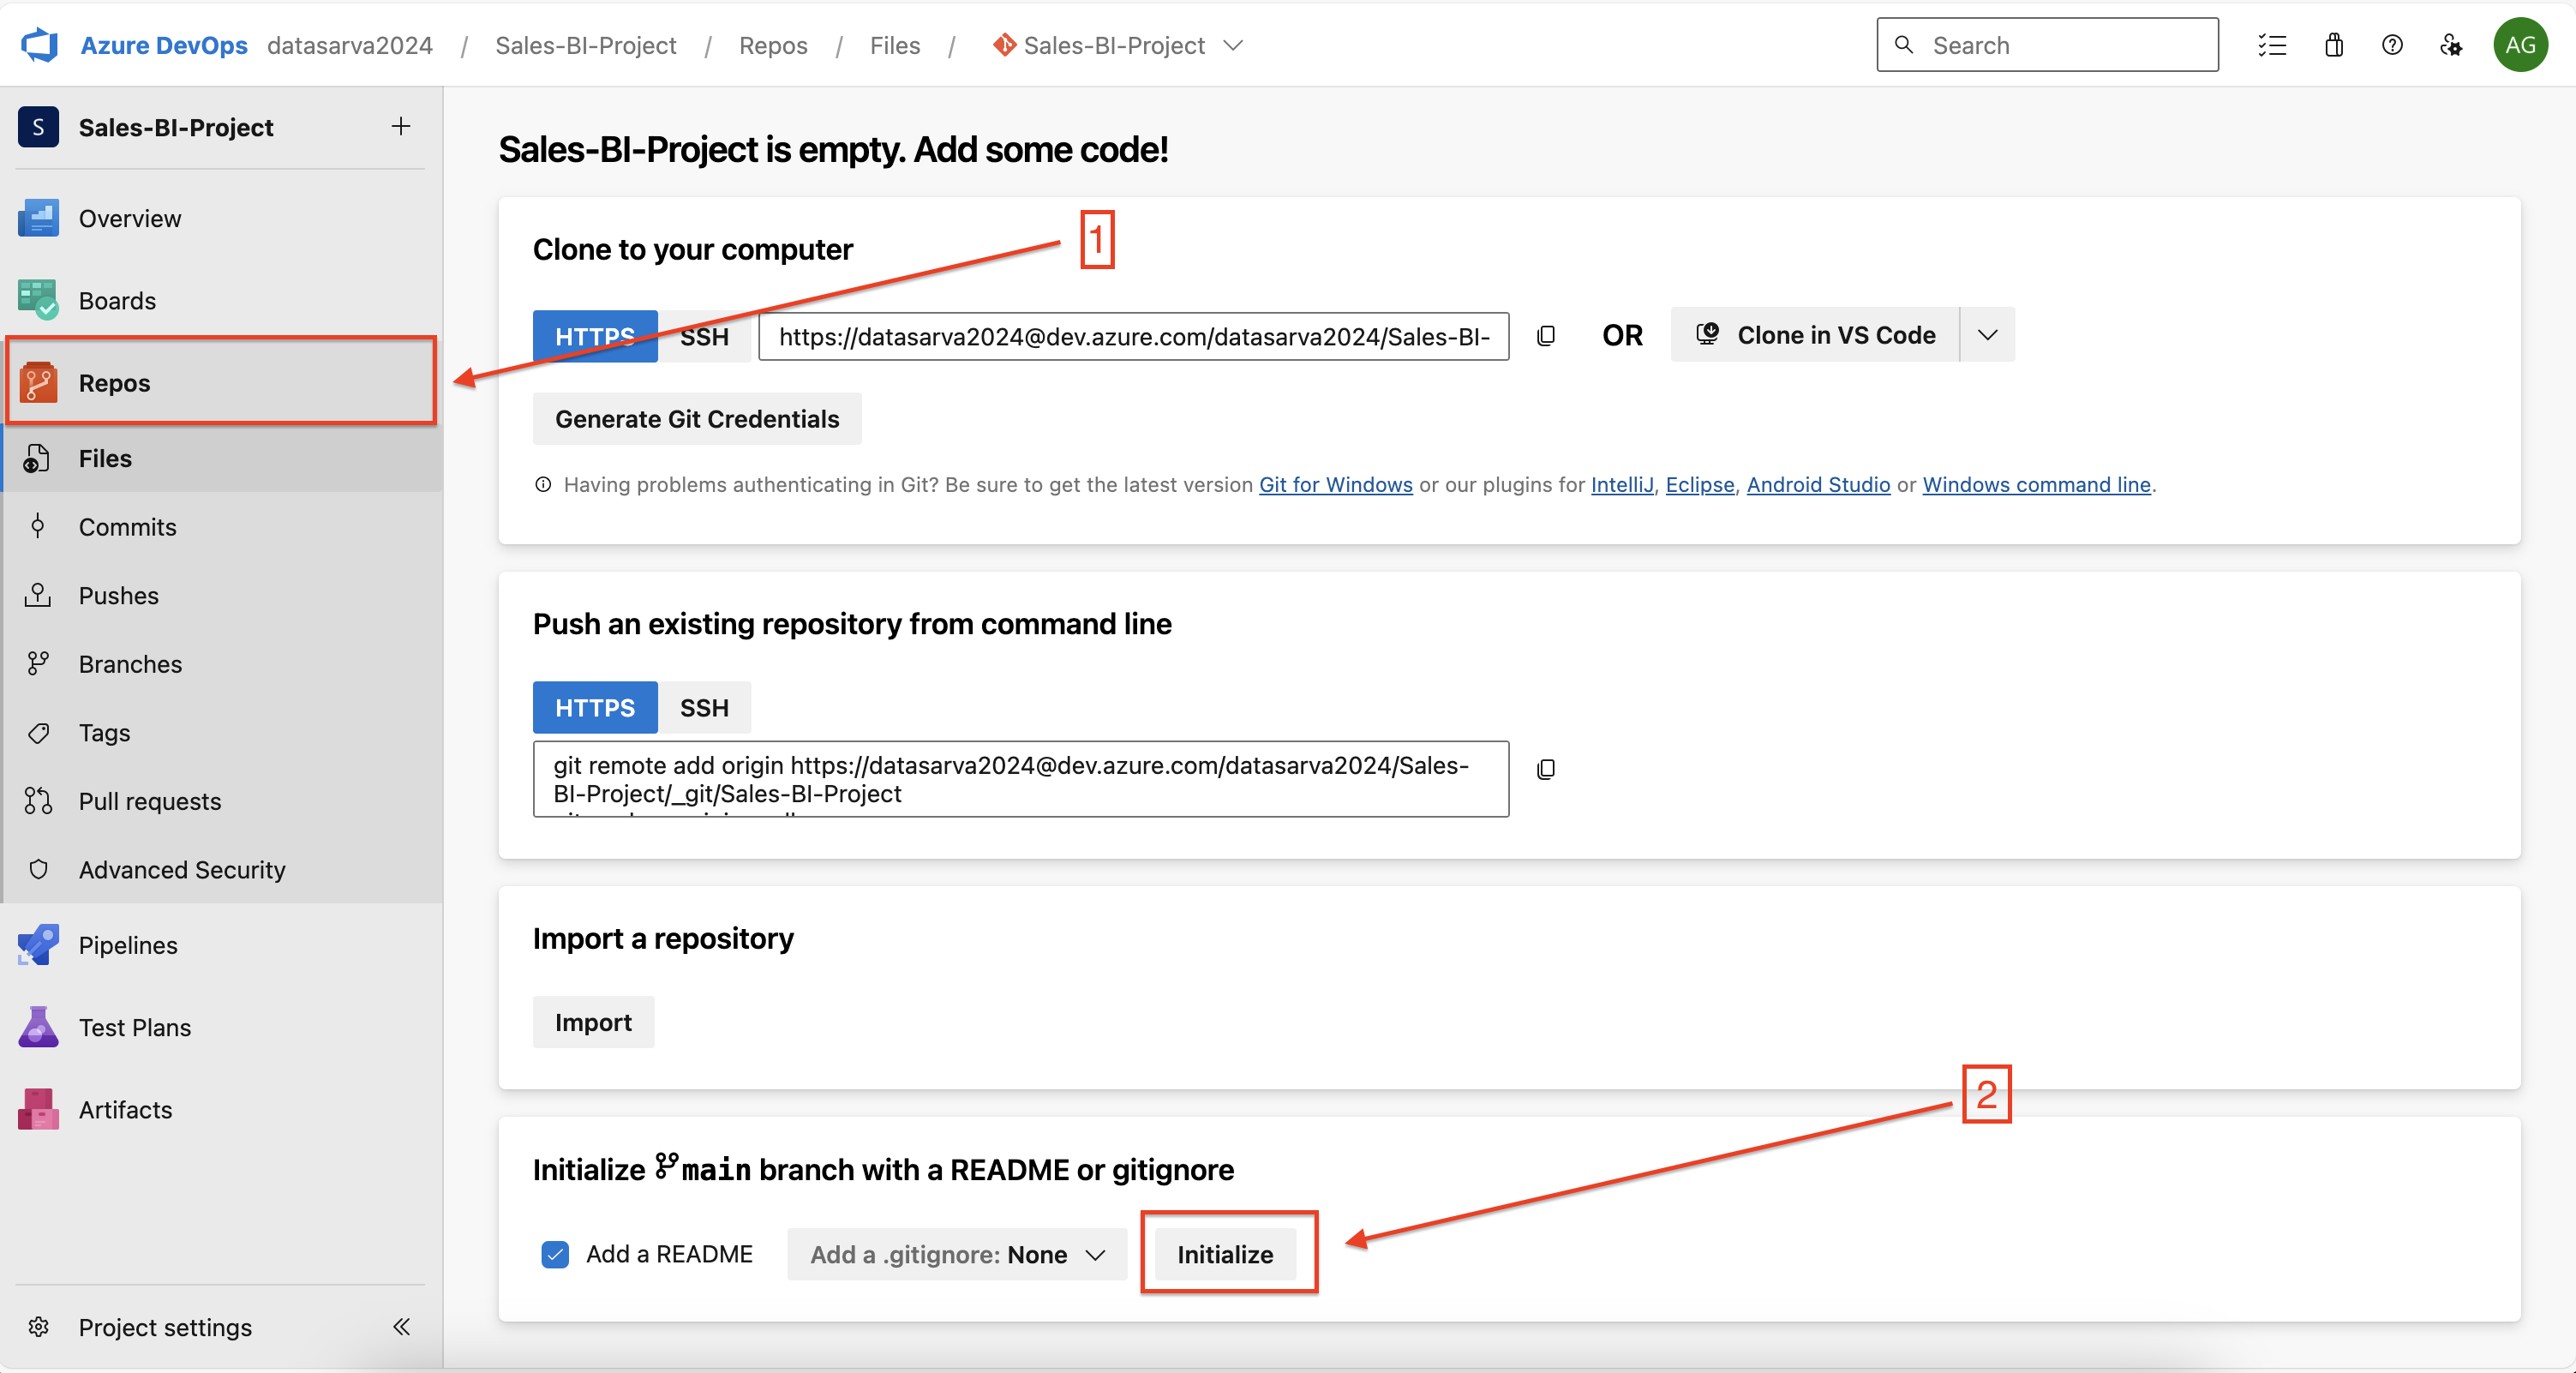
Create Repository
- In the project, navigate to Repos folder
- Initialize with a README file
Now you have a new Azure DevOps project and repository set up with default main branch.
2. Local Development Setup
Clone Repository to Local Machine
-
Open Visual Studio Code
-
Install Git extension if not already present
-
Process 1:
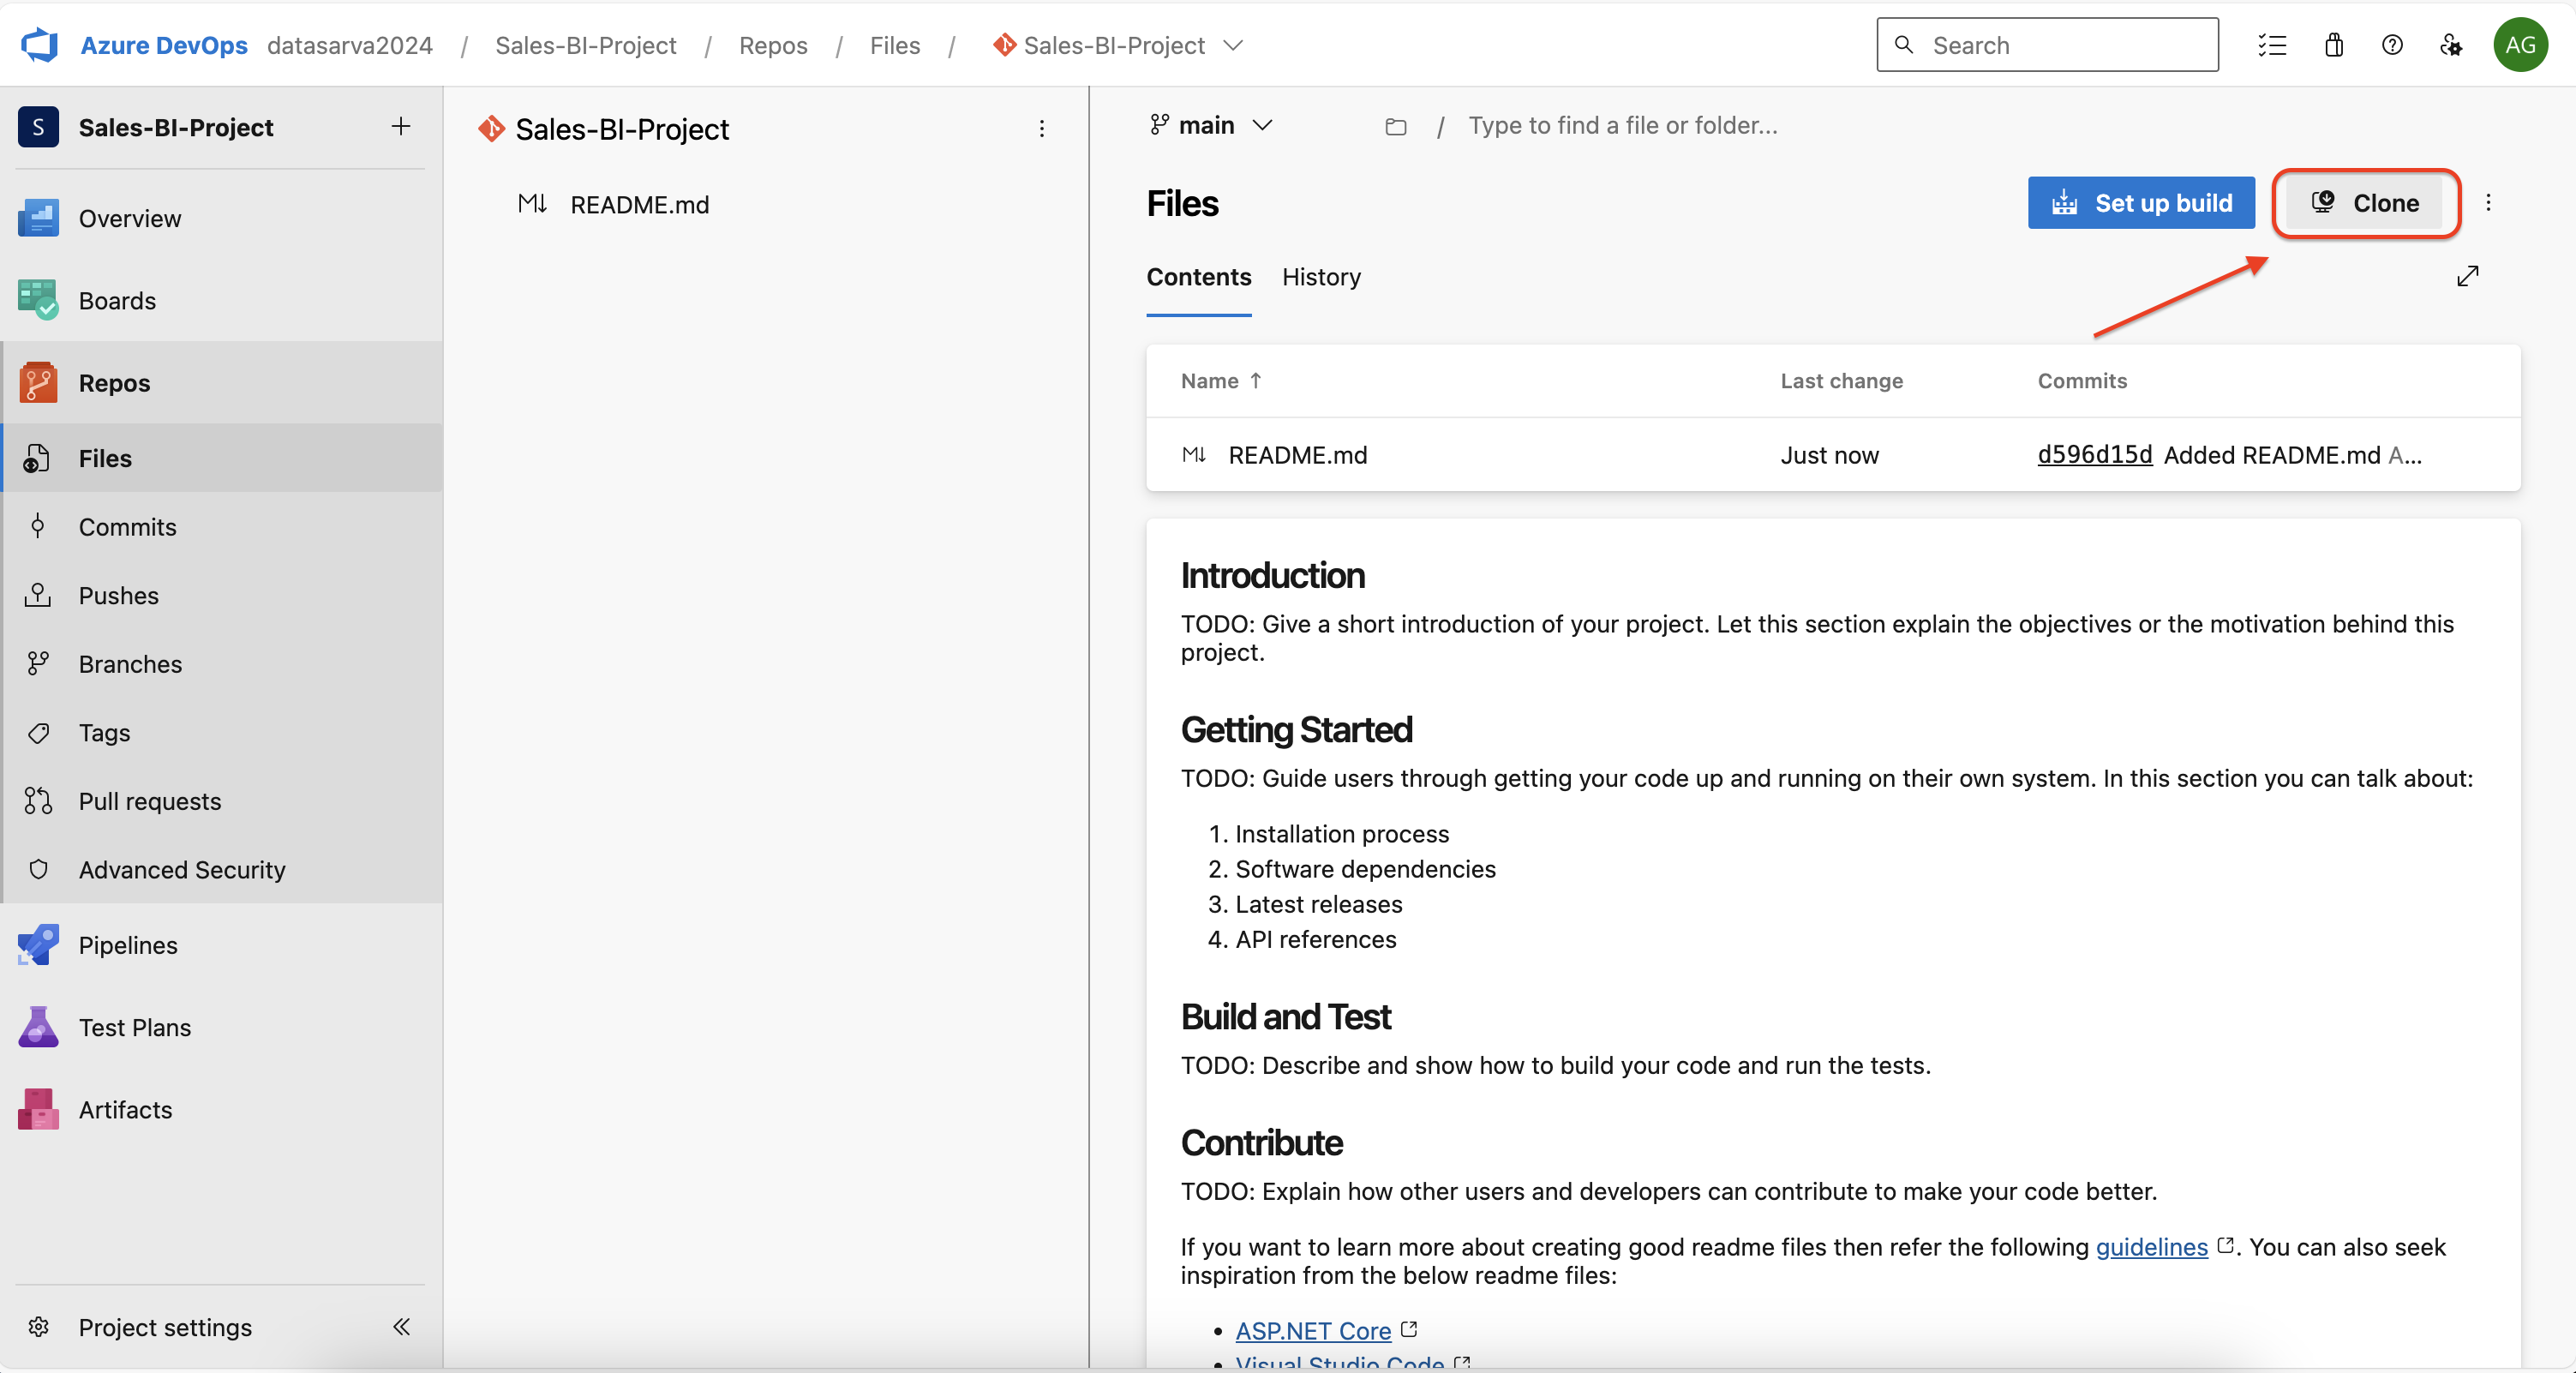
- In Azure DevOps, navigate to the repository
- Click “Clone” button
- Then click on “Clone in VS Code”
- Select local destination folder for the repo
- Click “Clone”
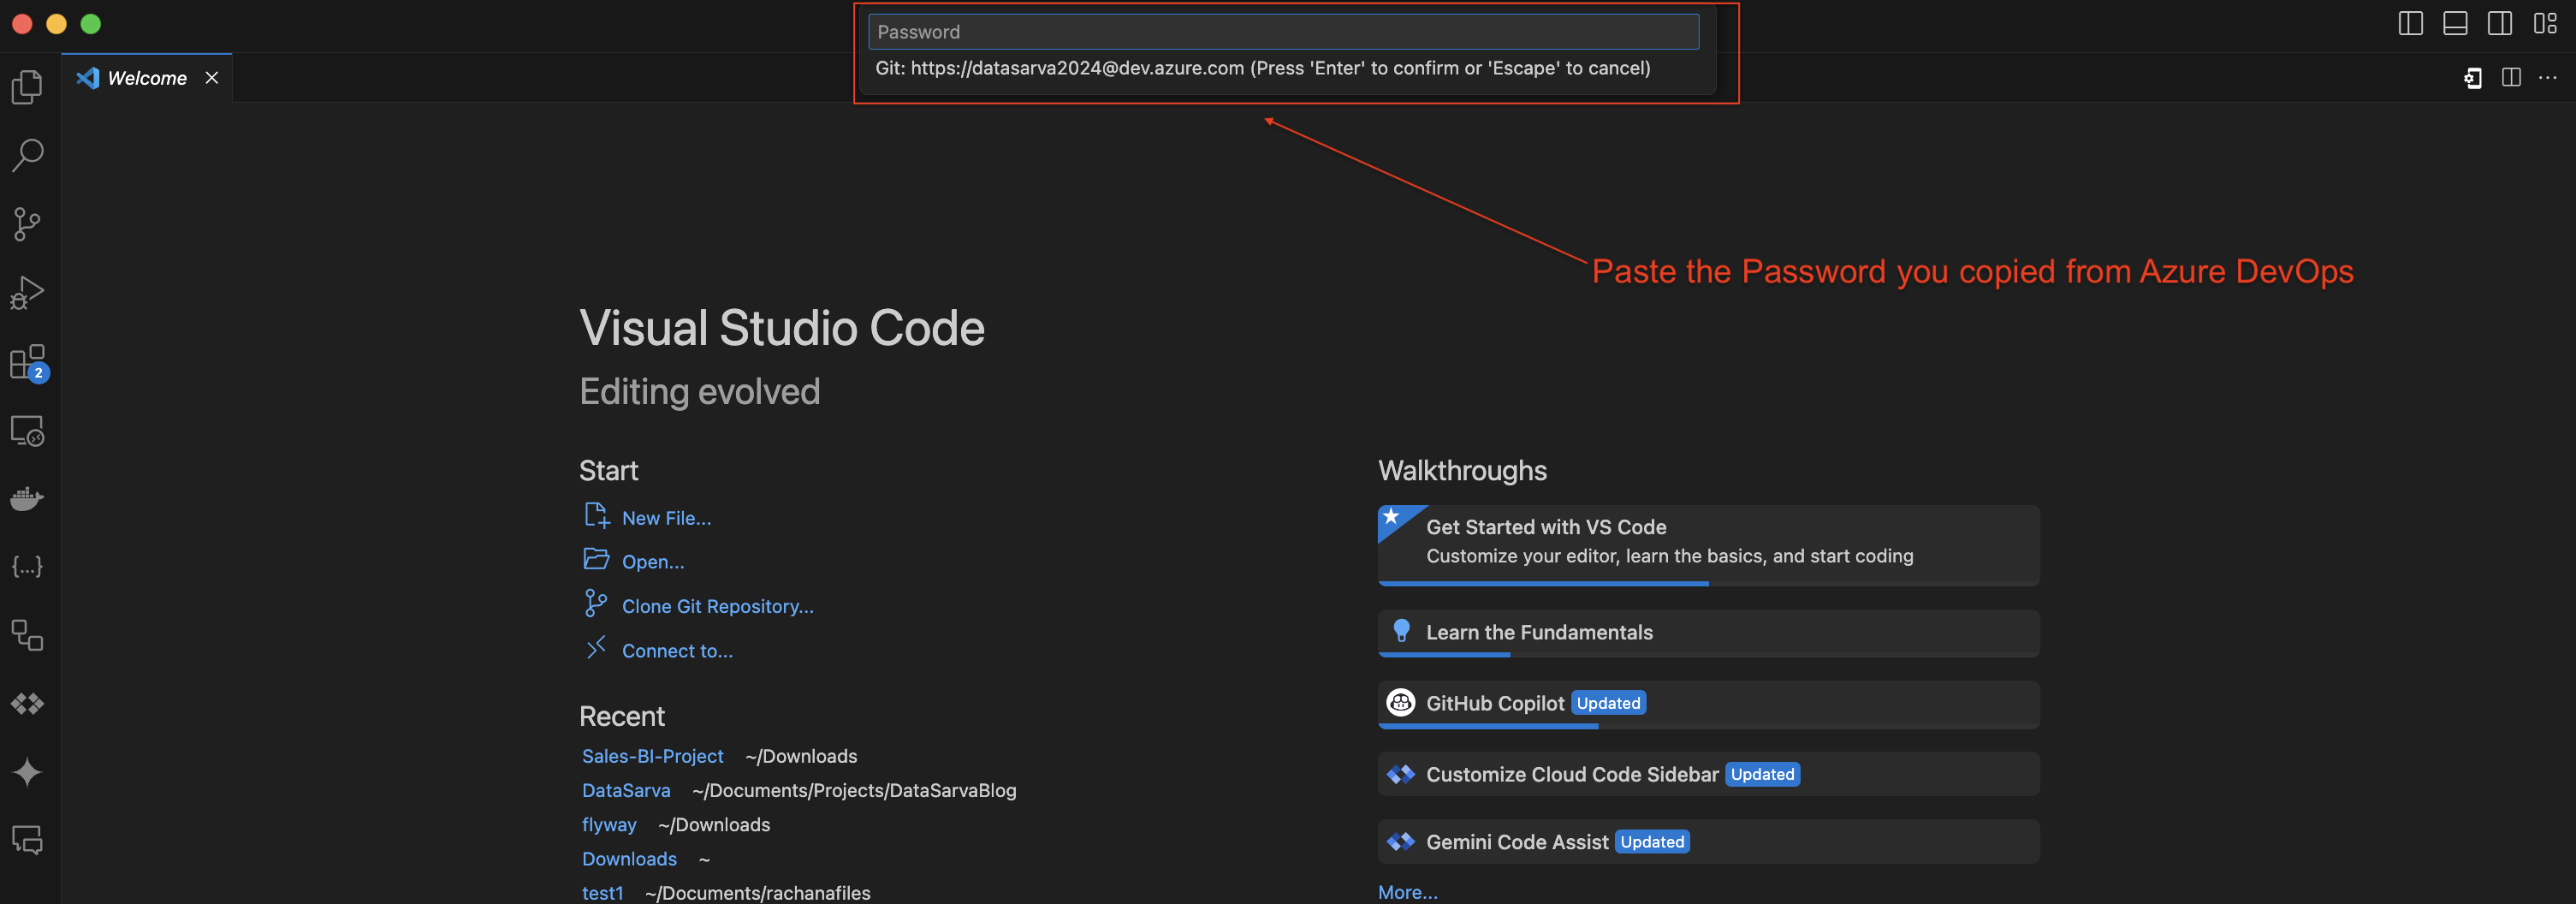
- Now it asks for password, enter the password shown in Azure DevOps
- Open the cloned repository in Visual Studio Code
-
Process 2:
- Open Source Control panel
- Click “Clone Repository”
- Paste the Azure DevOps repository URL
- Select local destination folder for the repo in VS Code
- Open the terminal window and enter git clone
- Now it asks for password, enter the password shown in Azure DevOps
- Open the cloned repository in Visual Studio Code
3. Preparation and Conversion
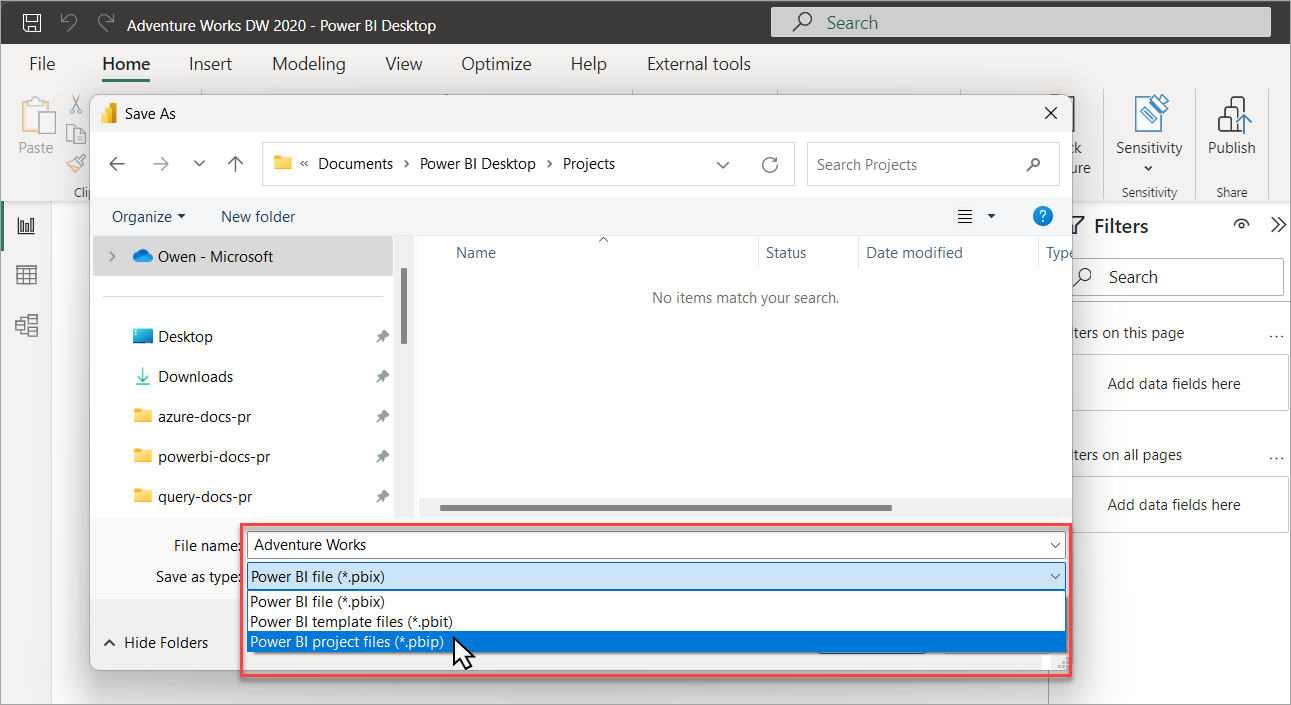
Convert PBIX to PBIP Format
- Open the existing PBIX file in Power BI Desktop
- Navigate to File > Save As > Power BI Project (.pbip)
- Choose local destination folder where the new azure devops repo is cloned above
Add PBIP Project to Repository
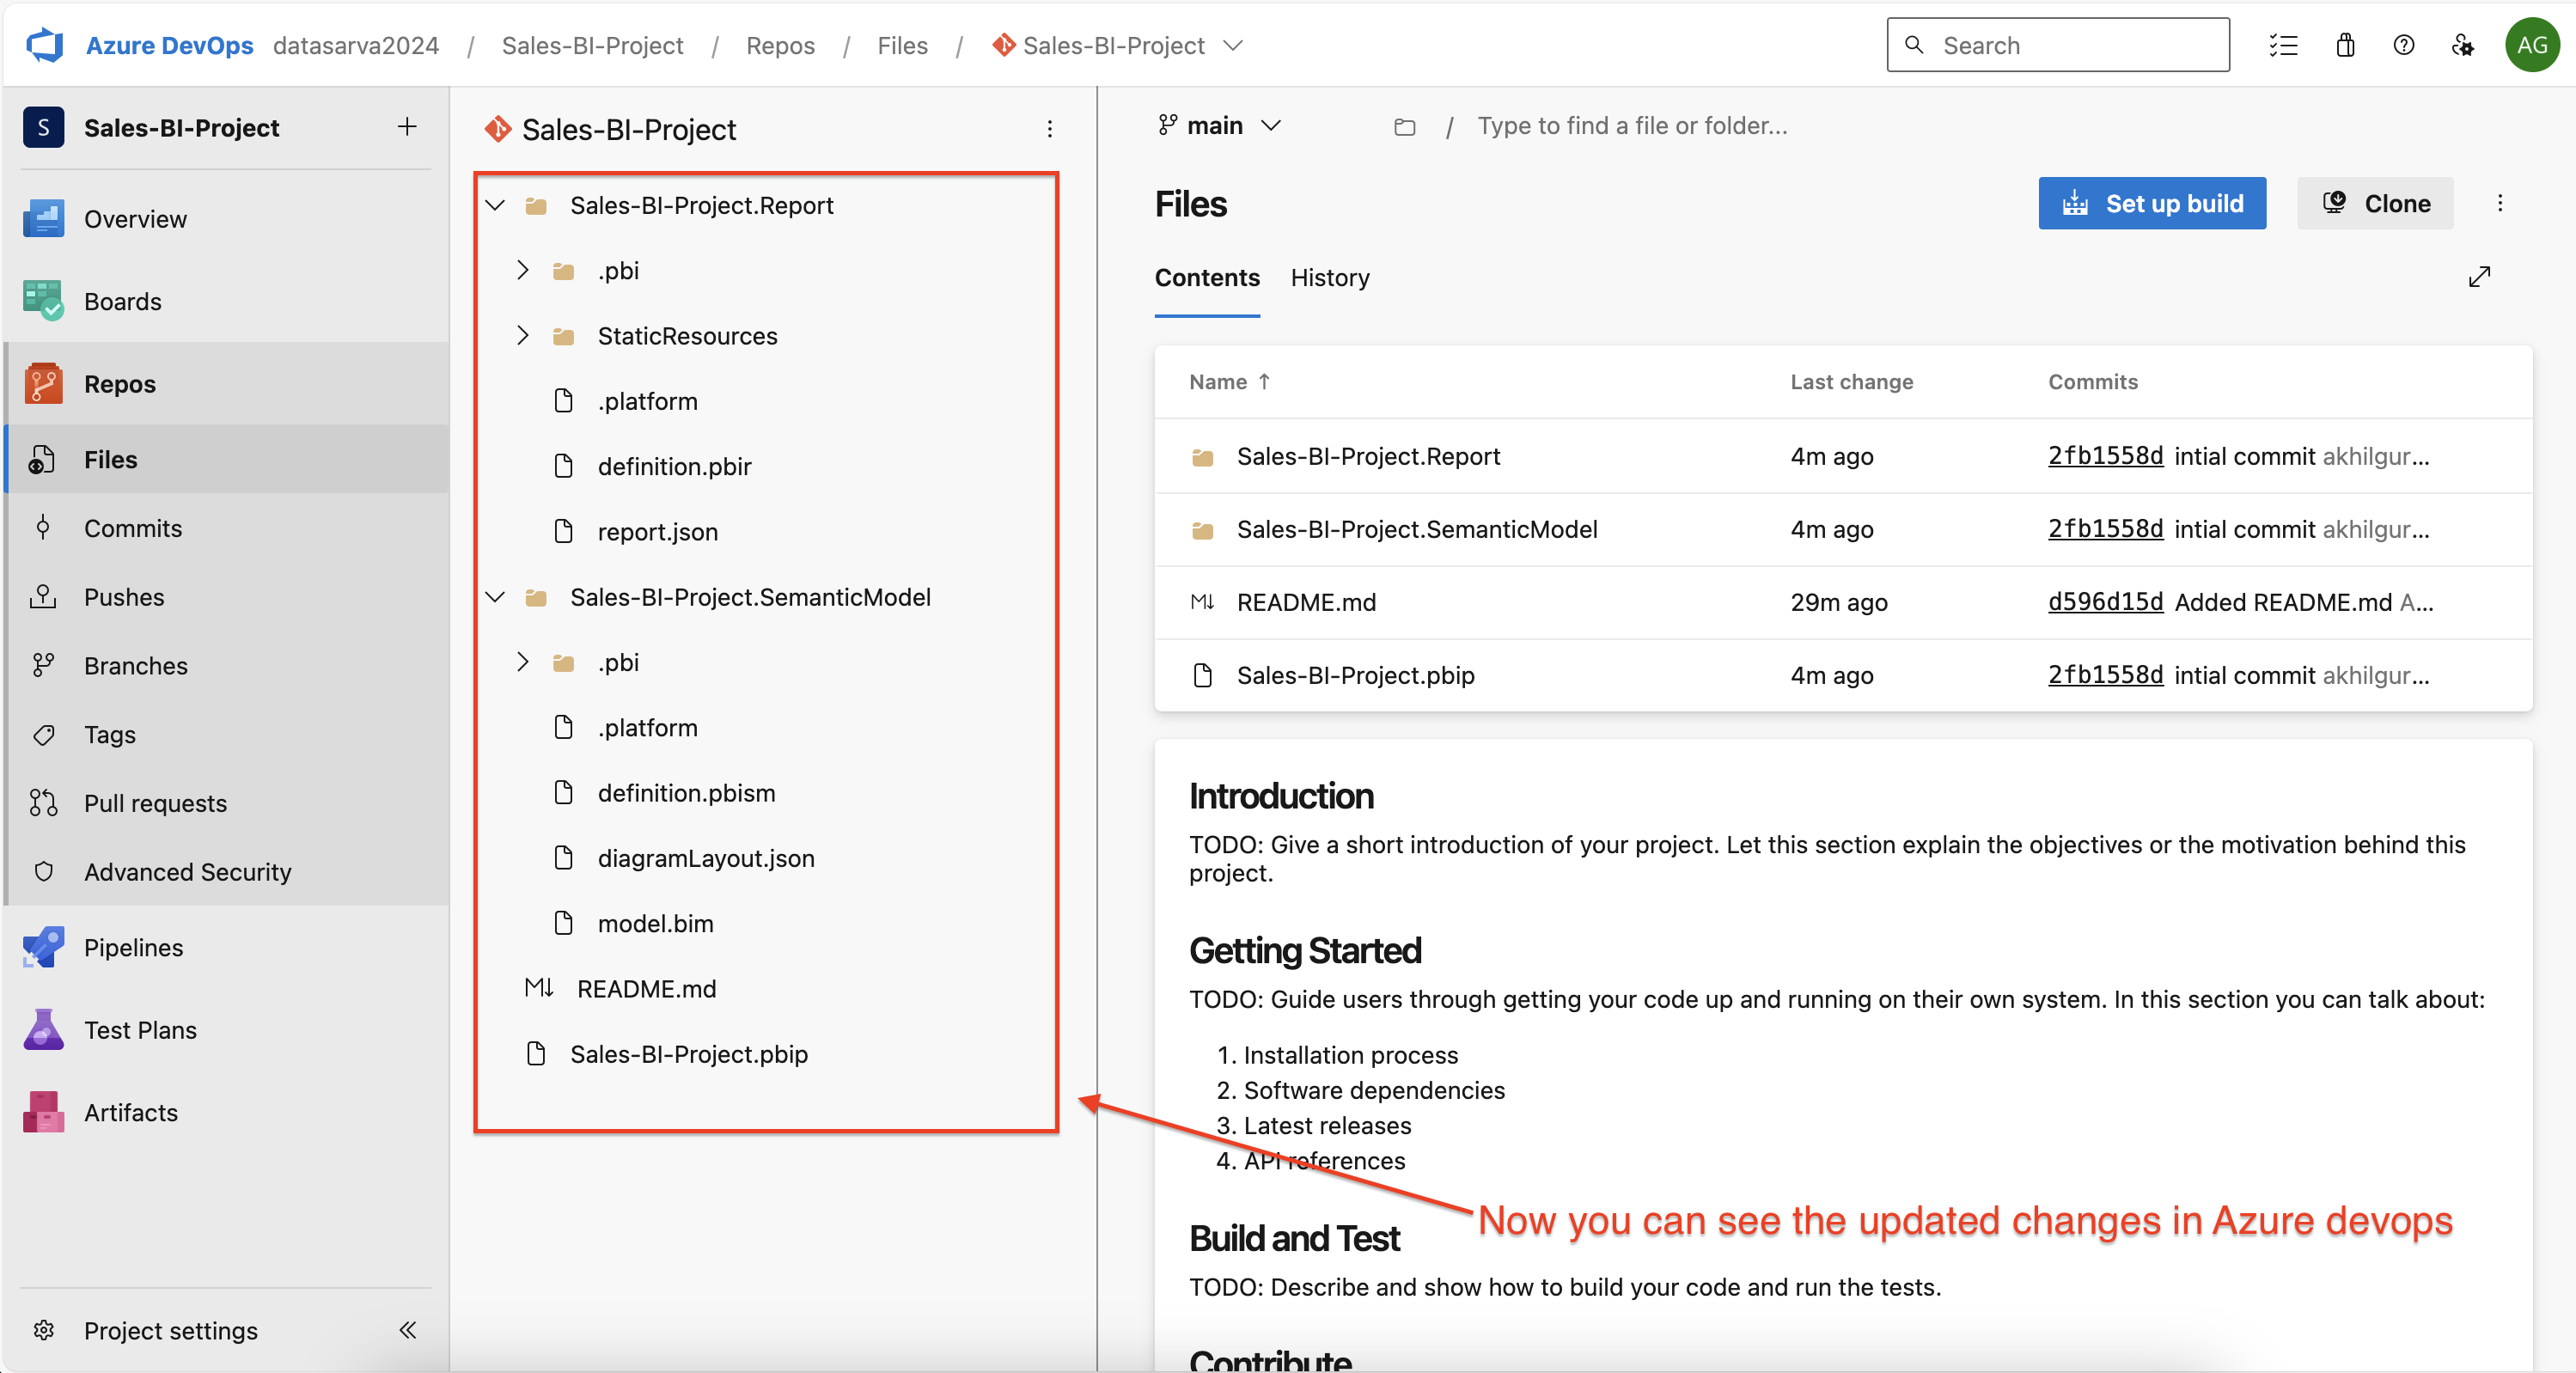
- Verify that the project breaks down into separate JSON files and folders [Report folder, Semantic model folder]
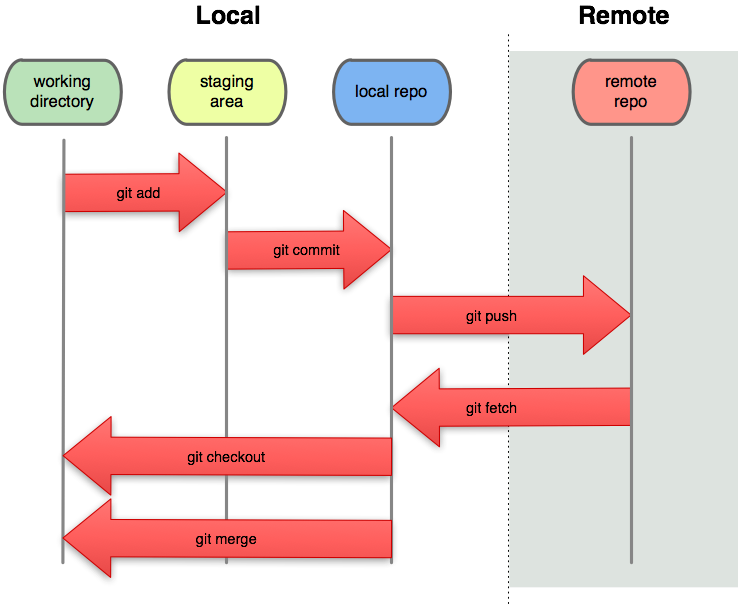
- Open Source Control in VS Code as shown in image below.
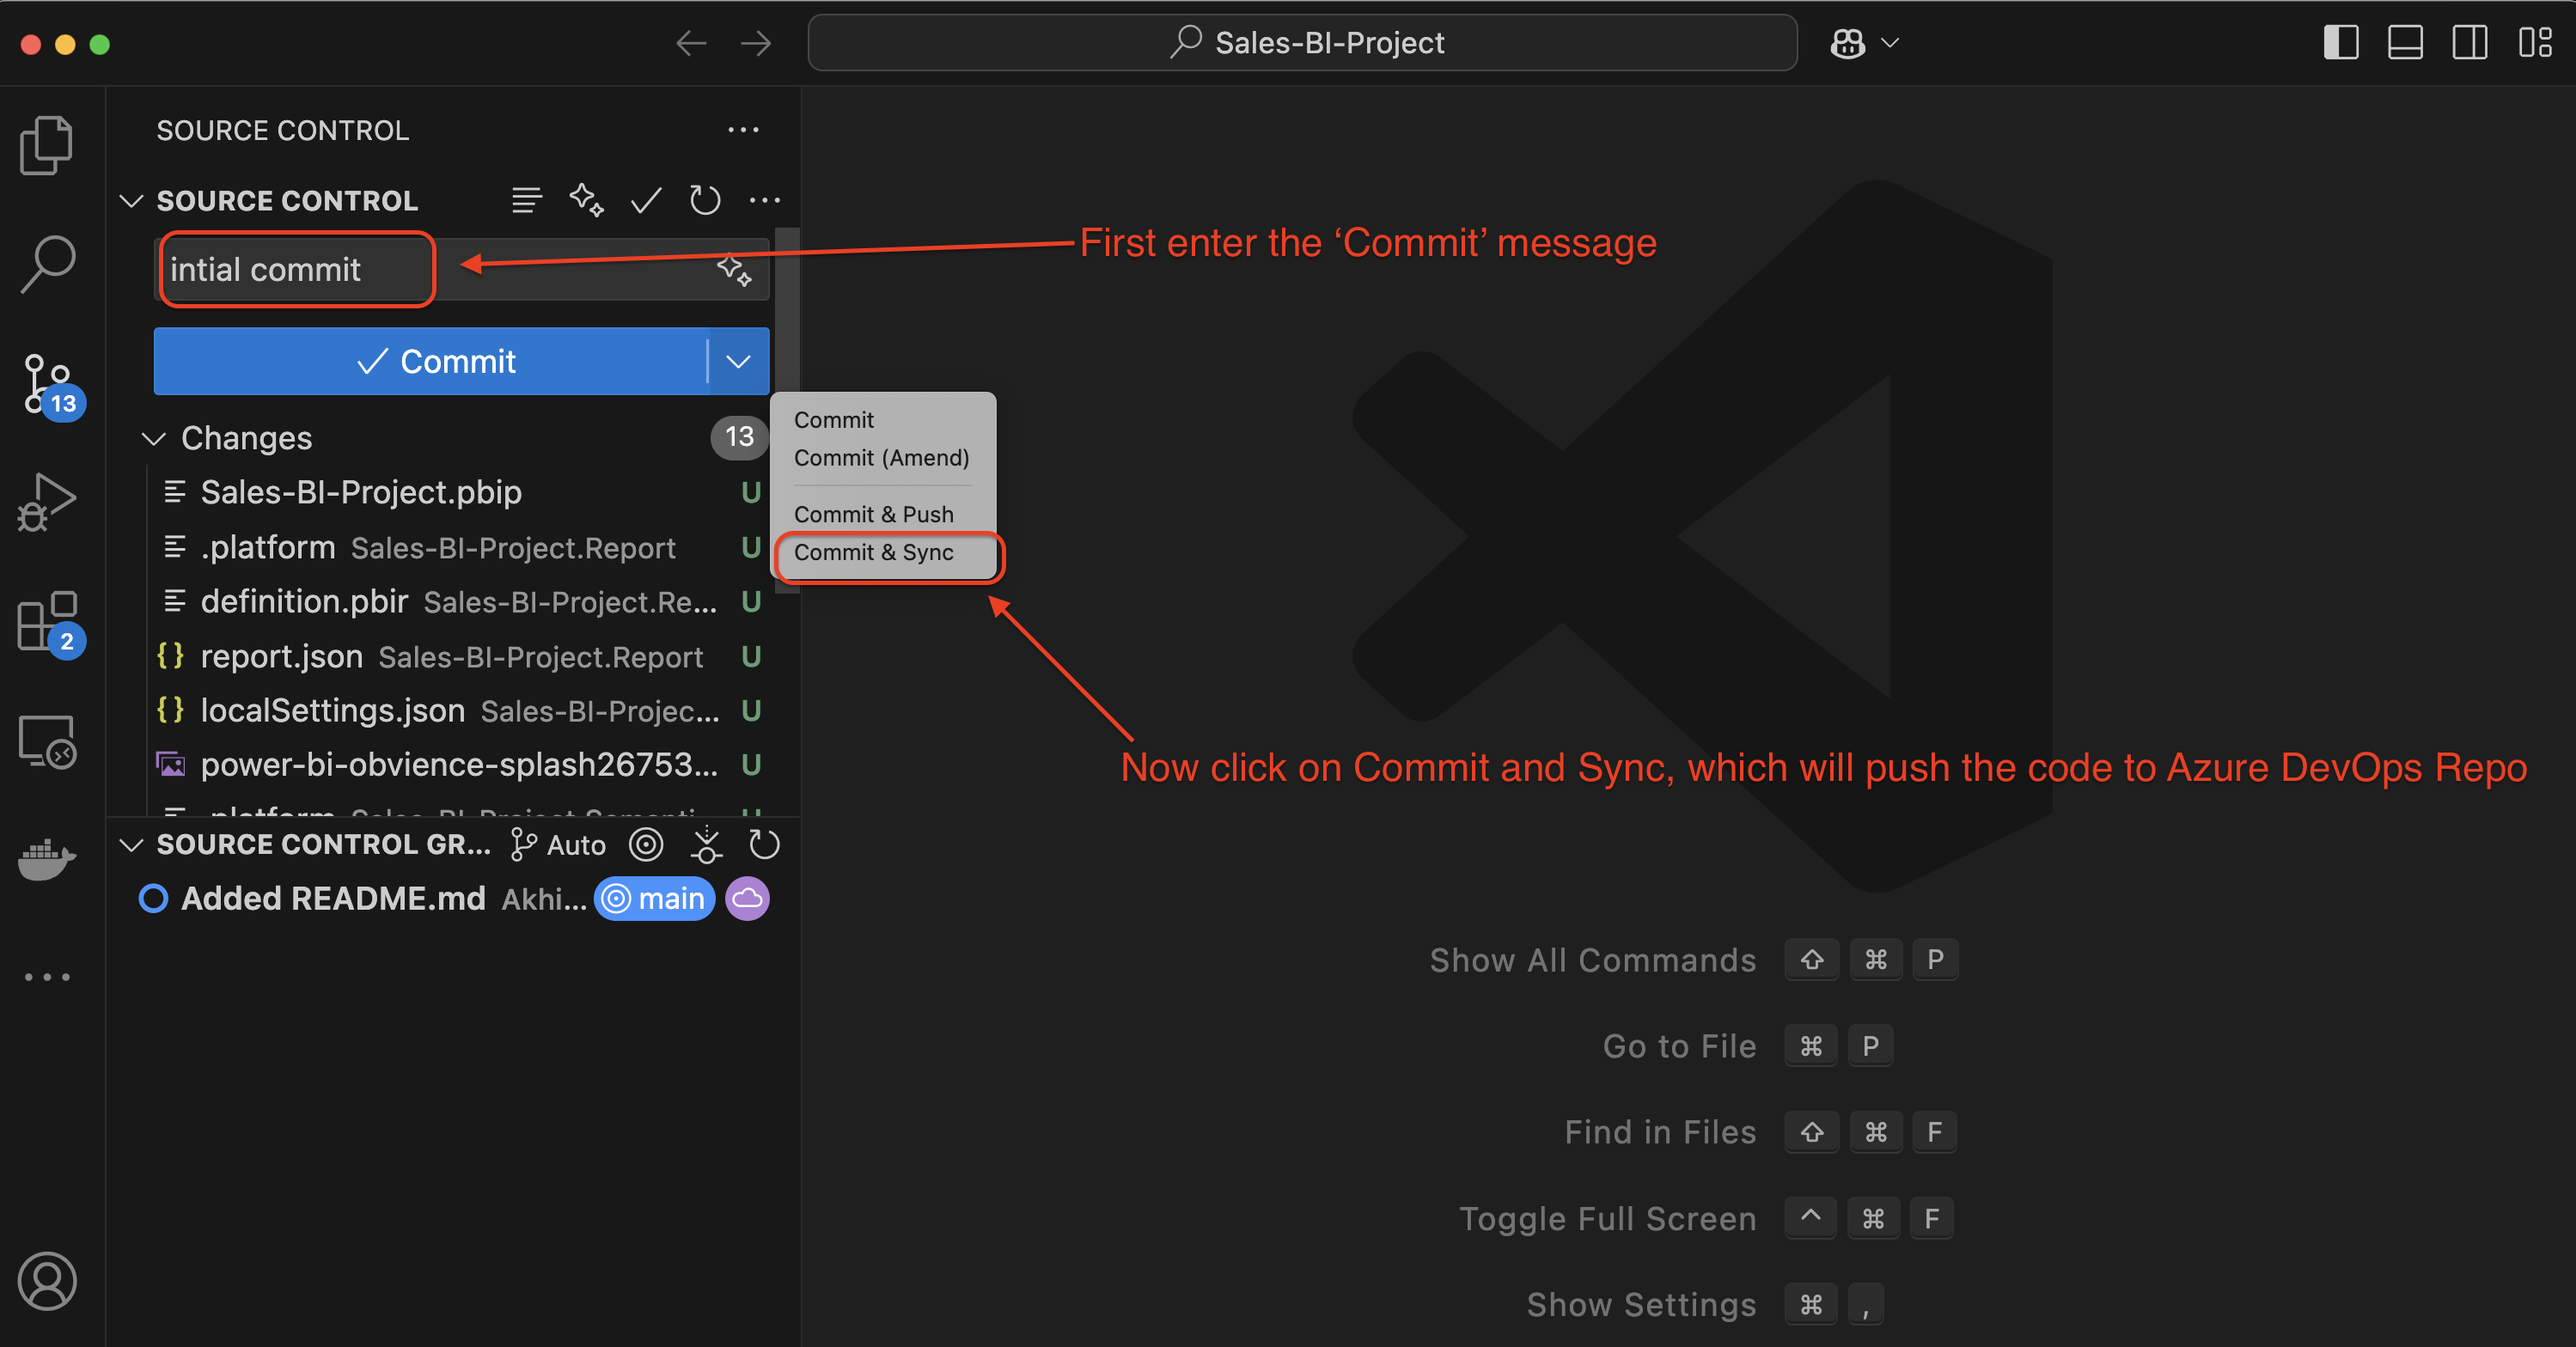
- Stage the changes
- Commit with a meaningful message (e.g., “Initial commit: Sales report PBIP project”)
- Push changes to the remote repository
- Now open the Azure DevOps repo in the browser and verify the changes
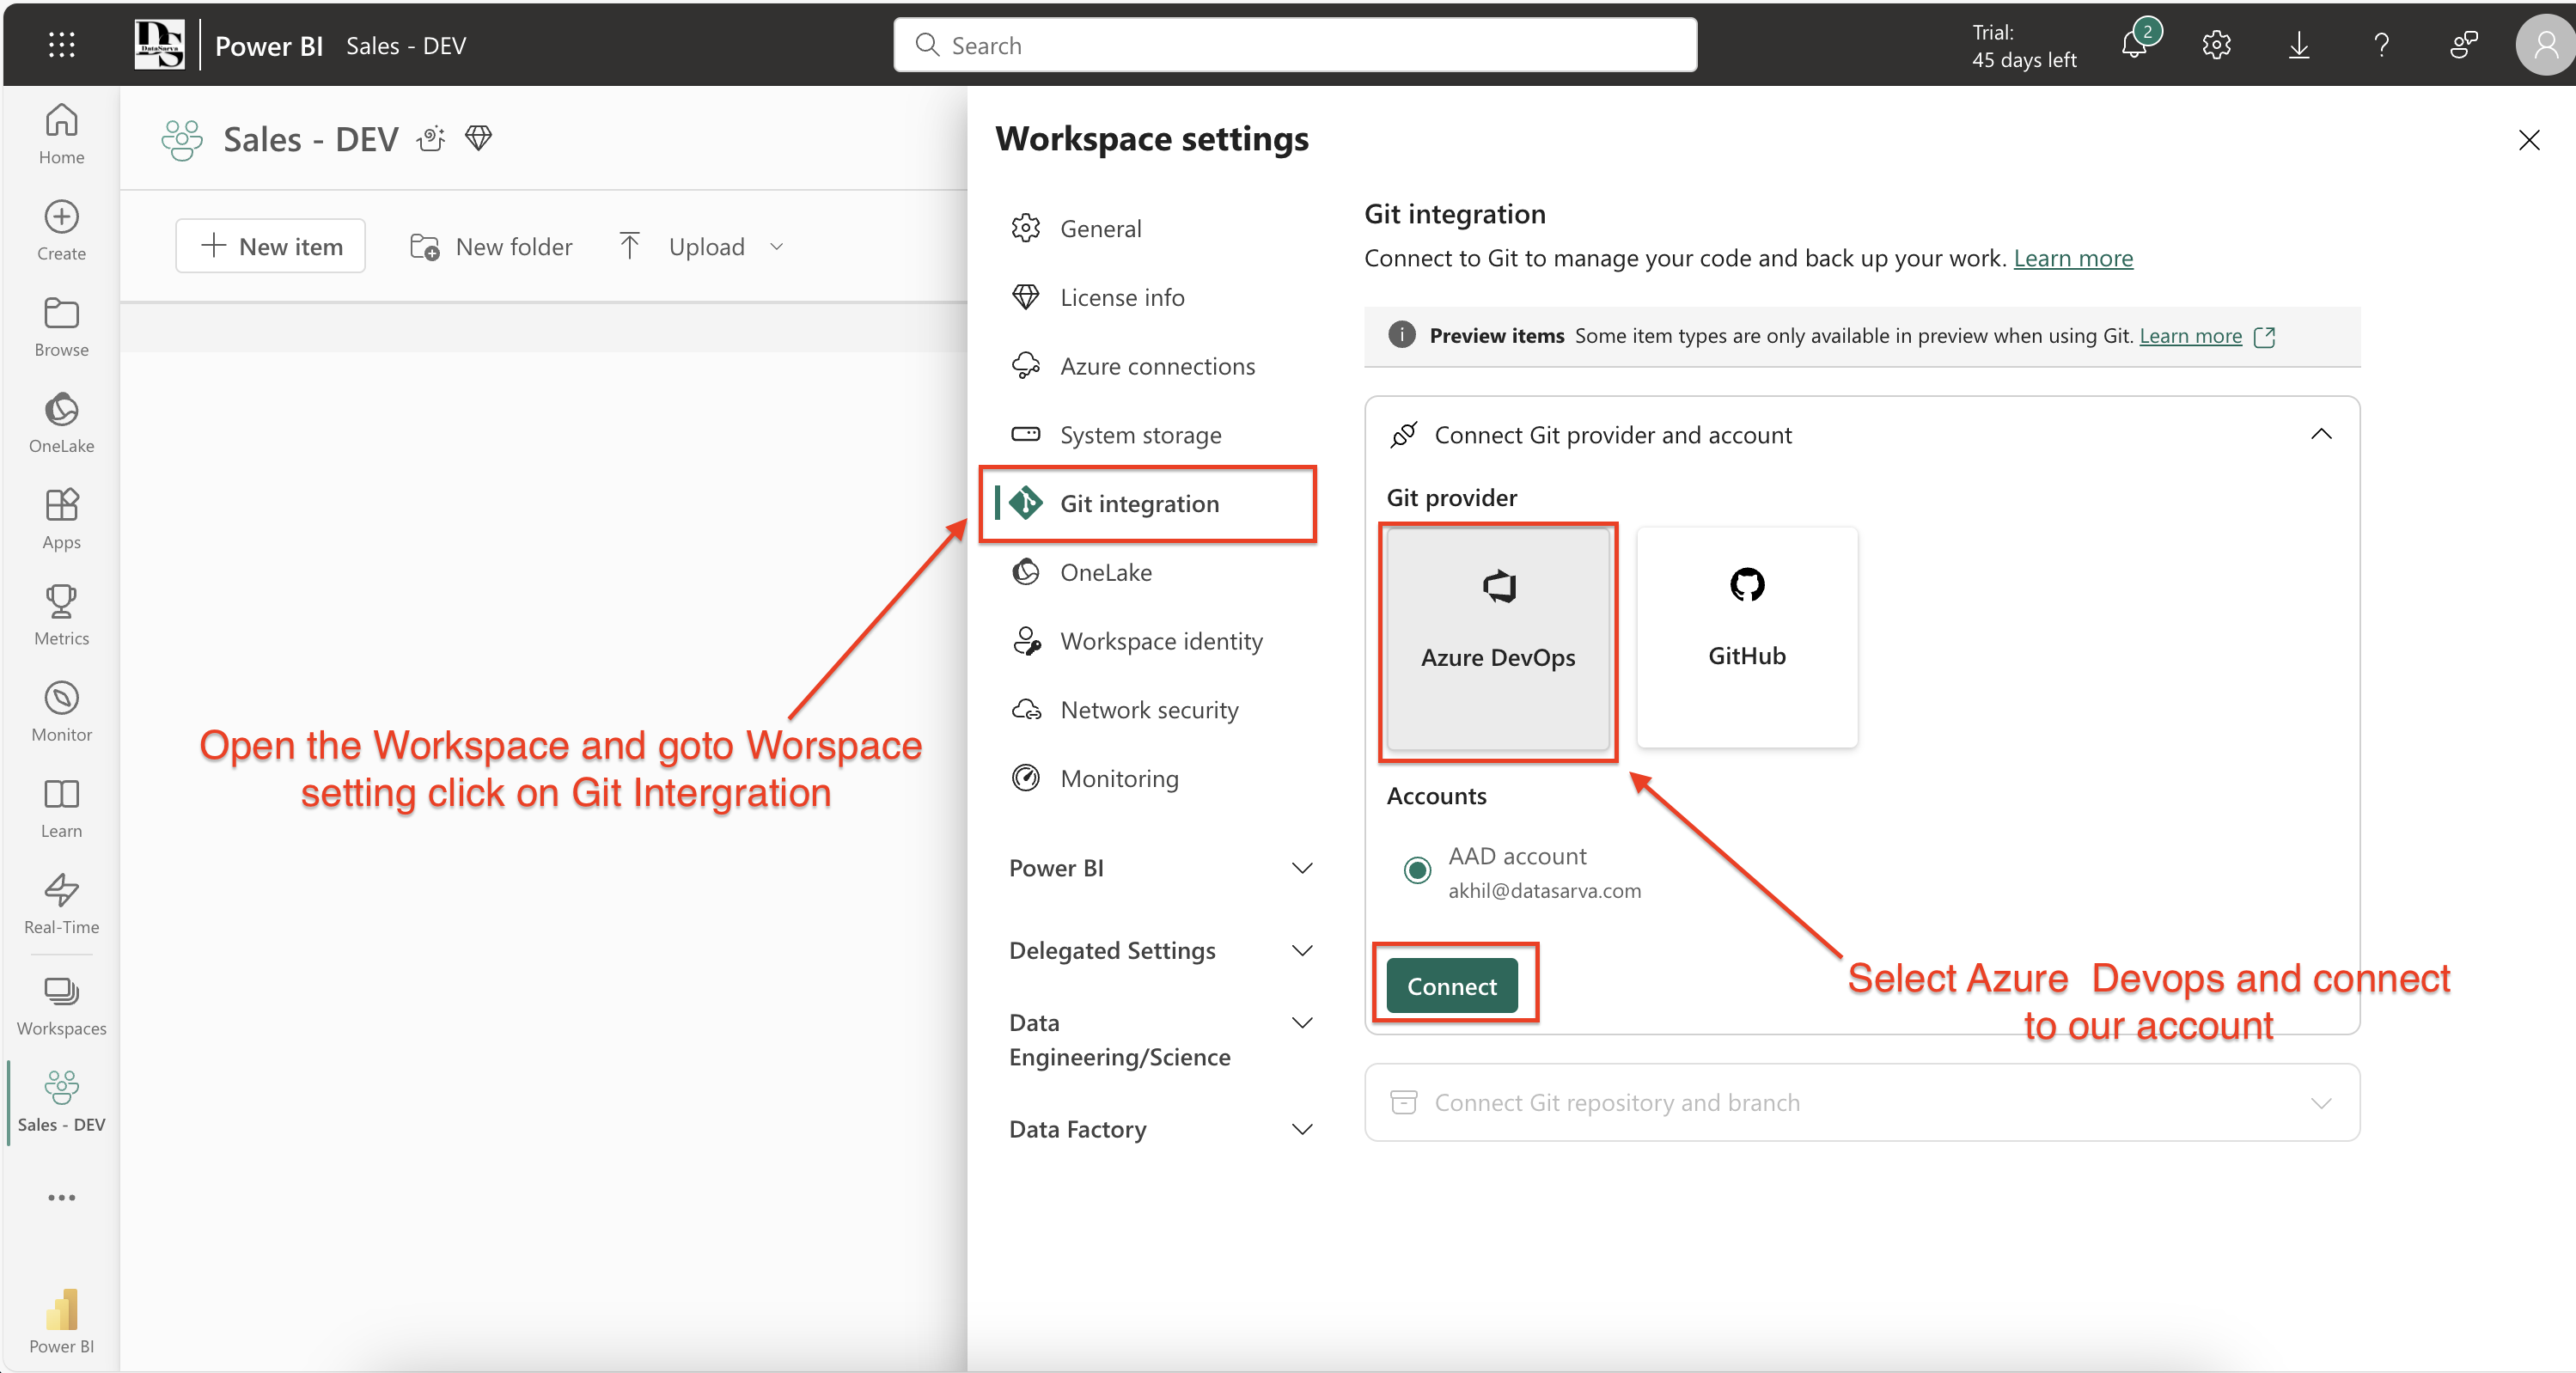
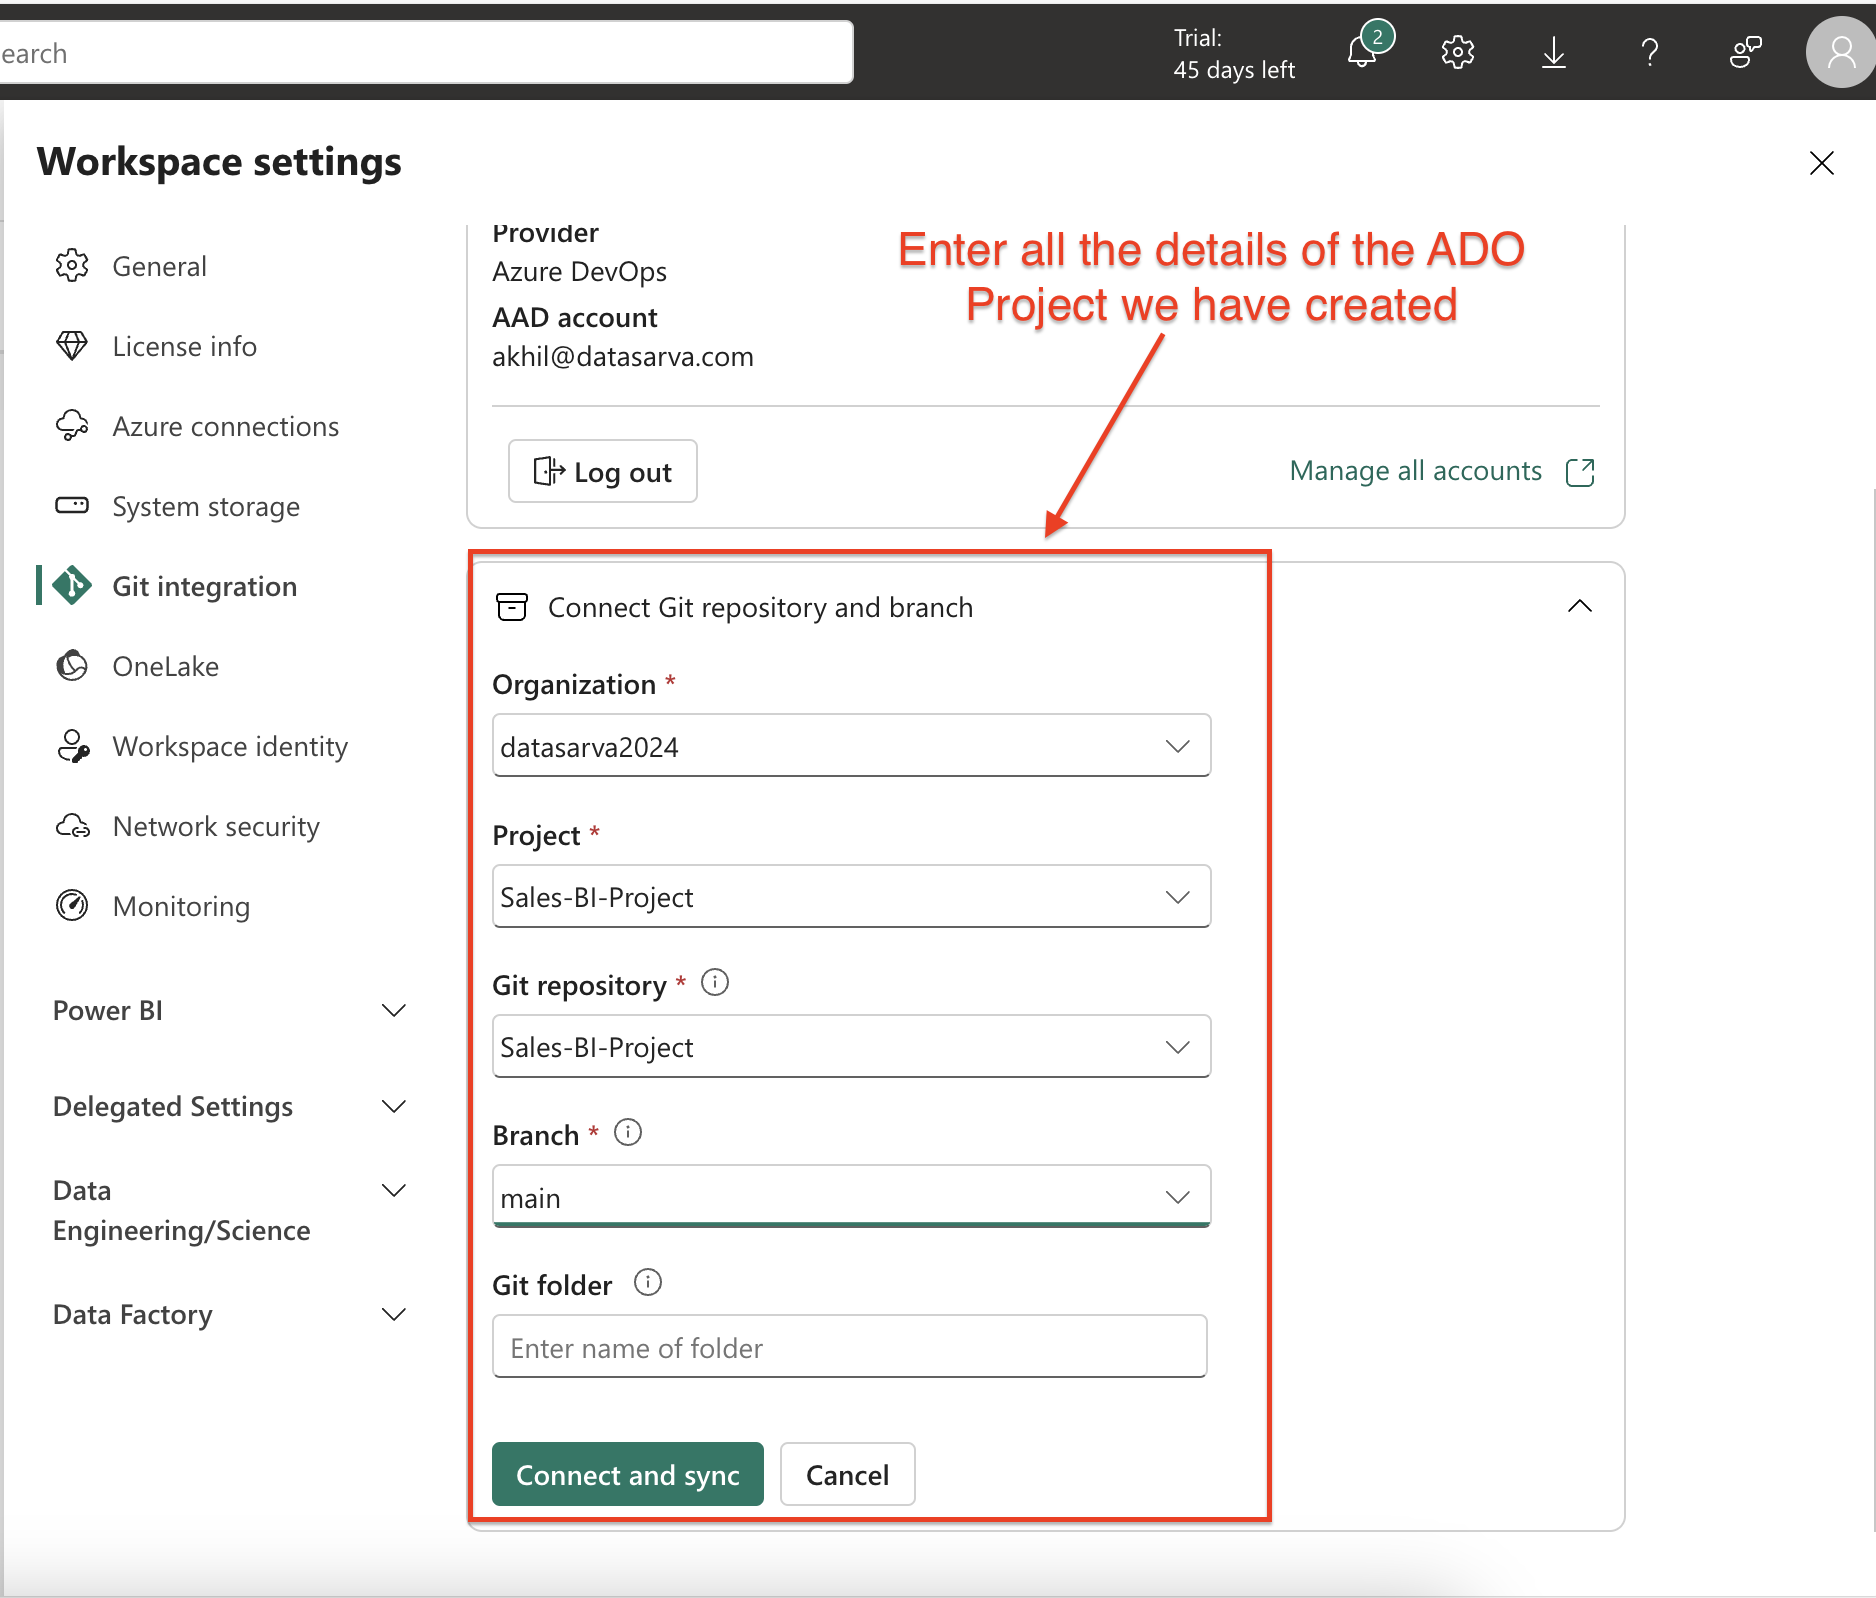
4. Microsoft Fabric Workspace Configuration
Enable Git Source Control
- Open Microsoft Fabric workspace (Sales - Dev)
- Navigate to Workspace Settings
- Select “Git Source Control”
- Choose Azure DevOps as the source control provider
- Select the previously created repository
- Authenticate and connect
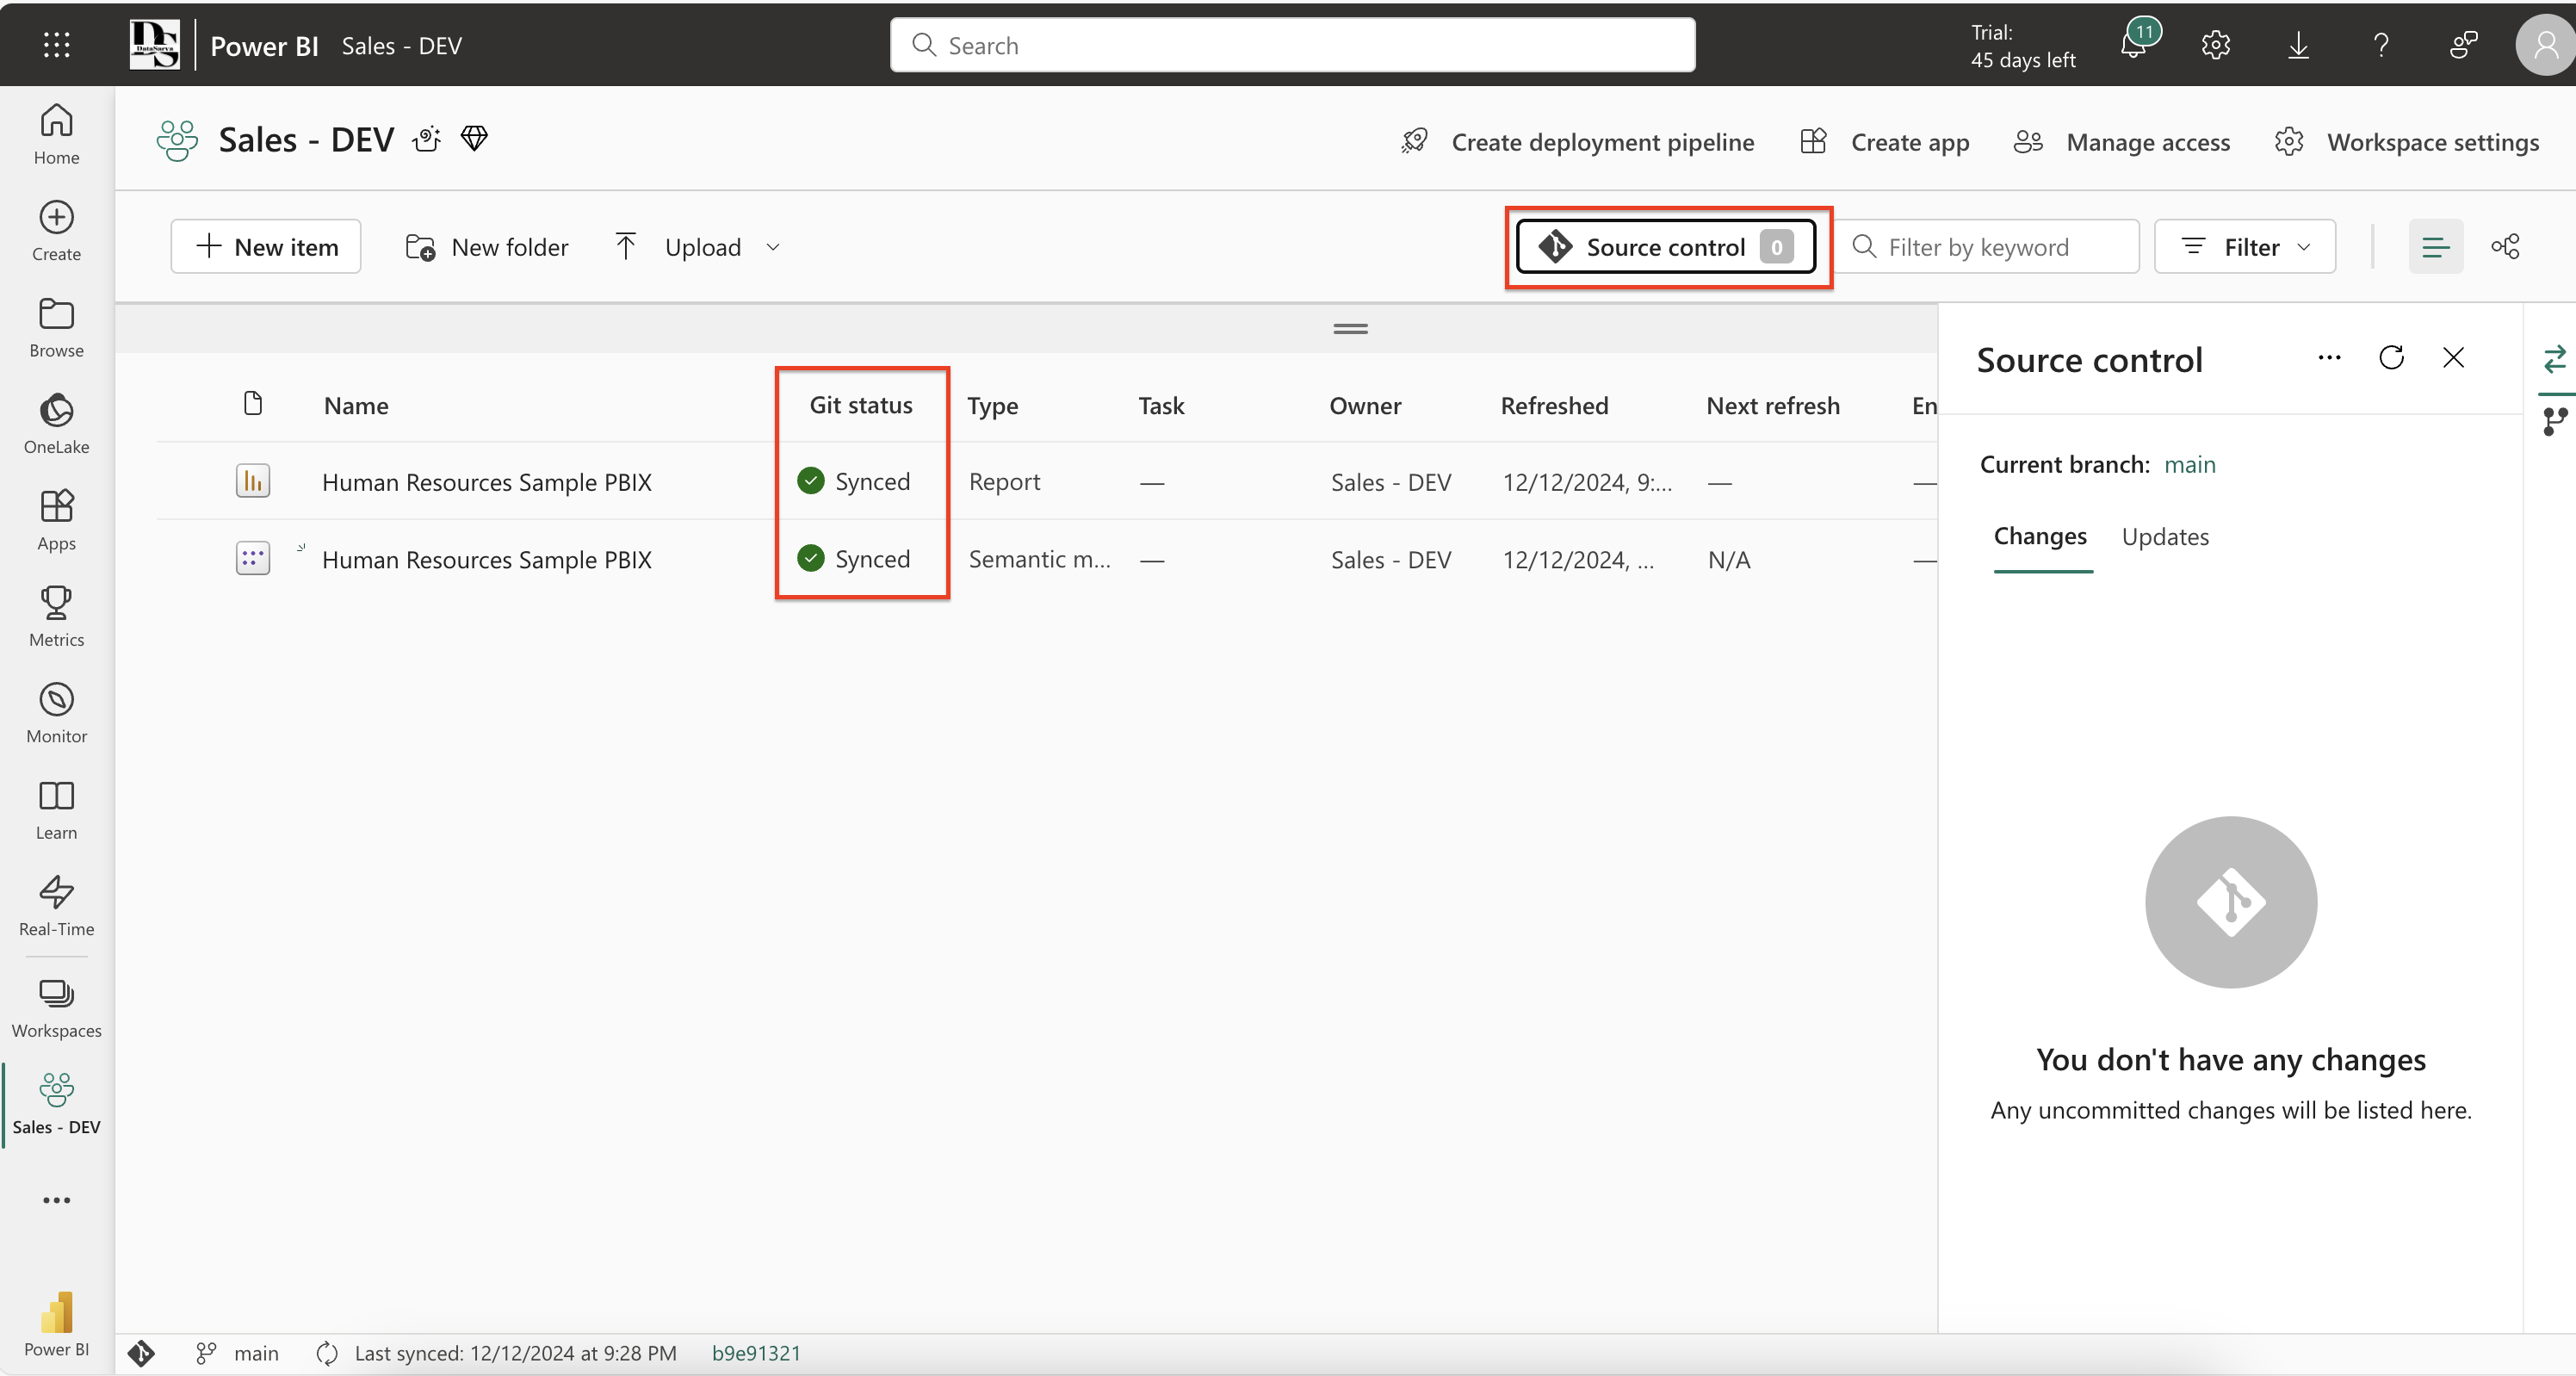
Synchronize Changes
- Now you can see the changes in Azure DevOps Repo appears in Workspace[Can acess it using Source Control button]
- There are two sections in ‘Source Control’ tab
- Changes: It lists all the changes in the workspace that are missing from the Azure DevOps repo
- Updates: It lists all the changes in the Azure DevOps repo that are missing from the workspace
- Sync changes from Azure DevOps repo to Fabric workspace by clicking ‘Update’ button
5. Deployment Pipeline Setup
Create Deployment Pipeline
- Follow the similar steps as in the previous section for the Deployment Pipeline
- Open Deployment Pipelines in Microsoft Fabric
- Click “New Pipeline”
- Name the pipeline (e.g., “Sales-Reports-Pipeline”)
Define stages (default):
- Development
- Testing
- Production
Deploy Across Stages
- Start with Development stage
- Validate and test changes
- Deploy to Testing stage
- Conduct thorough testing
- Approve and deploy to Production
Getting Started with Power BI Developer Mode
- Enable Preview features [PBIP format] in Power BI Desktop
- Create or convert existing reports to PBIP format
- Set up git source control integration in Microsoft Fabric/Power BI
- Configure deployment pipelines
- Implement automated testing
- Set up monitoring and logging
Conclusion
Implementing CI/CD in Power BI and Microsoft Fabric brings numerous benefits:
- Improved collaboration
- Reduced errors
- Faster deployments
- Better version control
- Enhanced quality assurance
Whether you’re part of a small team or a large enterprise, adopting CI/CD practices can significantly improve your Power BI development workflow and ensure more reliable deployments.
Additional Resources
- Microsoft Fabric free trial: https://aka.ms/try-fabric
- Fabric Community: https://aka.ms/fabriccommunity
- Power BI Desktop projects documentation: https://learn.microsoft.com/en-us/power-bi/developer/projects/projects-overview
- Deployment Pipeline Automation: https://learn.microsoft.com/en-us/fabric/cicd/deployment-pipelines/pipeline-automation
- Fabric Documentation: https://aka.ms/fabric-docs
[Note: Added relevant screenshots and diagrams throughout the blog post to illustrate key concepts and steps]